Introduction to System Restore
System Restore is a recovery feature in Windows 8 that allows you to
restore your computer to a previous state. This is useful if your
computer starts to function poorly or crashes and you cannot determine
what the cause is. To resolve these types of issues, you can use System
Restore to restore your computer back to a previous state that was saved
before your problems started occurring. This will allow your computer
to start operating correctly again.
When System Restore is enabled in Windows, it will automatically create
snapshots called restore points that contain a backup of your Windows
Registry, system configuration, program files, and system drivers and
executables. These restore points are created automatically every day
and before a significant event such as installing a program or adding
hardware drivers to your computer. It is also possible to manually
create a restore point at any time you wish. As previously said, when a
restore point is created it only backups up your system files, program
files, and the Windows configuration. It does not backup your personal
data such as email, pictures, documents, videos, saved games, and music.
Therefore, you should not use System Restore as a method of backing up
and restore these types of files.
If used properly, System Restore can be an incredibly useful tool for
the well being of your computer. Since System Restore creates new
restore points every day and every time a program is installed, you
always have a way to fall back to a working Windows configuration in the
event that something causes a problem on your computer. For example, if
you install a new program or hardware and find your computer is no
longer working properly, you can simply restore back to a restore point
that was created before you made the changes. This allows you to save
considerable time and money by being able to quickly and easily resolve
these issues by yourself.
Another powerful feature of System Restore is that you can use it from
the Windows Recovery Environment in the event that you are unable to
start Windows. This allows you to easily resolve an issue where Windows
does not start by restoring to a time and date when you know Windows was
working properly. More information on using System Restore from the
Windows Recovery Environment can be found here:
System Restore points are created when the following event occur in Windows:
- Automatically every day.
- When a new application is installed.
- When a new driver is installed.
- When you uninstall certain programs.
- When new Windows updates are installed.
- When you manually create one.
- When programs are programmed to create a new restore point. This may be done when a program cleans your computer of infections or makes changes to your Windows Registry.
- Right before you restore to a previous restore point, System Restore will create a new restore point.
System Restore does have some requirements to operate properly. These are:
- System Restore needs to be enabled for each drive that you wish to monitor.
- For each drive that System Restore monitors, it needs 300 megabytes of free space on that drive for it to be monitored.
This tutorial will guide you through using System Restore in Windows 8
to protect and restore your PC to a working configuration when it is
necessary.
If you have a problem on your computer and you cannot fix it by normal
means, then you can use System Restore to restore your computer to a
previous state when your computer was working properly. To restore your
computer to a previously created restore point please go to the Windows 8
Start Screen and type restore point. When the search results appear click on the Settings category as shown below.
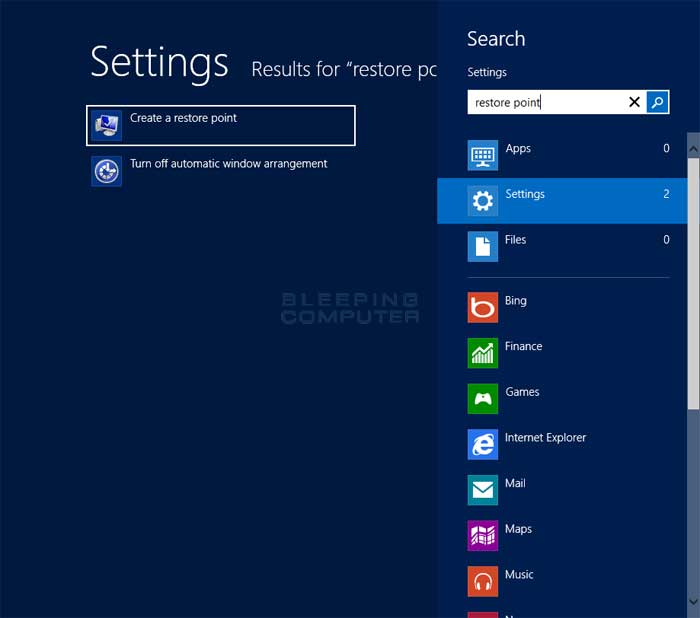
Now click on the option labeled Create a restore point and you will be brought to the System Protection tab of the System Properties control panel.

To restore your computer, click on the System Restore button and you will be presented with the main screen for System Restore. Now click on the Next button and you will be shown a list of available restore points that you can restore.

Select the restore point you wish to restore by left-clicking on the entry once. This will then make the Scan for affected programs
button available. If you click on that button you will be shown a list
of programs that will be removed when you perform a restore.
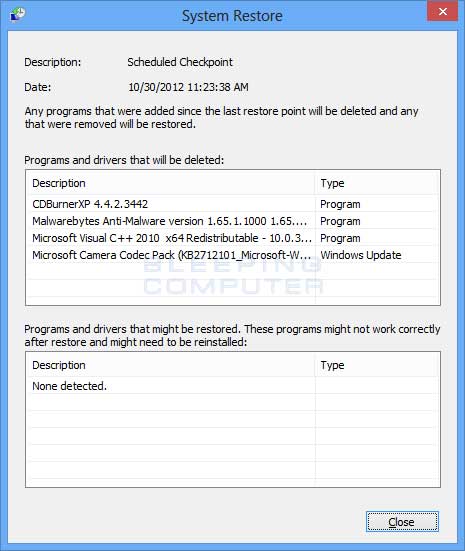
If you are okay with the programs that will be deleted, please click on the Close button and then click on the Next
button at the restore point selection screen. You will now be at a
screen asking if you are sure you wish to perform the restore.
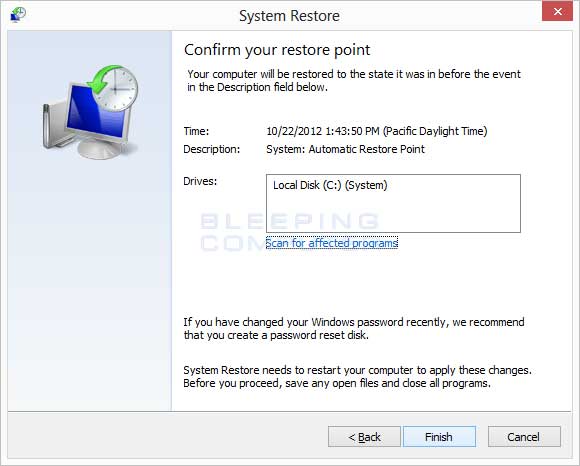
If you are sure you wish to continue, please click on the Finish button. System Restore will once again ask if you are sure you wish to continue. If you are sure, please click on the Yes button.
System Restore will now reboot your computer and begin the restore process. Please be patient as this can take quite some time.

When the restore point has finished being restored, Windows will start
back up and you will be at your login screen or desktop. You will then
be shown a confirmation box as seen below.
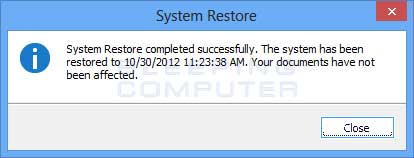
Your computer has now been restored back to the selected point in time.
If you restore a restore point and find that your system has become
more unstable or you need the applications that have been deleted, you
can undo a restore point. As System Restore creates a restore point
right before it restores another one, you can revert back to the exact
configuration you were using before you ran System Restore.
To undo a system restore, please go to the Windows 8 Start Screen and type restore point. When the search results appear click on the Settings category. Now click on the option labeled Create a restore point and you will be brought to the System Protection tab of the System Properties control panel. Now click on the System Restore button and you will be presented with the main screen for System Restore.
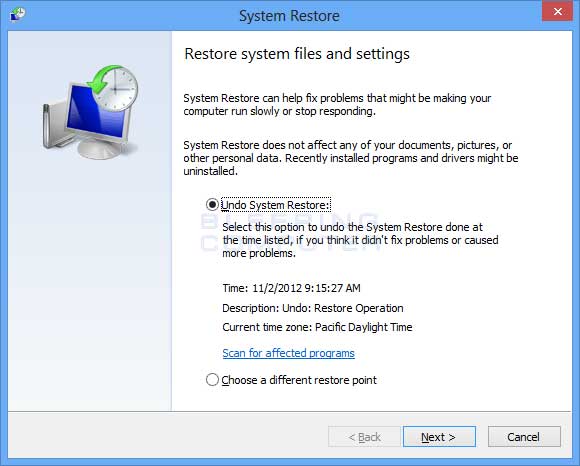
To undo a system restore, select the Undo System Restore option and then click on the Next
button. Windows will now ask you to confirm whether or not you wish to
perform the Undo: Restore Operation. If you wish to, please click on the
Finish button. Once again, Windows will ask if you are sure you wish to continue and you should now click on the Yes button.
Windows will now restore your computer and begin to undo your previous
system restore. When it has finished, you will be brought back to the
Windows login screen. Once you login, you will see a confirmation box on
the classic desktop stating that the restore was successful.
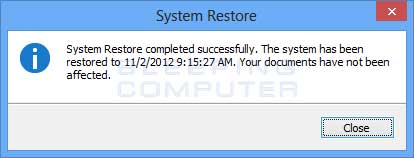
Your previous system restore has now been undone.
It is possible to manually create a new restore point when you wish
rather than waiting for the daily interval. If you wish to create manual
restore point you need to go to the Windows 8 Start Screen and type restore point. When the search results appear click on the Settings category. Now click on the option labeled Create a restore point and you will be brought to the System Protection tab of the System Properties control panel.
Please click on the Create button and you will be shown a prompt asking you what you would like to name the new restore point.
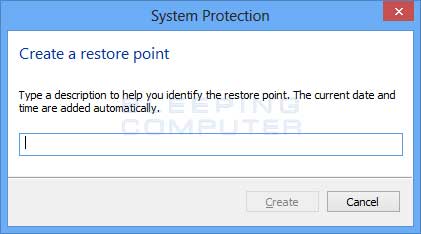
Enter a descriptive name and then click on the Create button. The restore point will now be created.

When the restore point is finished, you will be shown a dialog box where you can click on the Close button.
It is advised that you do not disable System Restore as your computer
will no longer be protected and all the previous restore points will be
deleted. If you still wish to disable System Restore, please go to the
Windows 8 Start Screen and type restore point. When the search results appear click on the Settings category. Now click on the option labeled Create a restore point and you will be brought to the System Protection tab of the System Properties control panel.
To disable System Restore you need to disable it for each drive that is
currently protected. To do this left-click on each drive listed in the
Protection Settings box so that it becomes highlighted. Then click on
the Configure button. This will open up the System Protection properties for the selected drive.
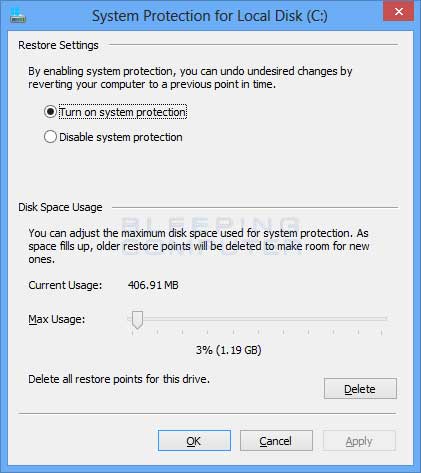
To disable System Restore, select the Disable system protection option and then click on the Apply button followed by the OK button. System Restore will now be disabled for that particular drive.
Now go through all of the other drives and disable System Restore for
those drives as well. Once all drives have been disabled, System Restore
will be disabled.
If you, or a computer infection, has previously disabled System
Restore, you should enable it again so that your computer is protected.
To do this, follow the steps in the previous section until you are at the System Protection properties for a particular drive. This time you should select the Turn on system protection option and then press the Apply button followed by the OK button.
You need to perform this step for each drive on your computer for your
system to be fully protected. Once you have enabled System Restore on
each drive, you should see that protection is On for each of the drives
on your computer.
Using System Restore is an important step to keeping your system safe
and secure. In the event that you have an issue in the future, you can
use System Restore to easily revert your computer's configuration back
to a point where the computer was working normally. This makes it much
easier to manage your computer and make sure it continues to run
efficiently.
Thanks & Regards,
"Remember Me When You Raise Your Hand For Dua"
Raheel Ahmed Khan
System Engineer
send2raheel@yahoo.com
send2raheel@engineer.com
sirraheel@gmail.com
send2raheel (skype id)
My Blog Spot
http://raheel-mydreamz.blogspot.com/
http://raheeldreamz.wordpress.com/
My Face book pages
http://www.facebook.com/pages/My-Dreamz-Rebiuld-our-nation
http://www.facebook.com/pages/Beauty-of-islam
http://www.facebook.com/pages/Health-is-wealth


No comments:
Post a Comment