When you purchase a new computer, one of the most daunting tasks is
figuring out how to transfer the data from your old computer to your new
one. Windows comes with a feature called Windows Easy Transfer that
makes this process a lot easier. The best and fastest way to do this is
via an external USB hard drive. External hard drives cost around $50
dollars for 500GB drives, which will be suitable for most people. If you
do not wish to spend the money on the new hard drive, then you can use a
network to transfer the files, but that gets to be a little tricky. For
the purpose of this guide we will be using an external hard drive.
If your old computer is using Windows 7, then you have Windows Easy
Transfer already installed on your computer. If your old computer is
using Windows XP or Windows Vista, though, you first need to download
and install Windows Easy Transfer before we begin. You can download
Windows Easty Transfer for XP and Vista from the following links:
This tutorial will first guide you through the steps that you need to
perform on the old computer. This will entail saving your existing data
onto the external hard drive. The second part of the tutorial will then
discuss what you need to do to import your old data to the Windows 8
computer.
Steps to do on the old computer:
First connect the external drive to your old computer. Then, if you are
using Windows XP or Windows Vista you must first download and install
Windows Easy Transfer onto your computer. Once the program is installed,
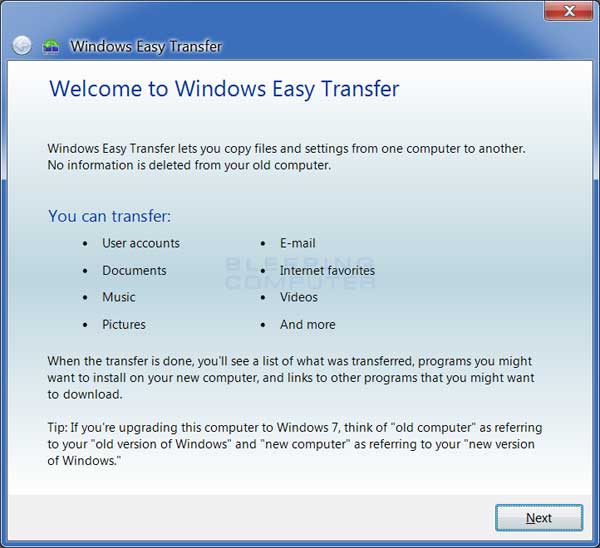
it will automatically start. If you are using Windows 7, click on the Start button and type Windows Easy Transfer and then click on its search result when it appears. Windows Easy Transfer should now be open as shown below.
Click on the Next button and you will be at a screen where you will select how you wish to transfer your data.
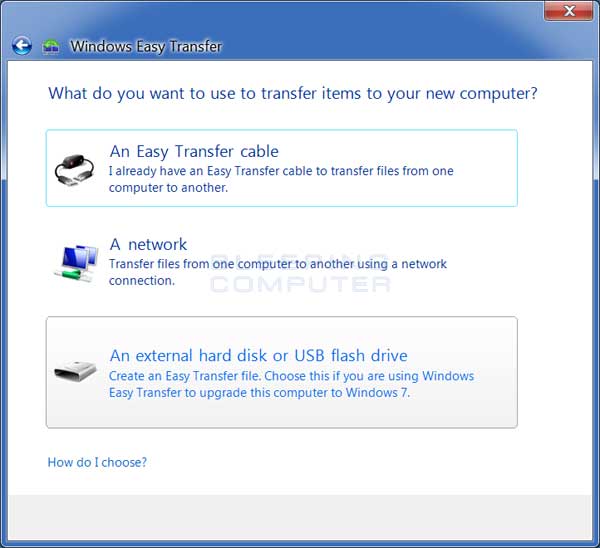
Click on the An external hard disk or USB flash drive and you will now go to a screen where Windows will ask you if this is your new or old computer. Please click on the This is my old computer button.
You will now be at a screen where Windows Easy Transfer is scanning
your computer for data. When it has finished it will display a list of
all users on the computer and how much data is expected to be
transferred.
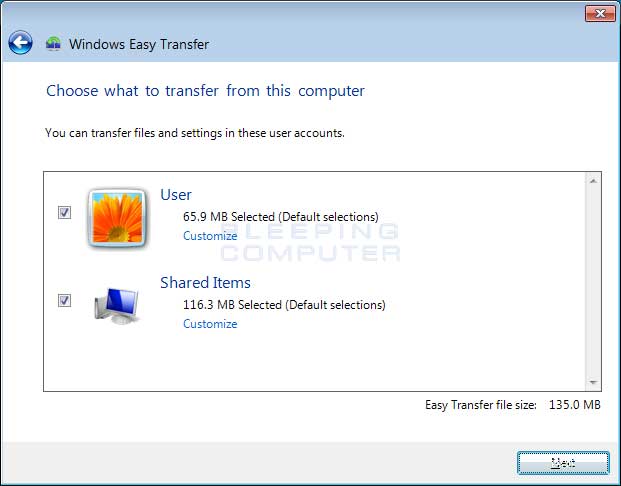
As we are upgrading to Windows 8, which is very different, you should
not transfer any Windows setting. To remove the Windows settings option,
click on the Customize link under each user and under Shared Items. This will bring up a small screen similar to the following.
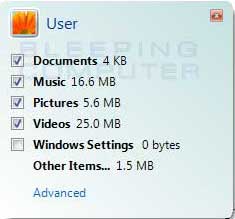
Remove the check mark next to Windows Settings. If you wish to see what folders will be copied over, you can also click on the Advanced
button, which will allow you to browse through the data that will be
transferred. If there is data that you do not wish to transfer, simply
clear the boxes next to that data by clicking on them. If the box is
white, it means that the data will not be transferred. When you are
satisfied with your selections, click on the little red X button in the
upper right hand corner of the above screen. Then click on the Next button.
You will be brought to a screen where you will be asked for a password
to use on your data file. If you wish to use a password to protect your
file, enter your password and then click on the Next button.
You will now be prompted for a location where you wish to save your
file. You should double-click on the drive letter associated with the
external drive that is plugged into your computer. Once you double-click
on the drive, click on the Save button.
Windows will now start saving your selected data to the external drive. This may take a while so please be patient.
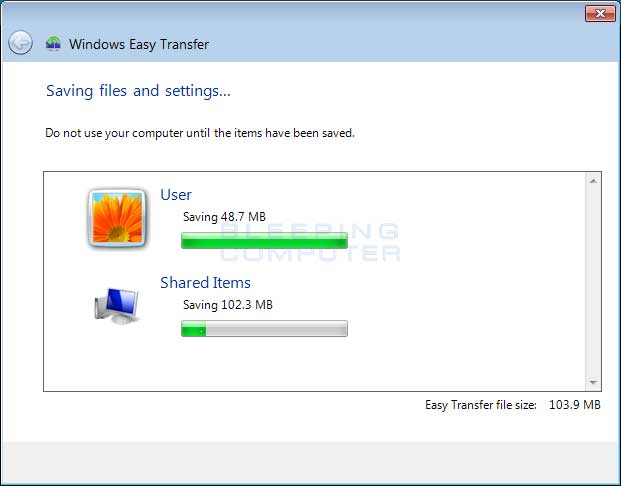
When the data is finished saving, Windows Easy Transfer will let you know. Now click on the Next and you will be at the final instruction screen.
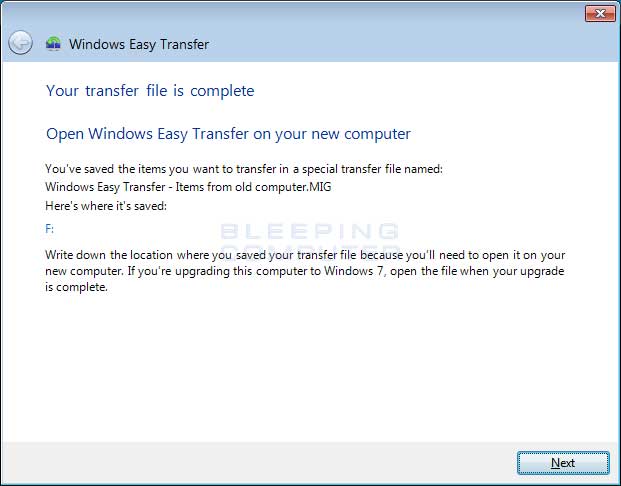
Click on the Next button and close the screen. Please
shutdown your old computer and unplug the external drive. Please proceed
with the following steps that you need to perform on your new Windows 8
computer.
Steps to do on the new Windows 8 Computer:
Start Windows Easy Transfer by typing Windows Easy Transfer
at the Windows Start Screen. When it appears in the search results,
click on it. Windows Easy Transfer will now open and you should click on
the Next button. You will now be shown a screen where you will be asked how you wish to transfer the data.
Please click on the An external hard disk or USB flash drive option. At the next screen when it asks if this is new or old computer, please click on the This is my new PC button. Windows Easy Transfer will now show a screen asking if your data is already saved on your external drive.
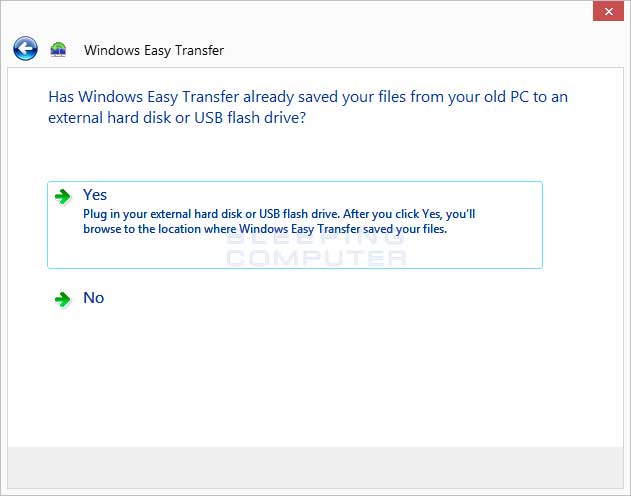
Make sure your external drive is plugged into the Windows 8 computer and then click on the Yes
button. Windows will now open a browse screen and show you all the
available drives on your computer. Double-click on the drive where you
saved your old data.
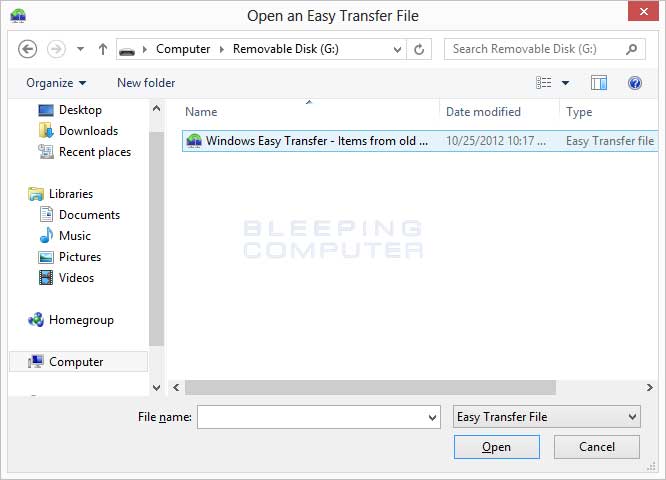
You should see, as shown in the window above, a file called Windows Easy Transfer - Items from old computer. Left click on this file to select it and then click on the Open button. A new screen will open showing the users data that will be copied to the new Windows 8 computer.
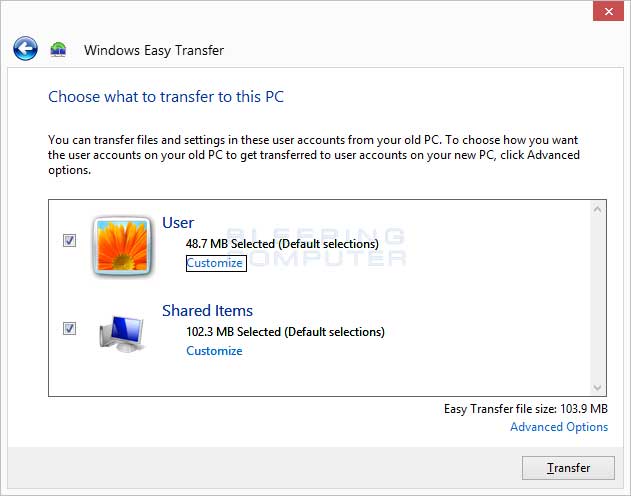
The first thing you should do on this screen is click on the Advanced Options button. This will open a screen showing you the mapping between the old users and new users.
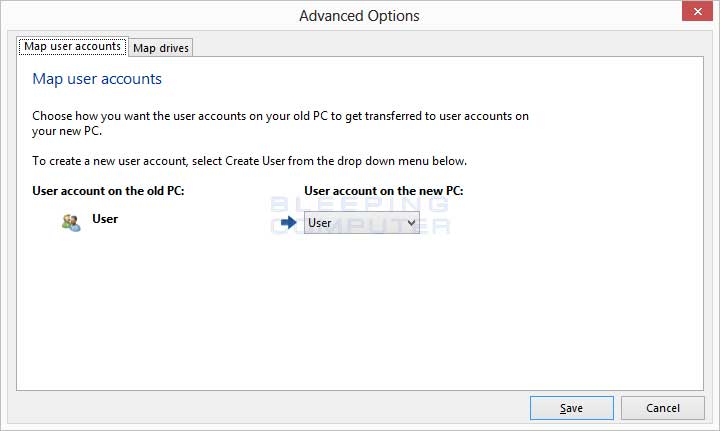
On the above screen you can specify which account on the new machine
the user's data from the old machine should go. If the account names are
the same, you should not have to change anything here. If you click on
the Map Drive tab, you can also specify which drive on
the new machine the data from the drives on the machine should go. When
you are satisfied with your settings, click on the Save button.
We will back to the Choose what to transfer screen.
Just like we were able to customize what we were saving on the old
computer, we can customize what we wish to transfer to the new computer.
To do this, click on the Customize option for each and every user or Shared Items. When you are satisfied with what you are transferring click on the Transfer button.

When the data has finished transferring you will be shown a new screen with two options. These options are:
See what was transferred
When you click on this option, Windows Easy Transfer will display a report of all the data and items that were transferred to your new Windows 8 computer.See a list of apps you might want to install on your new PC
When you click on this option, Windows Easy Transfer will display a report of the applications that were installed on your old computer. You can then use this list to determine if you wish to install any of them again on your new computer.
When you are ready you can then click on the Close button to close Windows Easy Transfer. Your data has now been successfully transferred to your new Windows 8 computer.
Thanks & Regards,
"Remember Me When You Raise Your Hand For Dua"
Raheel Ahmed Khan
System Engineer
send2raheel@yahoo.com
send2raheel@engineer.com
sirraheel@gmail.com
send2raheel (skype id)
My Blog Spot
http://raheel-mydreamz.blogspot.com/
http://raheeldreamz.wordpress.com/
My Face book pages
http://www.facebook.com/pages/My-Dreamz-Rebiuld-our-nation
http://www.facebook.com/pages/Beauty-of-islam
http://www.facebook.com/pages/Health-is-wealth


No comments:
Post a Comment