The Windows 7 System Recovery Command Prompt is a text-based console
that allow you to perform maintenance and recovery tasks on your
computer by typing the commands that you would like to execute. These
commands allow you to perform a wide variety of tasks such as replace
infected files, delete infections, repair boot up configurations for
your hard drive, resize hard drive partitions, as well as many other
tasks. Like the Windows Vista Recovery Command Prompt, the Windows 7
version also allows you to run graphical programs such as Notepad,
Regedit, and possibly some anti-malware programs. This is a huge
advantage as you now have a much larger variety of tools at your
disposal to repair your computer.
In order to access the Windows 7 System Recovery Command Prompt you first need to boot your computer off of the Windows 7 DVD by inserting it into your DVD player and turning your computer on. Your computer will start and you should see the BIOS listing the hardware on your computer as well as other information. When that information has been cleared, your computer will see that a bootable DVD is inserted and present a prompt similar to Figure 1 below. If your computer does not boot off of the DVD, and instead boots directly into Windows 7, then you can read this guide on how to configure your bios to boot from a CD or DVD.

Figure 1. Boot the computer from the Windows 7 DVD
As you want to boot the computer from the Windows 7 DVD, you need to press a key on your keyboard, and any key will do, when you see the above prompt. It is possible that the DVD that came with your computer does not allow you to boot off from it. If this is the case, then your computer manufacturer most likely installed the Windows Recovery Environment directly on to a small partition on your hard drive. To access this partition, you would slowly tap the F8 key on your keyboard after the BIOS information clears from your screen until you see the Windows startup menu. From this menu use your arrow keys to select the option for the Windows System Recovery and press the Enter key on your keyboard. You should now see a black screen with a white status bar at the bottom stating Windows is loading files.... After a while, the status bar will turn completely white and you will see a screen stating that Windows is loading. The Windows 7 Setup environment will continue to load and when finished you will be presented with a screen similar to Figure 2.
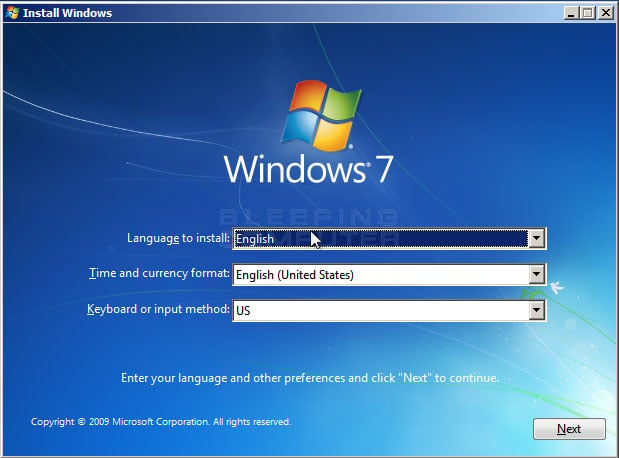
Figure 2. Configure language and location options in Windows 7 Setup
At this screen you should configure the Language to install, Time and currency format, and Keyboard or input method options so that they are set correctly for your location and language. When done, please press the Next button. You will now be at the main Windows 7 setup screen where you would normally install Windows 7 on to your computer.
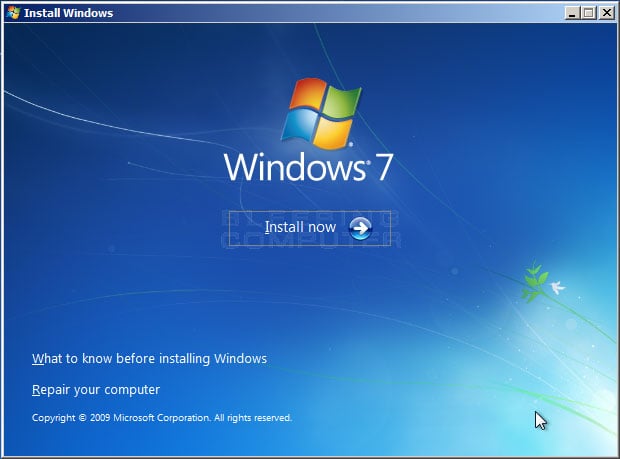
Figure 3. Windows 7 Install Windows screen
You should now click on the Repair your computer option, which will bring you to a new screen where the repair process will look for all Windows 7 installations on your computer. When done you will be presented with the System Recovery Options dialog box as shown in Figure 4 below.
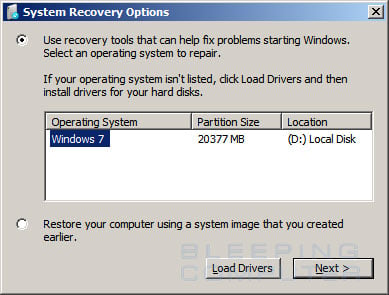
Figure 4. System Recovery Options
Select the Windows 7 installation you would like to repair. If there are drivers that you need to load in order for Windows 7 to recognize your hard drives, click on the Load Drivers button and load the files that are needed. When ready, press the Next button to continue.
The automatic Startup Repair screen will now start and attempt to fix any issues that it detects that could cause your computer to not boot properly. This process may take some time, so please be patient while it runs. At one point, if it does not find anything, it will prompt you to perform a System Restore as shown in the image below.
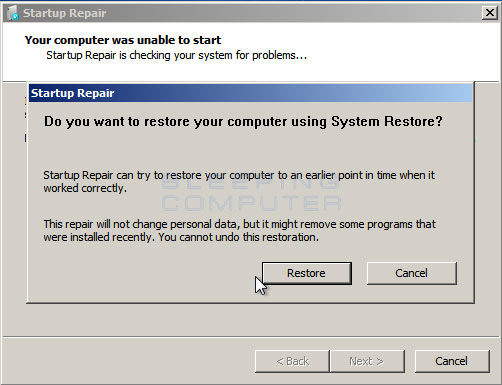
Figure 5. System Restore Prompt
At this prompt press the Cancel button to continue with the automatic Startup Repair process. When the repair process has finished it will state that it cannot fix the problem and ask if you would like to submit the information to Microsoft as shown below. You should press the Don't Send button, which will then cause a screen to be shown stating that Startup Repair could not fix the problems automatically.
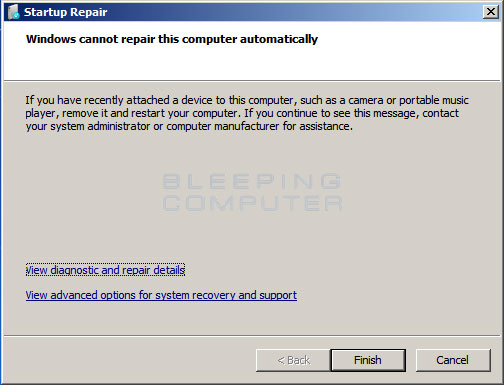
Figure 6. Startup Repair has finished
At this screen click on the menu item labeled View advanced options for system recovery and support. This will bring you to a screen, as shown below, where you can see a list of recovery options that are available.
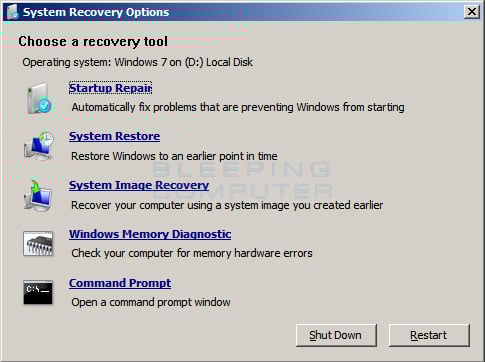
Figure 7. Choose a recovery tool
At this screen you should click on the Command Prompt option. Once you click on that option, the Command Prompt will open as shown in Figure 8 below.
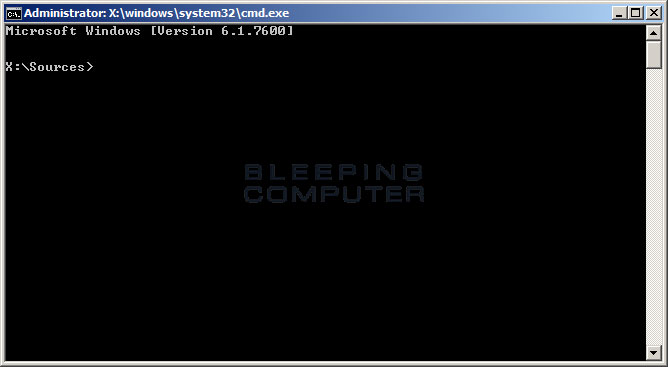
Figure 8. Command Prompt in the Windows Recovery Environment
Thanks & Regards,
"Remember Me When You Raise Your Hand For Dua"
Raheel Ahmed Khan
System Engineer
send2raheel@yahoo.com
send2raheel@engineer.com
sirraheel@gmail.com
send2raheel (skype id)
My Blog Spot
http://raheel-mydreamz.blogspot.com/
http://raheeldreamz.wordpress.com/
My Face book pages
http://www.facebook.com/pages/My-Dreamz-Rebiuld-our-nation
http://www.facebook.com/pages/Beauty-of-islam
http://www.facebook.com/pages/Health-is-wealth
In order to access the Windows 7 System Recovery Command Prompt you first need to boot your computer off of the Windows 7 DVD by inserting it into your DVD player and turning your computer on. Your computer will start and you should see the BIOS listing the hardware on your computer as well as other information. When that information has been cleared, your computer will see that a bootable DVD is inserted and present a prompt similar to Figure 1 below. If your computer does not boot off of the DVD, and instead boots directly into Windows 7, then you can read this guide on how to configure your bios to boot from a CD or DVD.
Figure 1. Boot the computer from the Windows 7 DVD
As you want to boot the computer from the Windows 7 DVD, you need to press a key on your keyboard, and any key will do, when you see the above prompt. It is possible that the DVD that came with your computer does not allow you to boot off from it. If this is the case, then your computer manufacturer most likely installed the Windows Recovery Environment directly on to a small partition on your hard drive. To access this partition, you would slowly tap the F8 key on your keyboard after the BIOS information clears from your screen until you see the Windows startup menu. From this menu use your arrow keys to select the option for the Windows System Recovery and press the Enter key on your keyboard. You should now see a black screen with a white status bar at the bottom stating Windows is loading files.... After a while, the status bar will turn completely white and you will see a screen stating that Windows is loading. The Windows 7 Setup environment will continue to load and when finished you will be presented with a screen similar to Figure 2.
Figure 2. Configure language and location options in Windows 7 Setup
At this screen you should configure the Language to install, Time and currency format, and Keyboard or input method options so that they are set correctly for your location and language. When done, please press the Next button. You will now be at the main Windows 7 setup screen where you would normally install Windows 7 on to your computer.
Figure 3. Windows 7 Install Windows screen
You should now click on the Repair your computer option, which will bring you to a new screen where the repair process will look for all Windows 7 installations on your computer. When done you will be presented with the System Recovery Options dialog box as shown in Figure 4 below.
Figure 4. System Recovery Options
Select the Windows 7 installation you would like to repair. If there are drivers that you need to load in order for Windows 7 to recognize your hard drives, click on the Load Drivers button and load the files that are needed. When ready, press the Next button to continue.
The automatic Startup Repair screen will now start and attempt to fix any issues that it detects that could cause your computer to not boot properly. This process may take some time, so please be patient while it runs. At one point, if it does not find anything, it will prompt you to perform a System Restore as shown in the image below.
Figure 5. System Restore Prompt
At this prompt press the Cancel button to continue with the automatic Startup Repair process. When the repair process has finished it will state that it cannot fix the problem and ask if you would like to submit the information to Microsoft as shown below. You should press the Don't Send button, which will then cause a screen to be shown stating that Startup Repair could not fix the problems automatically.
Figure 6. Startup Repair has finished
Figure 7. Choose a recovery tool
At this screen you should click on the Command Prompt option. Once you click on that option, the Command Prompt will open as shown in Figure 8 below.
Figure 8. Command Prompt in the Windows Recovery Environment
If you are unfamiliar with the Windows 7 Command Prompt, the first
thing you may notice is that there is no graphical user interface, but
instead there is a prompt where you will need to type in all of your
commands. Though this may appear daunting, once you learn the commands
to type in, you will find that the command prompt is a powerful tool for
accessing files, repairing Windows, or removing malware. If you would
like to learn more about the command prompt and the various commands
that you can use, then please read the Introduction to the Windows Command Prompt tutorial.
It should be noted that when you
boot into the Windows 7 Recovery Environment the drive letter for your
Windows installation may not be the same. For example, if your Windows
installation is normall on the C: drive, it may not be located at the D:
drive. To determine what drive letter your Windows installation is
located on, you can type this command press enter:
bcdedit | find "osdevice"
This command will display output similar to : os device partition=D:.
The drive letter after partition= is the drive that your Windows
installation is located. To change to that drive letter you can then
type D:, or whatever other drive letter it shows, and press Enter on your keyboard.
Using the command prompt is quite simple. Simply type in the command you wish to perform and then press Enter
on your keyboard. If you have entered the command properly then it will
be executed and the output from the command will be displayed directly
within the command prompt. A powerful feature of the System Recovery
Console Command Prompt is that not only can you run run console
programs, but you can also run certain Windows programs such as Notepad
or an antivirus program. Unfortunately, not all Windows programs will be
able to run in this environment, so you will need to test them to
determine which ones will operate correctly.
To help get you started with using the Command Prompt I have listed a
series of console commands that work in this environment. To get help
information for each of these programs you can type the program name
followed by /h and press the enter key. For example, to see the help information for the copy command you would type copy /h and then press the enter
key. As more programs and commands are found they will be added to the
lists below. Each of the console commands must be typed into the console
in order to execute them.
Console Command
|
Description
|
| attrib | Change permissions on files. |
| Bootrec | You can use the Bootrec.exe tool in the Windows Recovery Environment (Windows RE) to troubleshoot and repair the master boot record (MBR), boot sector,and Boot Configuration Data (BCD) store |
| bcdedit | Displays and allows you to change how Windows boots up. This command is useful for people who are having trouble with the Windows Boot Manager |
| cd | Changes the current directory |
| chkdsk | Checks a hard disk for errors and attempts to repair them. |
| copy | Copy a file from one location to another. |
| del | Deletes a file |
| dir | Lists the files and folders in the current directory |
| diskpart | Load the Windows disk management program. From this program you can create, delete, shrink, and expand your existing partitions as well as get information about partitions and hard drives |
| icacls | Change file and folder permissions and display or modify access control lists (ACLs) |
| mkdir | Creates a new folder |
| more | Displays the content of a file one page at a time |
| move | Moves a file or a folder |
| reg | Perform Windows Registry operations. |
| ren | Rename a file or folder |
| rd | Remove an empty folder |
| type | Display the contents of a file |
| xcopy | Copy a folder or files to another location |
Windows Program Name
|
Description/Notes
|
| Notepad.exe | Opens up the Windows Notepad so you can view and edit text files. You can also use the file browser when click the File -> Open menus to copy, move, rename, and delete files. |
| Regedit.exe | The Windows Registry Editor. |
| rstrui.exe | The System Restore console where you can restore your computer back to earlier restore points. |
When you are finished using the Command Prompt you can exit it by typing exit and then pressing the Enter
key on your keyboard. The command prompt will close and you will now be
back at the list of available repair tools, where you can reboot your
computer.
The Windows 7 System Recovery Command Prompt is such a powerful tool
because you can perform actions on your files and data without having to
be in Windows. This means that if you are infected with malware you can
use the recovery environment to clean your computer of rootkits or
malware without fear of them hindering your efforts as they will not be
started.
An advanced feature of the Windows 7 Recovery Command Prompt is that
you can load your Windows Registry hives and then access them using
Regedit. That way if you or a program has changed a setting in your
Registry that does not allow you to boot up, you can fix it using the
command prompt. An example of this would be when an antivirus program
incorrectly fixes the Userinit key and thus you are no longer able to
login to Windows. To fix this you would start the Windows Recovery
Environment Command Prompt and load the hives, fix the changes, and
unload them again.
This can be done using the following commands:
Type REG LOAD HKLM\TempSoft :\Windows\System32\config\software and press Enter to load the Registry hive.Type regedit.exe and press Enter to start the Windows Registry Editor.
Browse to HKEY_LOCAL_MACHINE\TempSoft\Microsoft\Windows NT\CurrentVersion\Winlogon key within the Registry Editor.
Double-click on the Userinit value and change the data to read :\Windows\system32\userinit.exe,
Exit the Windows Registry Editor.
Type REG UNLOAD HKLM\TempSoft and press Enter to unload the Registry hive.
Type exit and press Enter on your keyboard and then reboot your computer.
Thanks & Regards,
"Remember Me When You Raise Your Hand For Dua"
Raheel Ahmed Khan
System Engineer
send2raheel@yahoo.com
send2raheel@engineer.com
sirraheel@gmail.com
send2raheel (skype id)
My Blog Spot
http://raheel-mydreamz.blogspot.com/
http://raheeldreamz.wordpress.com/
My Face book pages
http://www.facebook.com/pages/My-Dreamz-Rebiuld-our-nation
http://www.facebook.com/pages/Beauty-of-islam
http://www.facebook.com/pages/Health-is-wealth


No comments:
Post a Comment