Introduction
There are two ways to uninstall a program in Vista; the wrong way and the right way. Unfortunately, though, too many people uninstall a program using the wrong ways, which can lead to poor performance and problems on the computer. These wrong ways are delete the program's folder or just deleting the icons. When you attempt to remove a program in this way, there will be a large amount of configuration information left in the Windows Registry as well as files that may be installed in locations other than the program's folder. These orphan files and Registry data have the chance of causing conflicts on your computer thus leading to problems.
The proper way to uninstall a program is to use the uninstall routine that is bundled with the program itself. This will remove the files, Windows Registry information, and other configuration from your computer so that there are no conflicts in the future. When a program is installed in Windows, it will add information to the Windows Registry on the proper way to uninstall it. You can then use Windows Vista's Programs and Features control panel to properly uninstall the program. This tutorial will walk you through using this control panel so that you uninstall programs correctly. This method has not changed too much from previous version of Windows, but there have been some changes in Vista, which should be outlined.
How to uninstall a program in Windows Vista
To see a list of the programs that we can uninstall we must first open the Programs and Features control panel. To do this you should follow these steps:

Figure 1. Programs and Features Screen

Figure 2. Select entry in the program list
If you press the Change button, the program will launch it's setup so that you can modify how the program is presently installed. It is important to note that the Change button does not uninstall a program, but rather allows you to modify how it is currently installed. If you want to uninstall the program you should instead click on the Uninstall button. Once you click on the uninstall button you will be presented with a confirmation asking if you would like to continue as shown in Figure 3 below. For those who like shortcuts, you could just double-click on an entry to start this process as well. For some programs when choose to uninstall it, Windows may prompt you with a message stating Windows needs your permission to continue. At this screen you should click on the Continue button.

Figure 3. Confirmation screen to continue with the uninstall
If you do not want to continue, then you should press the No button, and you will come back to the list of programs. If you press the Yes button
Vista will start the uninstall routine for the program and begin to
remove it. An uninstall screen will typically now open and may ask you
questions about how the program should be uninstalled. You typically
want to remove the entire program except any data that you may need in
the future. As each program's uninstall process is different, it is
advised that you read each screen carefully and continue with the
uninstall process. When uninstalling certain programs you may receive a
prompt from Windows stating An unidentified programs wants access to your computer. When you receive this as you uninstall the program, you should click on the Allow button, as it is the uninstaller being started.
The program will now continue to uninstall, and when completed you will be back at the list of programs installed on your computer. You will notice, though, that the program you just uninstalled is no longer listed. At this point you can either uninstall another programs or close the Programs and Features screen.
When examining the list of programs in your Uninstall list, if you are unsure as to what a program is, you can search for its name in our Uninstall Database.
How to uninstall a program in Windows 7 and Windows 8
To see a list of the programs that we can uninstall we must first open the Programs and Features control panel. To do this you should follow these steps:

Figure 1. Programs and Features Screen

Figure 2. Select entry in the program list
If you press the Change button, the program will launch it's setup so that you can modify how the program is presently installed. It is important to note that the Change button does not uninstall a program, but rather allows you to modify how it is currently installed. If you want to uninstall the program you should instead click on the Uninstall button. Once you click on the uninstall button you will be presented with a confirmation asking if you would like to continue as shown in Figure 3 below. For those who like shortcuts, you could just double-click on an entry to start this process as well. For some programs when choose to uninstall it, Windows may prompt you with a message stating Windows needs your permission to continue. At this screen you should click on the Continue button.

Figure 3. Confirmation screen to continue with the uninstall
If you do not want to continue, then you should press the No button, and you will come back to the list of programs. If you press the Yes button
Vista will start the uninstall routine for the program and begin to
remove it. An uninstall screen will typically now open and may ask you
questions about how the program should be uninstalled. You typically
want to remove the entire program except any data that you may need in
the future. As each program's uninstall process is different, it is
advised that you read each screen carefully and continue with the
uninstall process. When uninstalling certain programs you may receive a
prompt from Windows stating An unidentified programs wants access to your computer. When you receive this as you uninstall the program, you should click on the Allow button, as it is the uninstaller being started.
The program will now continue to uninstall, and when completed you will be back at the list of programs installed on your computer. You will notice, though, that the program you just uninstalled is no longer listed. At this point you can either uninstall another programs or close the Programs and Features screen.
When examining the list of programs in your Uninstall list, if you are unsure as to what a program is, you can search for its name in our Uninstall Database.
Conclusion
Now that know the proper way to uninstall a program you can avoid leaving errant files and configuration information on the computer when you would like to remove a program. This also allows you to clear up some extra disk space, if needed, by uninstalling any programs that you do not need.
Thanks & Regards,
"Remember Me When You Raise Your Hand For Dua"
Raheel Ahmed Khan
System Engineer
send2raheel@yahoo.com
send2raheel@engineer.com
sirraheel@gmail.com
send2raheel (skype id)
My Blog Spot
http://raheel-mydreamz.blogspot.com/
http://raheeldreamz.wordpress.com/
My Face book pages
http://www.facebook.com/pages/My-Dreamz-Rebiuld-our-nation
http://www.facebook.com/pages/Beauty-of-islam
http://www.facebook.com/pages/Health-is-wealth
There are two ways to uninstall a program in Vista; the wrong way and the right way. Unfortunately, though, too many people uninstall a program using the wrong ways, which can lead to poor performance and problems on the computer. These wrong ways are delete the program's folder or just deleting the icons. When you attempt to remove a program in this way, there will be a large amount of configuration information left in the Windows Registry as well as files that may be installed in locations other than the program's folder. These orphan files and Registry data have the chance of causing conflicts on your computer thus leading to problems.
The proper way to uninstall a program is to use the uninstall routine that is bundled with the program itself. This will remove the files, Windows Registry information, and other configuration from your computer so that there are no conflicts in the future. When a program is installed in Windows, it will add information to the Windows Registry on the proper way to uninstall it. You can then use Windows Vista's Programs and Features control panel to properly uninstall the program. This tutorial will walk you through using this control panel so that you uninstall programs correctly. This method has not changed too much from previous version of Windows, but there have been some changes in Vista, which should be outlined.
How to uninstall a program in Windows Vista
To see a list of the programs that we can uninstall we must first open the Programs and Features control panel. To do this you should follow these steps:
-
Click on the Start button to open your Start Menu. The Start button looks like this:

-
When the Start Menu opens click on the Control Panel menu option.
-
When the Control Panel window opens click on the Uninstall a program
option option under the Programs category. This option is shown by the
arrow in the image below. If you are using the Classic View of the
Control Panel, then you would double-click on the Programs and Features icon instead.
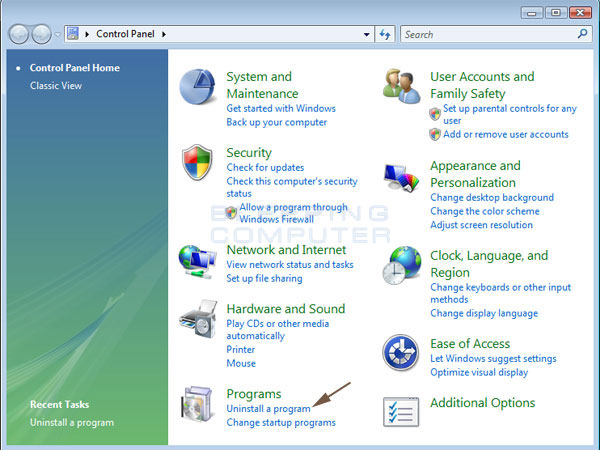
Figure 1. Programs and Features Screen
This screen contains a list of the programs installed on your computer,
the company that developed it, and when it was installed. This screen
also contains four options in the left navigation bar that are unrelated
to uninstalling a program. These four options are:
-
View Installed Updates
- If you click on this option you will come to a screen that shows the
installed updates and Ultimate Extras. From this screen you then have
the ability to uninstall them. More information about this screen can be
found in this tutorial.
-
Get new programs online at Windows Marketplace - If you click on this link your web browser will open and go to the Windows Marketplace homepage. From here you can purchase and download software.
-
View purchased software (digital locker) - When you purchase
software at the Windows Marketplace, the software will be added to your
digital locker. You can manage these programs from this screen.
- Turn Windows features on or off - Windows Vista is installed with certain features enabled and disabled by default. By clicking on this option you can manage that Vista features you want enabled. More information can be found at this tutorial.
Figure 2. Select entry in the program list
If you press the Change button, the program will launch it's setup so that you can modify how the program is presently installed. It is important to note that the Change button does not uninstall a program, but rather allows you to modify how it is currently installed. If you want to uninstall the program you should instead click on the Uninstall button. Once you click on the uninstall button you will be presented with a confirmation asking if you would like to continue as shown in Figure 3 below. For those who like shortcuts, you could just double-click on an entry to start this process as well. For some programs when choose to uninstall it, Windows may prompt you with a message stating Windows needs your permission to continue. At this screen you should click on the Continue button.
Figure 3. Confirmation screen to continue with the uninstall
The program will now continue to uninstall, and when completed you will be back at the list of programs installed on your computer. You will notice, though, that the program you just uninstalled is no longer listed. At this point you can either uninstall another programs or close the Programs and Features screen.
When examining the list of programs in your Uninstall list, if you are unsure as to what a program is, you can search for its name in our Uninstall Database.
How to uninstall a program in Windows 7 and Windows 8
To see a list of the programs that we can uninstall we must first open the Programs and Features control panel. To do this you should follow these steps:
-
In Windows 7 click on the Start button to open your Start Menu. The Start button looks like this:
 .When the Start Menu opens click on the Control Panel menu option. In Windows 8, click on the Control Panel app in the Windows 8 Start Screen. Then scroll to the bottom and click on the More Settings option.
-
When the Control Panel window opens click on the Uninstall a program
option option under the Programs category. This option is shown by the
arrow in the image below. If you are using the Classic View of the
Control Panel, then you would double-click on the Programs and Features icon instead.

Figure 1. Programs and Features Screen
This screen contains a list of the programs installed on your computer,
the company that developed it, and when it was installed. This screen
also contains four options in the left navigation bar that are unrelated
to uninstalling a program. These four options are:
-
Control Panel Home - This will bring you back to the main Control Panel screen.
-
View installed updates - If you click on this option you will come to a screen that shows the installed Windows updates on your computer
- Turn Windows features on or off - Windows 7 and Windows 8 is installed with certain features enabled and disabled by default. By clicking on this option you can manage that Vista features you want enabled.
Figure 2. Select entry in the program list
If you press the Change button, the program will launch it's setup so that you can modify how the program is presently installed. It is important to note that the Change button does not uninstall a program, but rather allows you to modify how it is currently installed. If you want to uninstall the program you should instead click on the Uninstall button. Once you click on the uninstall button you will be presented with a confirmation asking if you would like to continue as shown in Figure 3 below. For those who like shortcuts, you could just double-click on an entry to start this process as well. For some programs when choose to uninstall it, Windows may prompt you with a message stating Windows needs your permission to continue. At this screen you should click on the Continue button.
Figure 3. Confirmation screen to continue with the uninstall
The program will now continue to uninstall, and when completed you will be back at the list of programs installed on your computer. You will notice, though, that the program you just uninstalled is no longer listed. At this point you can either uninstall another programs or close the Programs and Features screen.
When examining the list of programs in your Uninstall list, if you are unsure as to what a program is, you can search for its name in our Uninstall Database.
Conclusion
Now that know the proper way to uninstall a program you can avoid leaving errant files and configuration information on the computer when you would like to remove a program. This also allows you to clear up some extra disk space, if needed, by uninstalling any programs that you do not need.
Thanks & Regards,
"Remember Me When You Raise Your Hand For Dua"
Raheel Ahmed Khan
System Engineer
send2raheel@yahoo.com
send2raheel@engineer.com
sirraheel@gmail.com
send2raheel (skype id)
My Blog Spot
http://raheel-mydreamz.blogspot.com/
http://raheeldreamz.wordpress.com/
My Face book pages
http://www.facebook.com/pages/My-Dreamz-Rebiuld-our-nation
http://www.facebook.com/pages/Beauty-of-islam
http://www.facebook.com/pages/Health-is-wealth


No comments:
Post a Comment