Introduction
The iPad is ultimately a device create to allow you consume content in an easy and portable manner. As there is no better location for consumable content than the Internet, being able to connect to a Wi-Fi network so you can access the Internet is a necessity. This guide will walk you through all of the steps required to connect to a Wi-Fi network using your iPad. We have also outlined steps that will allow you to access almost all types of Wi-Fi networks as well as using proxy servers if your particular scenario requires it.
How to connect to a Wi-Fi or Wireless Network
How to configure your iPad Wi-Fi connection to use a static IP address
If the wireless network you are connecting to does not use DHCP to assign IP addresses to wireless devices, then you will need to configure your iPad with static IP addresses and other information in order to connect to the Internet or a network. To do this first find out the info, such as the static IP address, IP subnet mask, DNS servers, and router IP address, and proceed with the following steps. Please note, you must first create the wireless profile that you will be assigning static information to.
How to configure your iPad to use a Proxy Server
Some networks require you to use a proxy server to access the Internet. A proxy server is another computer or device that acts as an intermediary between you and the Internet by relaying your requests to a server and the servers responses back to you. Unfortunately, this type of setup requires you to specify certain settings in order for you to use the Internet properly. This section will provide information on how to configure your iPad to use a proxy server.
Deleting a Wi-Fi connection profile so the iPad wont automatically join it
At times you may find the need to delete a Wi-Fi connection profile that has previously been configured on your iPad. Whether this is because the profile belongs to a hotel that you are no longer staying at or you have changed your wireless password and need to re-enter it, this section will explain how to delete the profile from your iPad.
Troubleshooting
When working with computers and networking problems invariably happen. This section will offer steps that can be tried to resolve Wi-Fi connectivity issues with your iPad.
What to do if your iPad can't access a visible network:
As you can see there are many Wi-Fi configuration options available to suit your specific needs. By knowing how to connect to a wireless network you can now connect to the Internet from locations such as a public Wi-Fi hotspot, a friends house, or a hotel. No matter what the specific requirement of your location, hopefully the information in this guide has shown you how to work around them.
Thanks & Regards,
"Remember Me When You Raise Your Hand For Dua"
Raheel Ahmed Khan
System Engineer
send2raheel@yahoo.com
send2raheel@engineer.com
sirraheel@gmail.com
send2raheel (skype id)
My Blog Spot
http://raheel-mydreamz.blogspot.com/
http://raheeldreamz.wordpress.com/
My Face book pages
http://www.facebook.com/pages/My-Dreamz-Rebiuld-our-nation
http://www.facebook.com/pages/Beauty-of-islam
http://www.facebook.com/pages/Health-is-wealth
The iPad is ultimately a device create to allow you consume content in an easy and portable manner. As there is no better location for consumable content than the Internet, being able to connect to a Wi-Fi network so you can access the Internet is a necessity. This guide will walk you through all of the steps required to connect to a Wi-Fi network using your iPad. We have also outlined steps that will allow you to access almost all types of Wi-Fi networks as well as using proxy servers if your particular scenario requires it.
How to connect to a Wi-Fi or Wireless Network
This section will explain how to connect to a Wi-Fi or Wireless
network that is broadcasting its name or SSID. For most public, and many
private, Wi-Fi networks the name, or SSID, of the network is broadcast
so that anyone who tries to connect to it will be able to do so. This
guide will walk you through the steps of connecting to a Wi-Fi network
that is broadcasting its name. If you wish to connect to a wireless
network that is not broadcasting its name, then please see the steps here.
-
Start the iPad
-
Tap on the Settings app. The Settings icon looks like the following:
Settings Icon
Once in the settings application, you will be at the General Settings screen as shown below.
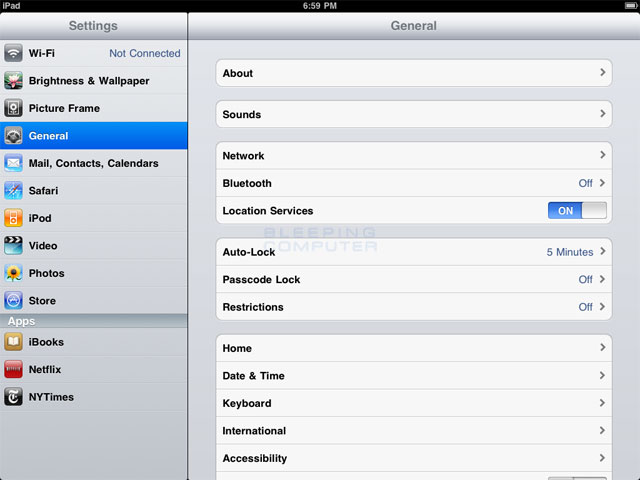
General Settings screen
-
Tap on the Wi-Fi category to get to the screen where you will connect to a wireless network as shown below.
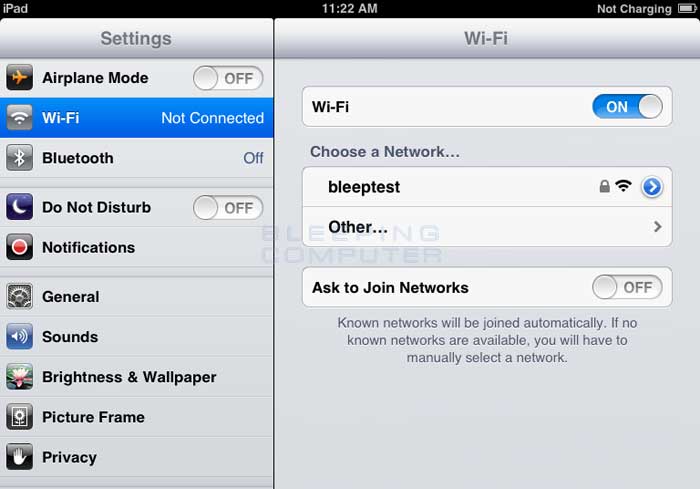
Choose an available wireless network screen
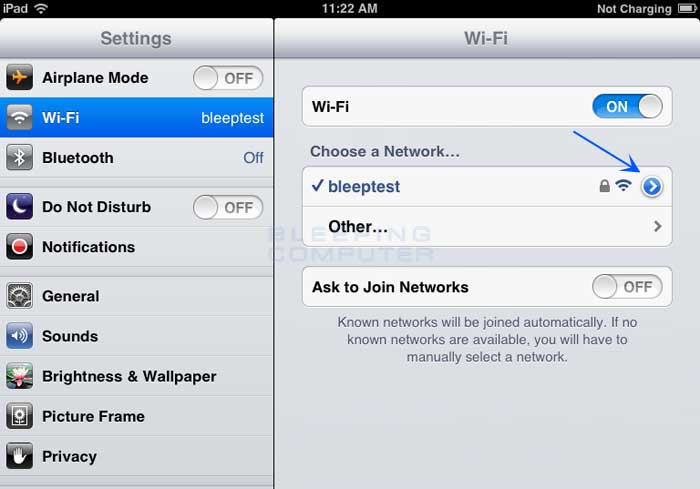
When you reach this screen, the iPad will start searching for Wi-Fi networks that are in range and that are broadcasting their names. As it discovers available networks it will list them under the Choose a Network... label. Please note that it may take some time for the iPad to see all of the available networks, so please be patient while it searches. You can tell that it is searching as there will be an animated symbol next to the Choose a Network... label while it is searching. If it does not find anything, it will pause for about a minute and then attempt to search again.
When you see the Wi-Fi network that you would like to connect to, simply tap on it to attempt to join it. If it has a lock next to the name, then it will require you to enter a wireless encryption password in order to connect to it as discussed in the next step.
-
Once you Tap on a network name, it will try to connect to it. If the
network is not using encryption, then you can just skip to this step.
If the network is using wireless encryption, though, you will be
presented with a screen asking you to enter the wireless encryption
password as shown below.
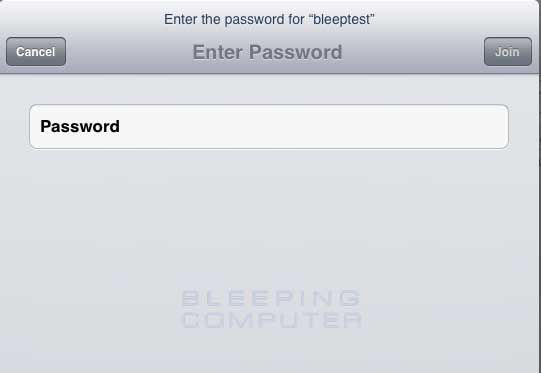
Enter wireless security password screen
In the password field, enter the wireless encryption password that is required to join this network. This password was originally set on your wireless router, and if you do not remember this password anymore, you can logon to the router and change the password to a new one. Please note that if you change the password on the router, then any other devices that connect to this device wirelessly will also need to have their settings changed to use the new password.
-
The iPad will now attempt to connect to the network, and when finished,
will display the Wi-Fi settings screen again, but this time with the
joined network listed and with a checkmark next to it as shown below.
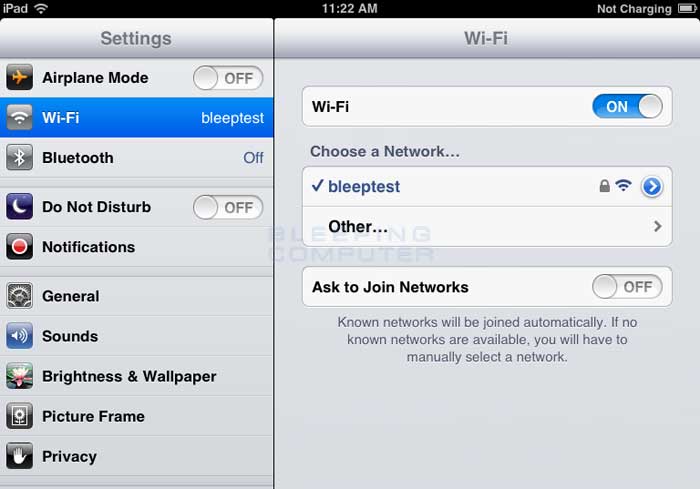
Screen showing the iPad connected to a wireless network
This checkmark designates that your iPad is connected to the network. You can also see that your iPad is connected to a wireless network as in the upper left-hand corner you will see the word iPad with the Wi-Fi symbol ( )next to it. You can now go back to your home screen and use any apps that require Wi-Fi connectivity.
There are many networks that do not advertise their network name, or
SSID, for extra security. Due to this, the only way for an iPad to
connect to these types of networks is to manually enter the network
information that is required to make a connection. This section will
explain how to manually connect your iPad to a wireless network.
In order to accomplish this please follow these steps:
-
Start the iPad
-
Tap on the Settings app. The app icon looks like the following:
Settings Icon
Once in the settings application, you will be at the General Settings screen as shown below.
General Settings screen
-
Tap on the Wi-Fi category to get to the screen where you will connect to a wireless network as shown below.
Wi-Fi Settings screen
-
Determine the correct Name, or SSID, that you will be connecting to and Tap on the Other...
button. You will now be at the Other Network screen where the iPad will
ask you to enter the settings required to connect to the network.
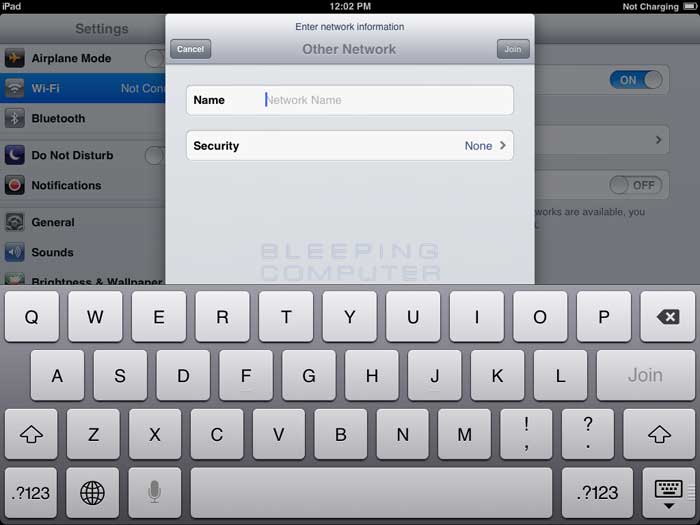
Enter SSID screen
In the Name field, enter the network name or SSID.
-
Then tap on the Security button and you will be at the screen show below.

Select Security Encryption Type screen
At this screen you need to select the wireless encryption that the network that network you wish to connect to is using. It is important that you select the correct encryption type, as if you do not, you will not be able to connect to the wireless network. After selecting the encryption type, tap on the Other Network button.
-
You will now be back at the Other Network screen where the iPad is now prompting you to enter the password as shown below.

Enter Security Encryption Password screen
In the password field, please enter the password that is required to connect to the Wi-Fi network. This password was originally set on your wireless router, and if you do not remember this password, you can logon to the router and change the password to a new one. Please note that if you change the password on the router, then any other devices that connect to this device wirelessly will also need to have their settings changed to use the new password.
-
Once you have entered in all the required information, tap the Join
button on the iPad keyboard. The iPad will attempt to connect to the
network, and when finished, will display the Wi-Fi settings screen
again, but this time with the joined network listed and with a checkmark
next to it as shown below.
Screen showing the iPad connected to a wireless network
This checkmark designates that your iPad is connected to the network. You can also see that your iPad is connected to a wireless network as in the upper left-hand corner you will see the word iPad with the Wi-Fi symbol () next to it. You can now go back to your home screen and use any apps that require Wi-Fi connectivity.
How to configure your iPad Wi-Fi connection to use a static IP address
If the wireless network you are connecting to does not use DHCP to assign IP addresses to wireless devices, then you will need to configure your iPad with static IP addresses and other information in order to connect to the Internet or a network. To do this first find out the info, such as the static IP address, IP subnet mask, DNS servers, and router IP address, and proceed with the following steps. Please note, you must first create the wireless profile that you will be assigning static information to.
-
Start the iPad
-
Tap on the Settings app. When the Settings app loads, you will be at the General Settings category.
-
Tap on the Wi-Fi settings category and you will be at a screen as shown below.
Screen showing the iPad connected to a wireless network
You should now tap on the to access the specific settings of the wireless connection.
-
You will now be at the Wi-Fi network settings screen for the connected network.
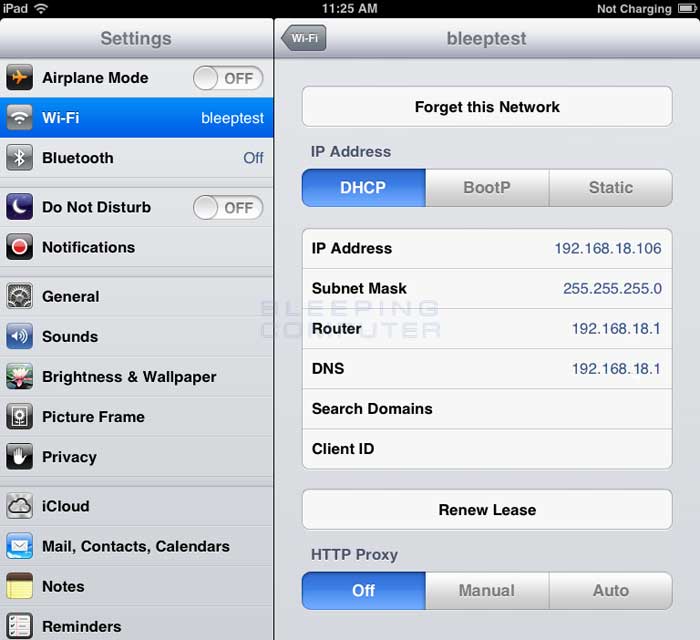
Wireless settings for a Wi-Fi network -
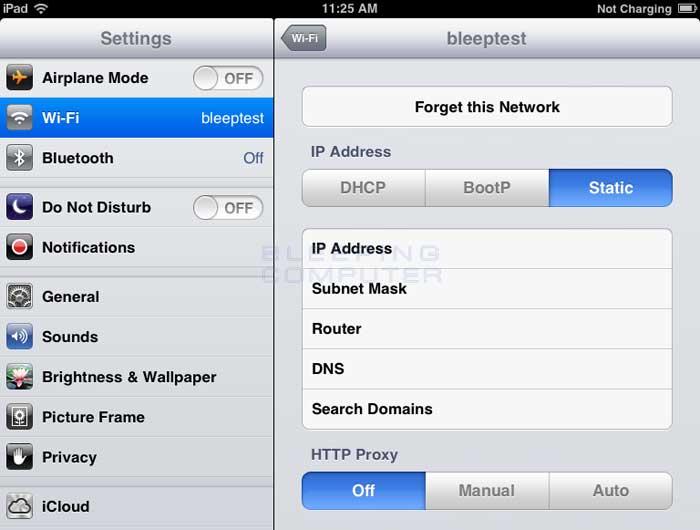
Now tap the Static button to enter the static settings screen as shown below.
Screen showing the iPad connected to a wireless network
In this screen you can enter the IP address, IP subnet mask, router IP address, DNS server, and search domains as necessary. At a minimum you must enter information in the IP Address, Subnet Mask, Router, and DNS fields for the iPad to be able to properly work on the wireless network. If you do not know this information, you should ask the router owner or administrator.
When you are done entering the information, tap on the Wi-Fi Networks button and then go back to your Home screen to start using the iPad with these new settings.
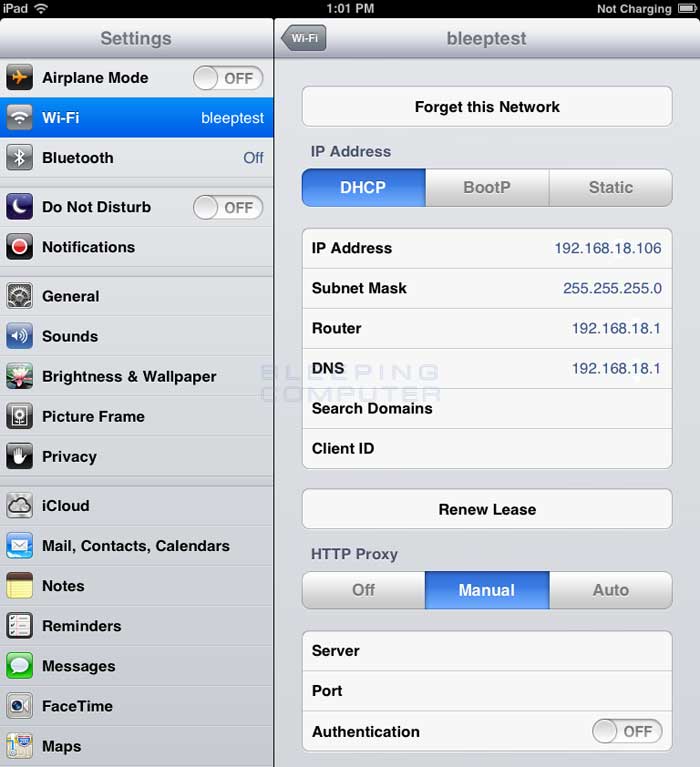
How to configure your iPad to use a Proxy Server
Some networks require you to use a proxy server to access the Internet. A proxy server is another computer or device that acts as an intermediary between you and the Internet by relaying your requests to a server and the servers responses back to you. Unfortunately, this type of setup requires you to specify certain settings in order for you to use the Internet properly. This section will provide information on how to configure your iPad to use a proxy server.
-
Start the iPad
-
Tap on the Settings app. When the Settings app loads, you will be at the General Settings category.
-
Tap on the Wi-Fi settings category and you will be at a screen as shown below.
Screen showing the iPad connected to a wireless network
You should now tap on the to access the specific settings of the wireless connection.
-
You will now be at the Wi-Fi network settings screen for the connected network.
Wireless settings for a Wi-Fi network
At the bottom you will find three proxy server options that you can choose from. The first option is Off, which is the default option and means that the iPad will not use a Proxy Server. The second setting is Manual, which means that you will enter the specific information about proxy server in the specified fields. The last option is Auto, which allows you to enter a URL that contains the configuration information as to what proxy settings the iPad should use.
-
If you need to specify manual settings, then simply tap on the Manual button and fill in the appropriate fields as shown below.
Screen showing the iPad connected to a wireless network
If your proxy server requires you to login to it before it allows you to use it, make sure you slide Authentication to ON and input your login credentials.
If you have a configuration URL that contains your proxy settings, then simply tap on the Auto button and you will see a screen similar to below.

Screen showing the iPad connected to a wireless network
Simply fill in the URL field with the proxy autoconfiguration URL.
- When you are done setting up your proxy server, tap on the Wi-Fi Networks button and then go back to your Home screen to start using the iPad with these new settings.
Deleting a Wi-Fi connection profile so the iPad wont automatically join it
At times you may find the need to delete a Wi-Fi connection profile that has previously been configured on your iPad. Whether this is because the profile belongs to a hotel that you are no longer staying at or you have changed your wireless password and need to re-enter it, this section will explain how to delete the profile from your iPad.
-
Start the iPad
-
Tap on the Settings app. When the Settings app loads, you will be at the General Settings category.
-
Tap on the Wi-Fi settings category and you will be at a screen as shown below.
Screen showing the iPad connected to a wireless network
You should now tap on the next to the Wi-Fi profile that you wish to delete.
-
You will now be at the Wi-Fi network settings screen for the connected network.
Wireless settings for a Wi-Fi network -
Tap on the Forget this Network button.
- When the iPad asks you to confirm that you wish to forget the network, tap on the Forget button.
Troubleshooting
When working with computers and networking problems invariably happen. This section will offer steps that can be tried to resolve Wi-Fi connectivity issues with your iPad.
What to do if your iPad can't access a visible network:
The first step is to make sure that the wireless connection does not require a password. You can determine this by seeing if there is a lock symbol next to the wireless network name. If there is, then make sure you know the correct password to the network before attempting to join it. If that still does not resolve your issue, try moving closer to the wireless router and seeing if you are able to connect then.What to do if you cannot access a network that is not broadcasting its network name or SSID:
Diagnosing connections to Wi-Fi networks that are not broadcasting their name or SSID can be difficult. The first suggestion, if the wireless router is under your control, is to allow the router to broadcast the name. If you can then connect, then you may have entered the name incorrectly, selected the wrong wireless encryption type, or entered the wrong wireless encryption password. You should then confirm these settings by looking at the configuration of the router, and if necessary, changing those settings to new ones. Then try connecting again.What to do if you cannot access the Internet when connected to a wireless network:
If it shows that you are connected to a network, but you still cannot access the network, you should first make sure that your Internet connection is actually working. Test the connection from another computer and device to confirm that it is working. If it is working, go into the Wi-Fi settings for this particular connection on the iPad and under the DHCP settings, make sure that you have an assigned IP Address, Subnet Mask, Router, and DNS. If you do not have these fields populated, then tap on the Renew Lease button, and then tap on the Renew button when it asks if you with to continue. This will make the iPad request new connection settings. Once that is done, if you now have settings in the DHCP fields, try connecting to the Internet again.How to fix slow iPad Wi-Fi speeds or low quality wireless connections:
If this still does not work, then you may want to confirm that you do not need to enter a static networking configuration into the iPad. To determine this, you should ask the owner or administrator of the wireless router.
Last, but not least, if the iPad shows its connected, but cannot access the internet, it could be because you entered the wrong wireless encryption password or it was changed after you initially created the Wi-Fi profile. To test this, simply Forget the network profile and try recreating it and entering the password again.
Unfortunately there have been a lot of reports that the iPad wireless range and sensitivity is not as good as it could, or should, be. That means that Wi-Fi connections that work fine with other devices or computers may not work as well with the iPad. To determine the quality of your Wi-Fi connection, you can look in the upper left-hand corner of the device. The three quality levels are shown from best to worst asConclusion
, with the lower the level being the worst connection speed.
Unless Apple releases an update, or a software hack is released to increase the power of the antenna, we will need to use other methods to make the Wi-Fi connection quality better. To do this you can first try and use the iPad closer to the wireless router to increase your connection quality. This, though, is a ridiculous thing to have to do considering how much you spent on the iPad. Another option is to purchase a wireless extender that can extend the range of your wireless device so it is strong throughout your entire house or apartment. Popular extenders are the Linksys WRE54G Wireless-G Extender, Belkin Wireless G Universal Range Extender, or the Netgear WGXB102 Range Extender. When you add an extender to your wireless network, it will increase the range of your wireless router so that you can connect to your network in locations that previously you could not.
As you can see there are many Wi-Fi configuration options available to suit your specific needs. By knowing how to connect to a wireless network you can now connect to the Internet from locations such as a public Wi-Fi hotspot, a friends house, or a hotel. No matter what the specific requirement of your location, hopefully the information in this guide has shown you how to work around them.
Thanks & Regards,
"Remember Me When You Raise Your Hand For Dua"
Raheel Ahmed Khan
System Engineer
send2raheel@yahoo.com
send2raheel@engineer.com
sirraheel@gmail.com
send2raheel (skype id)
My Blog Spot
http://raheel-mydreamz.blogspot.com/
http://raheeldreamz.wordpress.com/
My Face book pages
http://www.facebook.com/pages/My-Dreamz-Rebiuld-our-nation
http://www.facebook.com/pages/Beauty-of-islam
http://www.facebook.com/pages/Health-is-wealth


No comments:
Post a Comment