Friday, 19 October 2012

How to Copy, Cut, and Paste in Windows

Introduction
A basic, but important, concept to understand when using a computer is cut, copy and paste. These actions will allow you to easily copy or move data between one application and another or copy and move files and directories from one location to another. Though the procedures in this tutorial are considered to be basic concepts, you would be surprised as to how many people do not understand these essential features. Even more importantly, once you understand these fundamentals you will be able to use this knowledge on almost any computer operating system as long as you know the corresponding keys that are used for these features. For the purpose of this tutorial I will cover how to cut, copy and paste with the Windows operating system. Other operating systems, such as Linux, Unix, and Apple support these concepts as well but will not be discussed in this tutorial.

Introducing the Windows Clipboard

Windows has a feature called the Windows Clipboard. The clipboard gives Windows users the ability to store information in memory and than retrieve that information for later use. The cut, copy and paste functions rely on the clipboard in order to work. The process of placing data into the clipboard is know as copying or cutting. The process of retrieving the data from that clipboard and placing it into another location is called pasting. We will cover the specifics on these actions in more detail later in the tutorial. For now it is important to understand that the clipboard is used to contain the data that you want to paste into another location. If there is no information contained in the clipboard, then you will not be able to paste anything. Any data that is stored in the clipboard via a copy or cut command will stay there until it is overwritten by another copy or cut command. When you paste that data, the data is not removed from the clipboard, and can be pasted over and over as many times as wish. The data in the clipboard will be erased, though, when you shut down or restart your computer.

How to highlight text in a document

Before you can copy, cut, or paste text data you must be able to highlight, or select, the text that you want to perform the action on. This is called highlighting and allows you to select all the information in a document or certain portions of it. Once the text is highlighted you can then copy or cut that information depending on your needs. An example of what highlighted text looks like is below:

 

Figure 1: Example of highlighted text
 
There are four standard methods used to highlight text and they are as follows:
Use your mouse
Using your mouse to select text could not be any easier. Simply find the location you would like to start selecting from and place your mouse cursor there. Then press and hold the left mouse button and drag the cursor to the last area you would like to highlight. You will find that as your are holding the left mouse button and dragging the mouse cursor, the text between where you first pressed the button and where you dragged the cursor to will now be highlighted.

Use the applications edit menu to select all
Windows applications that support copy and paste will usually contain an edit menu. Under this edit menu you will see an option to Select All. When you click on that menu option the entire contents of the file you are working for will be highlighted.

Right click your document
Many programs give you the ability to select all the data in your document, as described above, by right-clicking on the document and then clicking on Select All. the entire contents of the file will now be highlighted.

Use your keyboard
You can use your keyboard to select text by using the arrow keys while holding down the shift key. Place your cursor at the location you would like to start highlighting and then press and hold the shift key while you move your cursor with the keyboards arrow keys. As long as you are holding down the shift key, as you move the cursor with the arrow keys the data that you are moving the cursor over will become highlighted.
 
Pressing Control+A
When you press Control and then the letter A on your keyboard at the same time the program will select all the data in the document similar to how Select All works in the previous methods.
Now that you know how to highlight text, you should practice the the art of highlighting text. You can do this by opening Notepad and typing in a few lines of text. Then practice the different methods of highlighting text. To open Notepad you can double-click its icon found in the Start Menu under the Accessories submenu.
 
How to select files and folders

Just as you can highlight, or select, text you can also highlight files and folders for use with the copy, cut, and paste commands. Selecting files and folders work a little differently then text though. When selecting text you must select the text so that the highlighted text is next to the other highlighted text. Files and folders, on the other hand, can be selected as seen fit and the files do not have to be next to each other. You can see an example of this in the figure below:
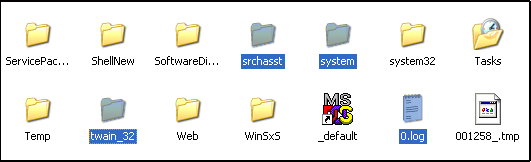
 

Figure 2. Select Files and Folders

As you can see from the image above, files and folder can be selected as needed and do not have to be right next to each other.
To select files or folder you can use the following methods:
Drag your mouse around the desired files or folders
You can select multiple files and folders to work with by dragging the mouse cursor around these files. Simply left click in an empty space next to a folder, and while keeping your left mouse button pressed, drag your mouse to create a square or rectangle around those files or folder you want to select. As you drag the mouse, those items contained in the box will become selected. When you are done, release the left mouse button.

Use the applications edit menu to select all
Windows applications that support copy and paste will usually contain an edit menu. Under this edit menu you will see an option to Select All. When you click on that menu option all the files in the folder you are looking at will become selected.

Use the Shift key
The shift key is used to automatically select all the items between one selected item and another. Click once on a file or folder to select it. Then press and hold the shift key, and click again on another item. You will now see that all items between the first selected one and the next selected one will be highlighted.
Use the Control
The control key is used to choose individual items to be selected at the same time. Simply hold down the control key and, with that key held down, use your mouse to left click on other items to select . As long as the control is kept pressed down, you can choose as many individual items you would like to select at the same time.
To test this, open your My Documents folder and practicing selecting files and folders.
 
Copying text

What if you were working on a word processing document and you need to take text that is located in another document and add it to the current document. You could manually type the information found in the original document into the new document but that could take quite a long time. Luckily for us, operating systems give us the ability to copy text from one document to another document called Copy. When you copy highlighted data, this data is stored in the clipboard until you are ready to paste that data into another program
To copy something you must first highlight the text that you would like to copy using one of the methods described above. When when you have the text highlighted that you would like to copy, you can copy it to the clipboard in one of three ways:
  • When the text is highlighted you can press the Control button and the C button at the same to copy the data.
  • Right-clicking on the highlighted text or files and then clicking on Copy.
  • If there is an Edit menu you can click on Edit and then click on Copy.
Once you use one of these methods a duplicate of the highlighted text will be placed in the clipboard allowing you to paste it in another document or application.
Cutting text

Cutting is very similar to copy in that they both place the highlighted item into the clipboard for future pasting. The difference is that you when you Cut the highlighted text, it will remove, or cut, the highlighted text from the original location and place it into clipboard. It is therefore important to be careful when using this command as it is possible to lose data if you mistakenly cut the data from the document and then save the file.
To cut text you must first highlight the text or data that you would like to cut using one of the methods described above. When when you have the text highlighted that you would like to cut, you can cut it to the clipboard in one of three ways:
  • When the text is highlighted you can press the Control button and the X button at the same to cut the data.
  • Right-clicking on the highlighted text and then clicking on Cut.
  • If there is an Edit menu you can click on Edit and then click on Cut.
Once you use one of these methods a copy of the highlighted text will be placed in the clipboard and the highlighted data will be removed from the document. It is important to note that the text will only be removed from a document if that document is editable. For example, you can not cut text from a document set to read-only or a web page because it is not editable.
 
Pasting text

Now that you know how to Copy and Cut data from a document and have it placed in the clipboard, you need to learn how to retrieve that data and place it in your document. Once data has been copied or cut from a document, you can then paste it into another document, or the same document, by retrieving that information from the clipboard using the Paste command.
Simply move your cursor to the location where you would like the data to be pasted into your document and then choose one of the methods for pasting the data.
  • When the cursor is at the location where you would like the data to be pasted press the Control button and the V button at the same to paste the data.
  • Right-clicking on the document and clicking on Paste.
  • If there is an Edit menu you can click on Edit and then click on Paste.
After you use one of the above commands the data contained in the clip board will now be pasted into the document.

Cut, Copy and Paste with Files and Folders

It is also possible to use the same key combinations and commands on files and folder. Simply select a file(s) or folder(s) and cut or copy it. Then you can select another location to paste it to. If you paste a copied file or folder in the same location that the original resides in, Windows will automatically append Copy of in front of the file name. For example if I copy and paste the file test.txt to the same directory the original is in, it will paste the file as a new file called Copy of test.txt.
When cutting files and folders, a duplicate of the file or folder will placed where you paste it to and the original will be deleted. Do not worry, though, as the original document you cut will not be deleted until a valid copy is pasted elsewhere.

Conclusion

Now that you know how to cut, copy and paste text and files from one location to another you have a powerful tool at your disposal. Now you can quickly take information from another document and paste it into a document of your choice. You also have the ability to cut or copy files from one location and place them into another location.

Thanks & Regards,

"Remember Me When You Raise Your Hand For Dua"
Raheel Ahmed Khan
System Engineer
send2raheel@yahoo.com
send2raheel@engineer.com
sirraheel@gmail.com
send2raheel (skype id)

My Blog Spot
http://raheel-mydreamz.blogspot.com/
http://raheeldreamz.wordpress.com/

My Face book pages
http://www.facebook.com/pages/My-Dreamz-Rebiuld-our-nation
http://www.facebook.com/pages/Beauty-of-islam
http://www.facebook.com/pages/Health-is-wealth

Wednesday, 17 October 2012

An Introduction to your Computer

Introduction
Almost everyone uses a computer daily, but many don't know how a computer works or all the different individual pieces that make it up. In fact, many people erroneously look at a computer and call it a CPU or a hard drive, when in fact these are just two parts of a computer. When these individual components are connected together they create a complete and working device with an all encompassing name of computer. As a computer user it is important that you have a basic understanding of the core components that make up your computer.  This knowledge will prove invaluable if you decide to upgrade your computer or if a piece of hardware breaks and you need to purchase a replacement.  The purpose of this tutorial is to discuss the basic pieces in every computer and their function.

The Outside of your Computer
 
When you look at your computer what you are seeing is actually the computer case. Inside the case are all of the individual components that when connected together create your computer. On the outside of the case you will see various external ports that you can plug devices into as well as the ability to access your optical devices such as your CD and DVD drives.
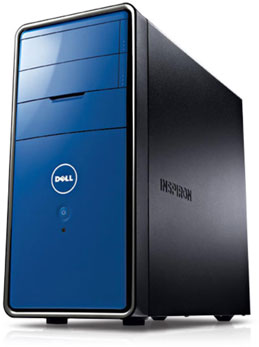
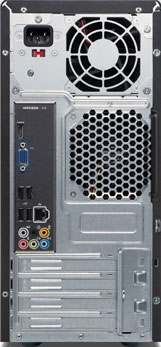
Front of a computer case Back of a computer case
Front of a Dell Inspiron Desktop Back of a Dell Inspiron Desktop
Figure 1. Front and Back of a Computer Case
On the front of the computer you will commonly find a CD or DVD drive that can be opened by pressing a small button near the door of the drive. This will eject the drive tray where you can place a CD or DVD disk. When you press the button again, the tray will slide back into your computer so that you can access it from within your operating system.
On the front of the case, you will also typically find USB ports and media readers. A USB port is a small opening on the front of your computer that allows you to plug a USB device or cable into it. You can usually determine if a port on your computer is USB as it will have the USB Logo logo next to it. Common devices that you would plug into USB ports are iPod and iPads, flash drives, and external hard drives. The other common ports that you can find are for camera memory media. These media readers allow you to remove the memory card from your camera and insert it into the computer so you can access the images stored on it.
On the back of the case are connectors that are typically only used when you assemble your computer for the first time. These connectors allow you to connect external devices such as your printer, monitor, mouse, keyboard, and speakers. The back connections will also include an Ethernet port that will allow you to connect your computer to your network. Last, but not least, there will also be more USB ports available in the event that you need more USB connections than are available on the front of your computer.

The Inside of your Computer
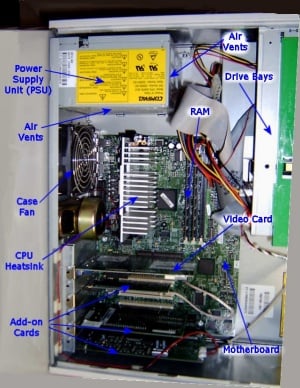
Now that you know how to connect your various external components to your computer case, let's take a look at the inside of a computer as this is where the magic really happens. To open your case, you will need to typically unscrew a side panel or press a button on the bottom of the computer to open the computer like a clamshell. Once you can see inside a computer, you will see various individual components connected via cables or plugged directly into a large board attached to the side of the case. This board is the motherboard and is used to connect all the individual devices inside your case into a single computer. These individual devices and the motherboard they plug into can be seen in the image below.
 
Inside of a computer
Figure 2. Inside of a computer
 
As you can see from the image above, there are various components all connected to each other. Every device must be connected to the power supply unit, which provides electricity to various components. The add-on cards, each performing their own function, are inserted to the motherboard so that they can communicate with it. When all of these components are properly connected to each other, they can then communicate with each other and the computer will operate properly. In the next section we will discuss each individual component and what function they serve.

The individual parts of your computer
As already stated, a computer is nothing more than various individual hardware components connected to each through cables and the motherboard. These devices are then given electricity by the power supply unit so that they can function. In this section we will discuss the individual components and the function that each performs.

Computer Case
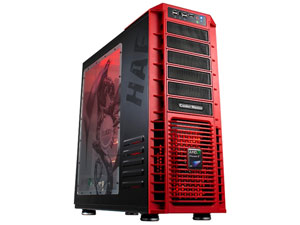
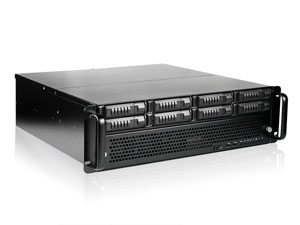
The computer case, also called a chassis, houses and protects other core parts of the computer.  Computer cases come in different sizes and shapes in order to accommodate the various environments that they will be stored in. These shapes are:
  • Tower - A tower case is vertical and usually sits on the floor. A tower case comes in a mini, mid, and full size, with the larger sizes being able to hold more components.
  • Desktop - A horizontal case that is designed to rest on a shelf or sit on your desk with the monitor on top of it.
  • Rackmount - Rackmount cases are horizontal and are typically used for servers. These servers will then mount in a rack so that there are stacks of computers in one computer rack.
Full Tower Case Rackmount Server Chassis
HAF 932 AMD Limited Edition Full Tower Case iStarUSA E3M8 Rackmount Case
Figure 3. Computer Cases
Computer cases also need to support the largest component that resides inside it, which is typically the motherboard. The motherboard can come in many different shapes and sizes, called form factors, and the specifications on a computer case will state which form factors can fit inside it.
Virtually all modern cases have:
  • Power switch
  • Indicator lights such as disk activity or network activity.
  • Back panel that contains holes to expose external ports.
  • Metal framework to house the PSU and hard disk/optical drives
  • Mounting points to secure the motherboard
  • Vented panels to allow airflow through the case
Depending on the model, some cases have other features as well such as headphone jacks or USB ports.


Motherboard
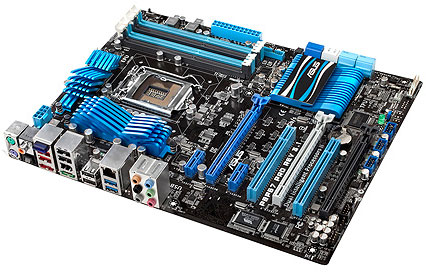
The motherboard, or mobo for short, is perhaps the most critical piece of the computer.  It is a relatively large, rectangular board filled with various circuits, chips , and slots that you plug things into The motherboard serves two functions.  First, the motherboard is home to a number of chips that dictate how the various components of the computer will talk to each other. It also has special slots that allow you to plug expansion cards in that add new or improved functionality to your computer.  Secondly, and perhaps most importantly, the motherboard is the connecting point for all of the other pieces of the computer.  Without the motherboard, the different parts cannot communicate with each other, and the computer cannot function.
Asus P8P67 PRO Motherboard
Figure 4. Computer Motherboard
Motherboards come in a variety of sizes, or form factors, such as ATX or microATX.  Generally speaking, the larger the form factor the more devices can be attached to it.  Motherboards connect with the other devices in your computer using a set of special slots and connectors called ports that are located on the top and back edge of the motherboard.  The ports on the back edge of the motherboard protrude out of the back panel of the computer case and allow you to connect external devices to the computer.  Virtually all modern motherboards have one or more USB ports and an Ethernet port mounted externally to allow connection to the internet and external devices.  Additionally, all modern motherboards contain at least one IDE or SATA port to allow the connection of a hard drive.
Central Processing Unit
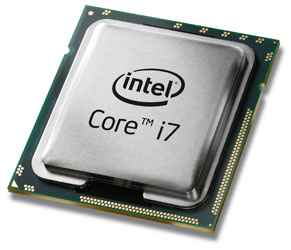
The central processing unit, or CPU, is at the core of every computer.  Functioning as the "brain" of the computer, the CPU performs basic mathematical and logical functions as instructed by a computer program.  The CPU is located on the motherboard and is connected to it through a special port called the CPU socket. When the CPU is in use it generates heats, which must be transferred away from CPU chip so that it is not damaged. This is accomplished through the use of a heat-sink and fan which draws the heat out of the CPU chip and transfers it into the case instead.
Intel Processor
Figure 5. A computer's CPU or Processor
A CPU has a maximum speed at which it can safely process instructions.  This speed is called the clock rate and is measured in hertz (Hz).  Some CPUs will allow a user to raise the clock rate beyond the speed at which the CPU is safely rated.  This is called overclocking, and can provide increased computer performance at the cost of  potential system instability or damage.  Due to the complexity of overclocking and the potentially destructive side effects it can cause, overclocking is a technique not recommended for average or professional computer users.
A relatively recent development in the field of CPUs is the multi-core processor.  Having many processing cores in the CPU effectively multiplies its potential by allowing the CPU to simultaneously process as many instructions as it has cores.  However, the OS must be designed to make use of multiple cores for this ability to take effect.  The CPU of a modern PC will likely have anywhere from two to eight cores


Power Supply Unit
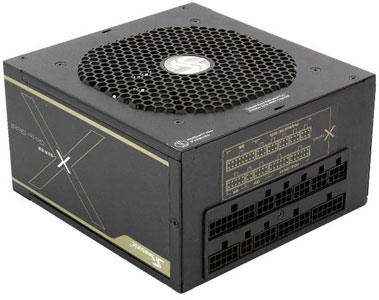
All parts of a computer require electricity in order to operate.  The part of the computer that provides this electricity is called the power supply unit, or PSU.  The PSU receives electricity from an external source, which is usually a wall outlet, and changes it into power that the other parts of the computer can use. 
Seasonic Power Supply
Figure 6. Power Supply
A PSU is necessary for two reasons.  First, computers require direct current, or DC, power.  However, electricity is supplied by power companies in alternating current, or AC, form.  The PSU takes the AC electricity and converts it into a DC form so that the computer can use it.  The second reason is that computer components use electrical power of relatively low voltage, while the electricity that comes out of a wall socket is of a significantly higher voltage.  The PSU converts the higher voltage energy into a low voltage form that the computer can properly use.
Power supplies are classified by the maximum amount of watts, such as 500 or 650 watts, which can be supplied to your computer system.  The amount of electricity that is required to power a computer depends on what components the computer is using.  For example, if you are using a high-end processor and a high-end video card your power you may need a more powerful PSU to support these power hungry devices. Therefore, when buying new components for a computer you should always look at the specifications for these devices to determine how much power they need and whether or not your PSU can support it.

Hard Disk Drive
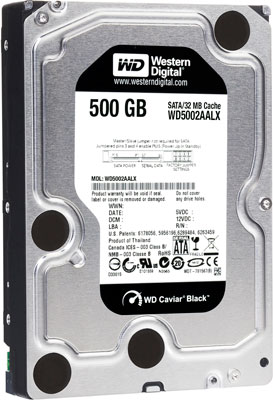
The hard disk drive, or HDD, is the primary source of secondary storage in modern computers.  Secondary storage is any device where information is stored when it is not needed for immediate use.  An HDD uses magnetism to record information on a rotating disk of magnetic material.  It uses a moveable arm containing a device called a drive head to read from and write to different portions of the disk..  Since the disk remains magnetized even after power is removed, information is not lost when you turn off the computer.  One downside of HDDs is that they are very slow compared to other devices in the computer.  This is because the drive must position the arm and disk in the correct position in order to retrieve a particular piece of information. 
Western Digital Hard Drive
Figure 7. Hard Disk Drive
Modern HDDs have three major variables.  The first is the drive capacity.  This is how much information the drive can hold.  Drive capacity is measured in either gigabytes (GB) or terabytes (TB).  One terabyte is equal to one thousand gigabytes.  The second variable is the rotation speed.  This is how quickly the disk inside the HDD can rotate, and is measured in rotations per minute (RPM).  The faster the disk spins, the more quickly information can be retrieved from it.  The final variable is the type of interface the HDD uses.  The interface is the part of the HDD that connects to the motherboard and is how the HDD sends and receives information.  Most modern HDDs use SATA or SAS interfaces, although HDDs using IDE interfaces are still somewhat common.  It is important to know which interfaces your motherboard supports when purchasing a new HDD.
A recent addition to the personal computer market is a technology called a solid state drive, or SSD.  While not technically an HDD, SSD's fill the same functions.  The difference between HDDs and SSDs is that while an HDD uses a spinning disk to store data, an SSD uses special microchips.  Due to this, SSD's are less susceptible to physical shocks such as impacts and falls compared to a HDD.  Additionally, SSDs run silently and can access data more quickly.  However, SSDs have a higher cost per gigabyte than their HDD cousins do.

Optical Disk Drives
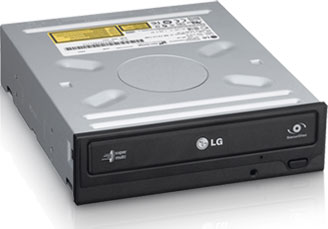
An optical disk drive is a component that uses a laser to read from or write to an optical disk.  Examples of optical disks include CDs, DVDs, and Blu-Rays.  An optical disk drive writes to a disk by using a laser to etch tiny grooves into the surface of the disk.  The disk is read by using a different, low-power laser to detect those grooves.  Modern optical disk drives usually have reading and writing (burning) capability.  Additionally, most optical drives are backwards compatible, which means that a new technology can read the media from an older technology. For example, a Blu-Ray drive can also play DVDs and CDs.
Optical Drive
Figure 8. Optical Drive
Optical disk drive speed is measured differently than HDD speed.  While HDD speed is measured in the number of RPMs, optical drive speed is measured by the maximum rate at which data can be read from the disk.  For each technology (CD, DVD, Blu-Ray) there is an industry-wide standard data rate that serves as a benchmark by which drive speeds are measured.  The speed listed is put in terms of multiples of that base speed.  For example, the base speed for Blu-Ray technology is 6.74 megabytes per second.  Therefore, a drive rated at 52x can read data at a maximum rate of 52 x 6.74 = 350.48 megabytes per second.

Cooling Devices
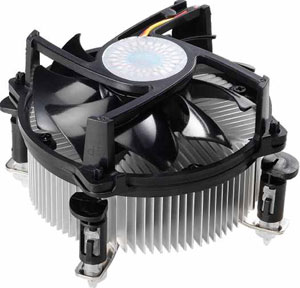
As a computer runs, it generates a lot of heat.  One or more cooling devices are part of any modern computer in order to keep the machine from overheating.  The two types of cooling devices that are in almost every modern computer are heat sinks and cooling fans.  Heat sinks are small metal structures that conduct heat well.  They function by absorbing the heat produced by a component and efficiently releasing it into the air, or a liquid in certain special situations, similarly to how the radiator in your car works.  Cooling fans work by removing warm air from components or heat sinks and pulling in cool air to replace it.  Fans are available in a variety of sizes that determine how much air they can move within your case.  When adding a fan, it is important to ensure that you purchase a fan that is compatible with your motherboard, since different fans have different kinds of power connectors.
CPU Heat Sink and Fan
Figure 9. CPU Heat Sink and Fan
Some extremely high-end PCs have liquid cooling systems which use tubes of flowing water or coolant instead of or in addition to cooling fans.  These systems are more effective, quieter, and more efficient than air cooling systems.  However, they are complex, expensive, and carry the danger of a coolant leak which can damage the system.  For a typical PC, air cooling systems are sufficiently effective.
Memory
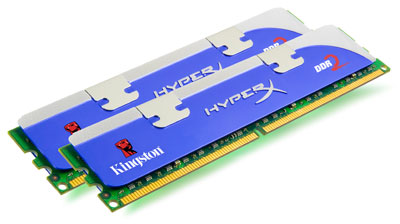
Random Access Memory, or RAM, is the part of the computer where information is stored while it is being used by the computer's processor, operating system, programs, and other devices on your computer.  RAM is designed so that any of the information stored on it can be read in any order without losing performance.  This makes RAM faster and more efficient to store data compared to slower devices such as an HDD or CD-ROM. 
Memory
Figure 10. Computer Memory
When you are using your computer it copies information that it is currently using, such as parts of the operating system or currently running programs, into RAM so that it can work faster.  The more RAM that the computer has, the less often it needs to get information off of the much slower HDD.  To use a comparison, think of your HDD as a well.  The information on the HDD is the water in the well, and the RAM is a bucket.  The bigger your bucket, the fewer trips you have to make to the well to get the water you need.
One characteristic of RAM is that it is volatile.  This means that when you turn off the computer, any information in the RAM is erased.  To protect against loss of information, an operating system will copy any data that it needs to the HDD so that it is available the next time you start the computer.
RAM comes in different speeds and types.  When you upgrade your computer's memory, it is important that you ensure that you choose a speed and type of RAM that is compatible with a computer's motherboard.  A great tool for finding out what kind of memory your computer uses is Crucial's Memory Advisor. 
Expansion Cards
An expansion card is a device that is inserted into special slots on the motherboard and provides the computer with additional functions, resources, or features.  There are a number of different kinds of expansion cards available; two of the most common being video cards, which provide increased graphics processing ability, and sound cards, which enhance the audio ability of the computer.  Some expansion cards such as video cards also include their own processor, memory, and even cooling devices such as fans or heat sinks.
When purchasing expansion cards there are a number of important factors to consider.  First and foremost is the type of connection that the expansion card requires.  There are a number of different standards for expansion slots, and motherboards have only a limited number of each kind of slot.  Before purchasing you need to ensure that your motherboard has the required slots available for use.  Another important factor is the size of the expansion card.  The card needs to be able to fit inside your computer case, and should not make contact with any other parts of the computer except for the motherboard.  Finally, you should ensure that your PSU can output enough power to support all your connected expansion cards.  If the PSU cannot supply the computer with enough electricity then one or more of your devices will fail to function.
Two common types of expansion cards are sound and video graphic cards, which are described below.
Sound Cards
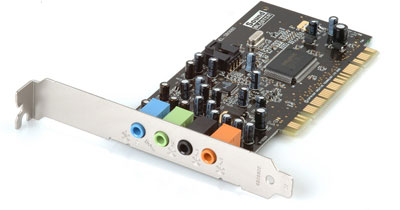
Sound cards are a kind of expansion card which deals with audio input and output. Sound cards generally fill two functions. First, sound cards enhance the sound processing capability of the computer, allowing for the creation and output of more complex sounds. Secondly, sound cards often possess input and output ports that allow for other audio devices such as microphones or speakers to be connected to it.
Sound Card
Figure 11. Sound Card
Video Cards
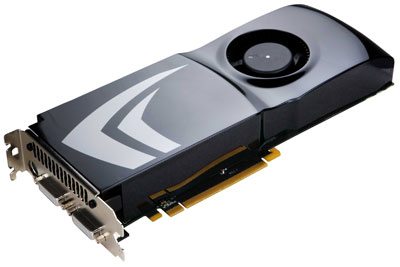
A video card is a type of expansion card which increases the computer's ability to handle different kinds of visual output. Video cards have two main functions. First, while nearly all modern motherboards have some basic graphics capabilities built in, a video card can handle graphics issues much more effectively than the graphic chips built into the motherboard.
As a result, a video card allows for the creation and display of more complex and detailed images without putting an additional strain on the CPU. Additionally, since many video cards have their own memory, this leaves more of the general computer memory available for other purposes. Second, many video cards add additional functions to the computer such as video capture, a TV-tuner which allows you to watch TV on your computer, or the ability to connect multiple monitors to the computer.
 
Video Card
Figure 12. Video Graphics Card

External Ports
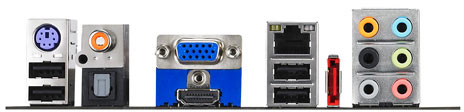
As mentioned above in the motherboard section, a number of connectors on the motherboard are accessible from the back panel of the computer case.  These connections are called external ports because they can be accessed from outside the computer case.  There are a number of different kinds of connections available that include:
  • VGA or DVI Connector- These ports are used for connecting a monitor or other display device to your computer.
  • Ethernet Port - This port allows you to connect your computer to a network or the Internet.
  • HDMI - Allows you to connect your computer a High Definition display or TV.
  • eSATA - These ports allow you to connect an external SATA hard drive to your computer.
  • USB Port - A common connector for external devices. More information about USB ports can be found below.
External Ports of a Motherboard
Figure 13. External Ports on the back of a computer
Virtually every modern PC also includes one or more USB, or Universal Serial Bus, ports.  There are two primary kinds of USB ports in use right now: USB 2.0 and USB 3.0.  USB 3.0 ports can move data much more quickly than USB 2.0 ports.  However, the connected device must be designed to take advantage of USB 3.0 technology in order to use the increased speed. 
USB ports and devices are both backwards and forwards compatible.  This means that you can plug any standard USB device into any standard USB port, and the device will function.  However, if the USB version of the device and the port do not match then the device can only transfer data to and from the PC at a maximum rate set by the lower of the two versions.  For example, if you connect a USB 3.0 device to a USB 2.0 port, the device will only transfer data at a maximum rate of 60 megabytes per second, which is the maximum rate for USB 2.0 technology.
When purchasing an external device such as a monitor, keyboard, mouse, or printer it is important to ensure that you have the correct kind of port available for use.  Otherwise you will be unable to use the device.

Conclusion
As you can see, a computer is more than that box sitting on the side of your desk. In fact it is a very complex machine comprised of numerous parts, cables, and devices that all need to properly work together in order for the computer to operate correctly. Having this basic understanding of the parts of your computer is important for any computer user. Whether you need to purchase a new one, upgrade an existing one, or repair a broken one, you now have the knowledge to understand what you are looking at.


Thanks & Regards,

"Remember Me When You Raise Your Hand For Dua"
Raheel Ahmed Khan
System Engineer
send2raheel@yahoo.com
send2raheel@engineer.com
sirraheel@gmail.com
send2raheel (skype id)

My Blog Spot
http://raheel-mydreamz.blogspot.com/
http://raheeldreamz.wordpress.com/

My Face book pages
http://www.facebook.com/pages/My-Dreamz-Rebiuld-our-nation
http://www.facebook.com/pages/Beauty-of-islam
http://www.facebook.com/pages/Health-is-wealth
How Hard Drives work

What is a Hard Drive
Almost all desktop computers have a hard drive inside them, but do you really know what they are? Many people when they hear the word hard drive, think that it refers to the computer as a whole. In reality, though, the hard drive is just one of many different pieces that comprise a computer. The hard drive is one of the most important parts of your computer because it is used as a long-term storage space for your data. What that means, is regardless of whether or not the computer is on, or you lose power, the data will still stay stored on this drive keeping it safe. On the other hand, it tells you how important backing up your data is, because if the hard drive malfunctions there is a good chance you will lose it all.
A hard drive is an integral piece of equipment for your computer as your operating system and all your data are typically stored there. In the majority of the situations, if you did not have a working hard drive, or the hard drive malfunctions, you would not be able to boot your computer into the operating system and would get an error. If you opened your computer case and wanted to find your hard drive, it would look similar to the image below:

Image of a Hard Drive
 
How hard drives work
If you were to open your hard drive, which would immediately void your warranty and potentially damage it, you would see something like the image below:
 

Inside a Hard Drive
 
A hard drive consists of the following:
  • Magnetic platters - Platters are the round plates in the image above. Each platter holds a certain amount of information, so a drive with a lot of storage will have more platters than one with less storage. When information is stored and retrieved from the platters it is done so in concentric circles, called tracks, which are further broken down into segments called sectors.
  • Arm - The arm is the piece sticking out over the platters. The arms will contain read and write heads which are used to read and store the magnetic information onto the platters. Each platter will have its own arm which is used to read and write data off of it.
  • Motor - The motor is used to spin the platters from 4,500 to 15,000 rotations per minute (RPM). The faster the RPM of a drive, the better performance you will achieve from it.
When a the computer wants to retrieve data off of the hard drive, the motor will spin up the platters and the arm will move itself to the appropriate position above the platter where the data is stored. The heads on the arm will detect the magnetic bits on the platters and convert them into the appropriate data that can be used by the computer. Conversely, when data is sent to the drive, the heads will this time, send magnetic pulses at the platters changing the magnetic properties of the platter, and thus storing your information.
It is important to note, that since the data stored on your hard drive is magnetic, it is not a good idea to play with a magnet near your hard drive :)

Hard Drive Interfaces
A hard drive connects to your computer through a specific type of interface. The interface on your hard drive must match the corresponding interface on your motherboard. If you purchase a new hard drive that has a interface that your motherboard does not support, it will not work in your computer. Currently there are three interfaces that have become the standard for connecting your hard to your computer. Some information about each of these interfaces are below.
  • IDE or ATA - This is currently the most common interface used but is quickly becoming overcome by the newer SATA interface. Hard drives using this type of interface have speeds up to 100 Mbps.
  • SATA - A newer interface that uses less bulky cables and has speeds starting at 150 Mbps for SATA and 300 Mbps for SATA II. Almost all computer manufacturers have started using SATA drives.
  • SCSI - This type of interface is typically used in a business environment for servers. Hard Drives designed for a SCSI interface tend to have a faster RPM which therefore provides better performance.
When buying a hard drive
When purchasing a hard drive there are some characteristics you want to keep in mind that will help you determine the right drive for your needs. These characteristics are:
  • Seek Time - The amount of time required to move a drive's read/write head to a particular location on the disk. The lower the number, the better.
  • Access time - The actual amount of time from when a data is requested from a drive and delivered. The lower the number, the better.
  • RPMS - How fast the platters spin. The higher the number, the faster the drive will be.
  • Capacity - The amount of storage space available on the drive. Typically most drives purchased today will be 80 Gigabytes or greater. An 80 GB hard drive will on average cost around 60 USD.
  • Interface - How the hard drive connects to your computer. Make sure that the hard drive's interface is supported on your computer before you purchase it.


Thanks & Regards,

"Remember Me When You Raise Your Hand For Dua"
Raheel Ahmed Khan
System Engineer
send2raheel@yahoo.com
send2raheel@engineer.com
sirraheel@gmail.com
send2raheel (skype id)

My Blog Spot
http://raheel-mydreamz.blogspot.com/
http://raheeldreamz.wordpress.com/

My Face book pages
http://www.facebook.com/pages/My-Dreamz-Rebiuld-our-nation
http://www.facebook.com/pages/Beauty-of-islam
http://www.facebook.com/pages/Health-is-wealth

Sunday, 14 October 2012

How to use the Windows 7 System Recovery Environment Command Prompt

The Windows 7 System Recovery Command Prompt is a text-based console that allow you to perform maintenance and recovery tasks on your computer by typing the commands that you would like to execute. These commands allow you to perform a wide variety of tasks such as replace infected files, delete infections, repair boot up configurations for your hard drive, resize hard drive partitions, as well as many other tasks. Like the Windows Vista Recovery Command Prompt, the Windows 7 version also allows you to run graphical programs such as Notepad, Regedit, and possibly some anti-malware programs. This is a huge advantage as you now have a much larger variety of tools at your disposal to repair your computer.
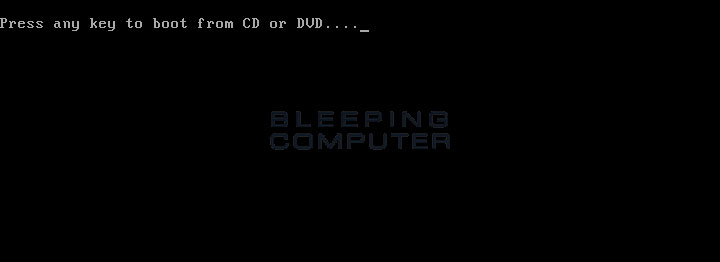
In order to access the Windows 7 System Recovery Command Prompt you first need to boot your computer off of the Windows 7 DVD by inserting it into your DVD player and turning your computer on. Your computer will start and you should see the BIOS listing the hardware on your computer as well as other information. When that information has been cleared, your computer will see that a bootable DVD is inserted and present a prompt similar to Figure 1 below. If your computer does not boot off of the DVD, and instead boots directly into Windows 7, then you can read this guide on how to configure your bios to boot from a CD or DVD.

Figure 1. Boot the computer from the Windows 7 DVD

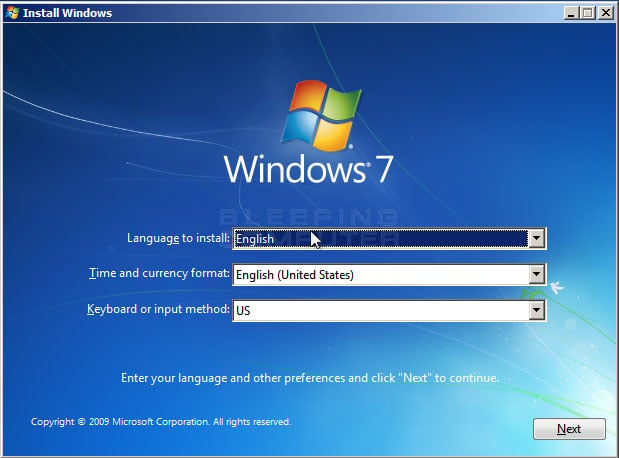
As you want to boot the computer from the Windows 7 DVD, you need to press a key on your keyboard, and any key will do, when you see the above prompt. It is possible that the DVD that came with your computer does not allow you to boot off from it. If this is the case, then your computer manufacturer most likely installed the Windows Recovery Environment directly on to a small partition on your hard drive. To access this partition, you would slowly tap the F8 key on your keyboard after the BIOS information clears from your screen until you see the Windows startup menu. From this menu use your arrow keys to select the option for the Windows System Recovery and press the Enter key on your keyboard. You should now see a black screen with a white status bar at the bottom stating Windows is loading files.... After a while, the status bar will turn completely white and you will see a screen stating that Windows is loading. The Windows 7 Setup environment will continue to load and when finished you will be presented with a screen similar to Figure 2.

Figure 2. Configure language and location options in Windows 7 Setup

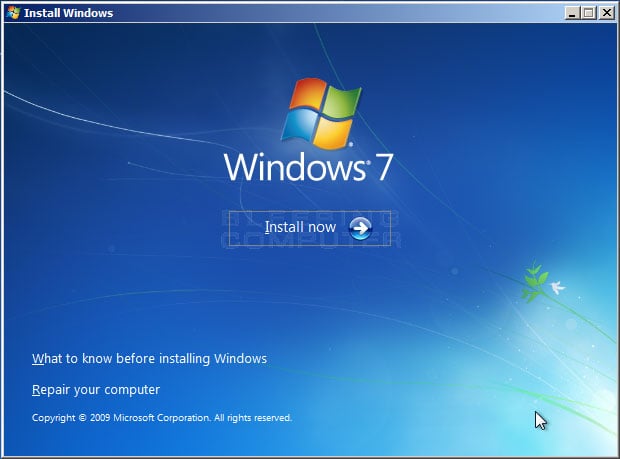
At this screen you should configure the Language to install, Time and currency format, and Keyboard or input method options so that they are set correctly for your location and language. When done, please press the Next button. You will now be at the main Windows 7 setup screen where you would normally install Windows 7 on to your computer.

Figure 3. Windows 7 Install Windows screen

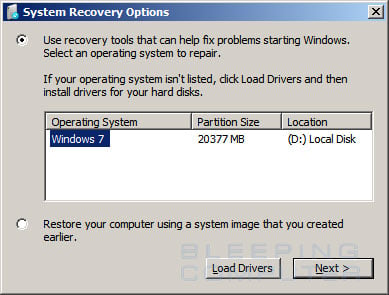
You should now click on the Repair your computer option, which will bring you to a new screen where the repair process will look for all Windows 7 installations on your computer. When done you will be presented with the System Recovery Options dialog box as shown in Figure 4 below.

Figure 4. System Recovery Options

Select the Windows 7 installation you would like to repair. If there are drivers that you need to load in order for Windows 7 to recognize your hard drives, click on the Load Drivers button and load the files that are needed. When ready, press the Next button to continue.
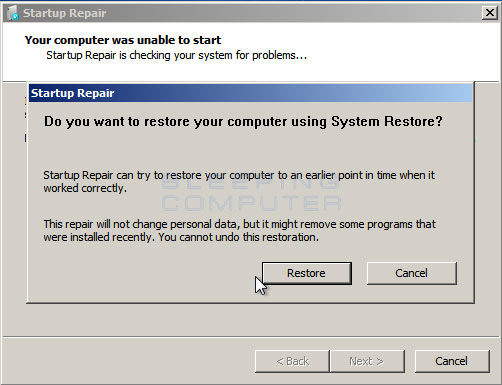
The automatic Startup Repair screen will now start and attempt to fix any issues that it detects that could cause your computer to not boot properly. This process may take some time, so please be patient while it runs. At one point, if it does not find anything, it will prompt you to perform a System Restore as shown in the image below.
Figure 5. System Restore Prompt

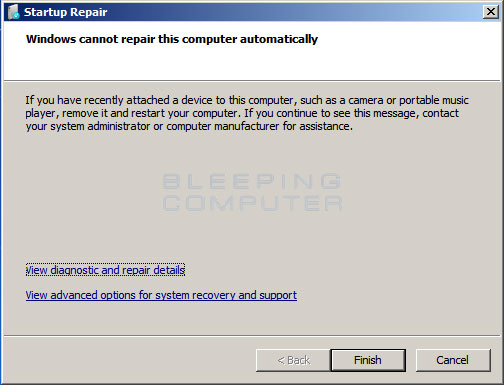
At this prompt press the Cancel button to continue with the automatic Startup Repair process. When the repair process has finished it will state that it cannot fix the problem and ask if you would like to submit the information to Microsoft as shown below. You should press the Don't Send button, which will then cause a screen to be shown stating that Startup Repair could not fix the problems automatically.

Figure 6. Startup Repair has finished
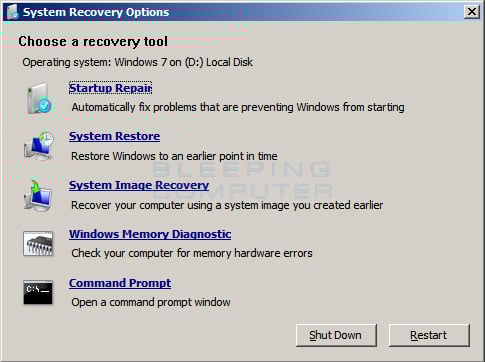
At this screen click on the menu item labeled View advanced options for system recovery and support. This will bring you to a screen, as shown below, where you can see a list of recovery options that are available.

Figure 7. Choose a recovery tool

At this screen you should click on the Command Prompt option. Once you click on that option, the Command Prompt will open as shown in Figure 8 below.

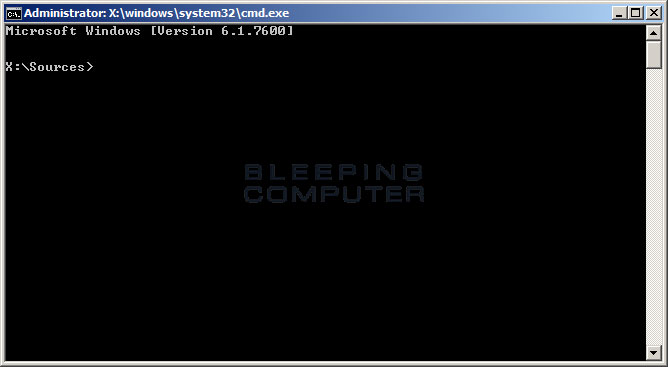
Figure 8. Command Prompt in the Windows Recovery Environment
If you are unfamiliar with the Windows 7 Command Prompt, the first thing you may notice is that there is no graphical user interface, but instead there is a prompt where you will need to type in all of your commands. Though this may appear daunting, once you learn the commands to type in, you will find that the command prompt is a powerful tool for accessing files, repairing Windows, or removing malware. If you would like to learn more about the command prompt and the various commands that you can use, then please read the Introduction to the Windows Command Prompt tutorial.
It should be noted that when you boot into the Windows 7 Recovery Environment the drive letter for your Windows installation may not be the same. For example, if your Windows installation is normall on the C: drive, it may not be located at the D: drive. To determine what drive letter your Windows installation is located on, you can type this command press enter:
bcdedit | find "osdevice"
This command will display output similar to : os device partition=D:. The drive letter after partition= is the drive that your Windows installation is located. To change to that drive letter you can then type D:, or whatever other drive letter it shows, and press Enter on your keyboard.
Using the command prompt is quite simple. Simply type in the command you wish to perform and then press Enter on your keyboard. If you have entered the command properly then it will be executed and the output from the command will be displayed directly within the command prompt. A powerful feature of the System Recovery Console Command Prompt is that not only can you run run console programs, but you can also run certain Windows programs such as Notepad or an antivirus program. Unfortunately, not all Windows programs will be able to run in this environment, so you will need to test them to determine which ones will operate correctly.
To help get you started with using the Command Prompt I have listed a series of console commands that work in this environment. To get help information for each of these programs you can type the program name followed by /h and press the enter key. For example, to see the help information for the copy command you would type copy /h and then press the enter key. As more programs and commands are found they will be added to the lists below. Each of the console commands must be typed into the console in order to execute them.
Console Command
Description
attrib Change permissions on files.
Bootrec You can use the Bootrec.exe tool in the Windows Recovery Environment (Windows RE) to troubleshoot and repair the master boot record (MBR), boot sector,and Boot Configuration Data (BCD) store
bcdedit Displays and allows you to change how Windows boots up. This command is useful for people who are having trouble with the Windows Boot Manager
cd Changes the current directory
chkdsk Checks a hard disk for errors and attempts to repair them.
copy Copy a file from one location to another.
del Deletes a file
dir Lists the files and folders in the current directory
diskpart Load the Windows disk management program. From this program you can create, delete, shrink, and expand your existing partitions as well as get information about partitions and hard drives
icacls Change file and folder permissions and display or modify access control lists (ACLs)
mkdir Creates a new folder
more Displays the content of a file one page at a time
move Moves a file or a folder
reg Perform Windows Registry operations.
ren Rename a file or folder
rd Remove an empty folder
type Display the contents of a file
xcopy Copy a folder or files to another location
Windows Program Name
Description/Notes
Notepad.exe Opens up the Windows Notepad so you can view and edit text files. You can also use the file browser when click the File -> Open menus to copy, move, rename, and delete files.
Regedit.exe The Windows Registry Editor.
rstrui.exe The System Restore console where you can restore your computer back to earlier restore points.
When you are finished using the Command Prompt you can exit it by typing exit and then pressing the Enter key on your keyboard. The command prompt will close and you will now be back at the list of available repair tools, where you can reboot your computer.
The Windows 7 System Recovery Command Prompt is such a powerful tool because you can perform actions on your files and data without having to be in Windows. This means that if you are infected with malware you can use the recovery environment to clean your computer of rootkits or malware without fear of them hindering your efforts as they will not be started.
An advanced feature of the Windows 7 Recovery Command Prompt is that you can load your Windows Registry hives and then access them using Regedit. That way if you or a program has changed a setting in your Registry that does not allow you to boot up, you can fix it using the command prompt. An example of this would be when an antivirus program incorrectly fixes the Userinit key and thus you are no longer able to login to Windows. To fix this you would start the Windows Recovery Environment Command Prompt and load the hives, fix the changes, and unload them again.
This can be done using the following commands:
Type REG LOAD HKLM\TempSoft :\Windows\System32\config\software and press Enter to load the Registry hive.
Type regedit.exe and press Enter to start the Windows Registry Editor.
Browse to HKEY_LOCAL_MACHINE\TempSoft\Microsoft\Windows NT\CurrentVersion\Winlogon key within the Registry Editor.
Double-click on the Userinit value and change the data to read :\Windows\system32\userinit.exe,
Exit the Windows Registry Editor.
Type REG UNLOAD HKLM\TempSoft and press Enter to unload the Registry hive.
Type exit and press Enter on your keyboard and then reboot your computer.

Thanks & Regards,

"Remember Me When You Raise Your Hand For Dua"
Raheel Ahmed Khan
System Engineer
send2raheel@yahoo.com
send2raheel@engineer.com
sirraheel@gmail.com
send2raheel (skype id)

My Blog Spot
http://raheel-mydreamz.blogspot.com/
http://raheeldreamz.wordpress.com/

My Face book pages
http://www.facebook.com/pages/My-Dreamz-Rebiuld-our-nation
http://www.facebook.com/pages/Beauty-of-islam
http://www.facebook.com/pages/Health-is-wealth

Monday, 8 October 2012

10 things you can do to improve network and PC security

Takeaway: Securing your network and PCs is a never-ending battle. Here are some effective strategies to add to your arsenal.
Security. It’s that which drives some administrators to early retirement, gray hair, or a permanent room in a padded cell. Okay, that’s an exaggeration… but you get the idea. Security is tops on most every administrator’s list. And with good reason. Incomplete or poor security can bring down a company’s network and/or computer resources. That equates to lost work, which affects bottom line.
Administrators must do all they can to ensure the security of their networks. But for some (especially those without the financial resources), just knowing where to start and what to use is the biggest challenge. With that in mind, I thought I’d lay down 10 tools and methods to help you arrive at better network/PC security.

1: Use Linux

I can already hear the groans from the gallery, but the truth of the matter is, you will cut down on PC security issues if you begin migrating at least some of your desktops to Linux. The best way to do this is to migrate users who don’t require the use of proprietary, Windows-only applications. If you use Exchange, just make sure you set up OWA so that the Linux users can access Web mail. Migrate a quarter of your desktops to Linux and that’s a quarter fewer security risks you’ll have to deal with.

2: Block users from installing software

I’ve had to deal with companies that do this. Yes, it can be a pain when users actually need a piece of software installed (you’ll have to visit their offices just to enter the administrator credentials), but the dividends it pays off are significant. You’ll have far fewer viruses and less malware to deal with than you would if the users were allowed to install at will. The give and take is certainly worth it here.

3: Upgrade your antivirus

I’m always shocked when I see antivirus tools that are out of date. This goes for applications and virus definitions. When dealing with the Windows platform, it’s crucial to keep everything as current as you possibly can. Keeping antivirus up to date is the only way to help protect vulnerable machines from malicious software and files.

4: Switch your browser

Not to stir up the mud, but the truth of the matter is simple: Internet Explorer is still an incredibly insecure browser. One of the best things you can do is migrate your users from IE to Firefox. Yes, Firefox may be getting a bit bloated, but it’s still far more secure than the Windows counterpart.

5: Disable add-ons

Browsers and email clients make use of add-ons. Some are necessary for work — some are not. Those that aren’t needed should not be used. Although some add-ons offer some handy features, it’s not always possible to ensure the validity or security of an add-on. And even when you can, it’s not always a given that the add-on won’t affect the performance of the machine. I’ve seen plenty of Outlook, IE, and Firefox add-ons drag a machine to a screeching halt.

6: Deploy a hardware-based firewall

Let’s face it: The built-in Windows firewall is simply not sufficient. If you want real security, you need a dedicated firewall on your network. This firewall will be a single point of entry that will stop many more attempted breaches than the standard software-based firewall will. Besides, the hardware-based fire will be far more flexible and customizable. Look at a Cisco, Sonicwall, or Fortinet hardware firewall as your primary protection.

7: Enforce strict password policies

For the love of all things digital, don’t let your end users control their password destiny. If you do this, you’ll wind up with accounts and systems protected with “password”, “1,” or worse — nothing at all. Make sure all passwords require a combination of upper/lowercase, numbers and letters, and special characters. While you’re working on password policies, be sure you enforce a rule that passwords must be changed every 30 days. It’s an inconvenience, but it’s worth the security it brings.

8: Do not share networked folders with “Everyone”

Although it’s tempting (especially when you can’t figure out why a user can’t access a folder), do NOT give the Everyone group access to a folder. This just opens up that folder to possible security issues. If this becomes an absolute necessity, only do it temporarily. For security’s sake, spend the extra time troubleshooting why that user can’t access the folder, instead of just giving Everyone full access.

9: Use network access control, like PacketFence

PacketFence is one of the most powerful NAC tools you will find. With this tool, you can manage captive-portal for registration and remediation, and you have centralized wired and wireless management, powerful guest management options, 802.1X support, layer-2 isolation of problematic devices, and much more. With this system on your network, you can rest assured that rogue devices will have a much smaller chance of connecting.

10: Use content filtering to protect from malware

I’m not a big fan of posing as Big Brother, so I don’t advocate too much content filtering. I do, however, believe it’s valid to use content filtering to prevent malware. There are obviously certain phrases, keywords, and URLs that can and should be filtered, based on their history of causing malware. I won’t post the best keywords to filter for malware, as those words might land me in trouble. Just do a simple search for keywords associated with malware.

Other tips?

Securing your network and PCs is a constant battle. But with the right tools and strategies, your network can be a much safer arena for productivity. Give a few of these options a look and see if they offer the missing pieces needed to further secure your environment.

Thanks & Regards,

"Remember Me When You Raise Your Hand For Dua"
Raheel Ahmed Khan
System Engineer
send2raheel@yahoo.com
send2raheel@engineer.com
sirraheel@gmail.com
send2raheel (skype id)

My Blog Spot
http://raheel-mydreamz.blogspot.com/
http://raheeldreamz.wordpress.com/

My Face book pages
http://www.facebook.com/pages/My-Dreamz-Rebiuld-our-nation
http://www.facebook.com/pages/Beauty-of-islam
http://www.facebook.com/pages/Health-is-wealth

Saturday, 6 October 2012

How to uninstall a program in Windows Vista, Windows 7, and Windows 8

Introduction
There are two ways to uninstall a program in Vista; the wrong way and the right way. Unfortunately, though, too many people uninstall a program using the wrong ways, which can lead to poor performance and problems on the computer. These wrong ways are delete the program's folder or just deleting the icons. When you attempt to remove a program in this way, there will be a large amount of configuration information left in the Windows Registry as well as files that may be installed in locations other than the program's folder. These orphan files and Registry data have the chance of causing conflicts on your computer thus leading to problems.

The proper way to uninstall a program is to use the uninstall routine that is bundled with the program itself. This will remove the files, Windows Registry information, and other configuration from your computer so that there are no conflicts in the future. When a program is installed in Windows, it will add information to the Windows Registry on the proper way to uninstall it. You can then use Windows Vista's Programs and Features control panel to properly uninstall the program. This tutorial will walk you through using this control panel so that you uninstall programs correctly. This method has not changed too much from previous version of Windows, but there have been some changes in Vista, which should be outlined.

How to uninstall a program in Windows Vista
To see a list of the programs that we can uninstall we must first open the Programs and Features control panel. To do this you should follow these steps:
  1. Click on the Start button to open your Start Menu. The Start button looks like this: Vista Start Button
     
  2. When the Start Menu opens click on the Control Panel menu option.
     
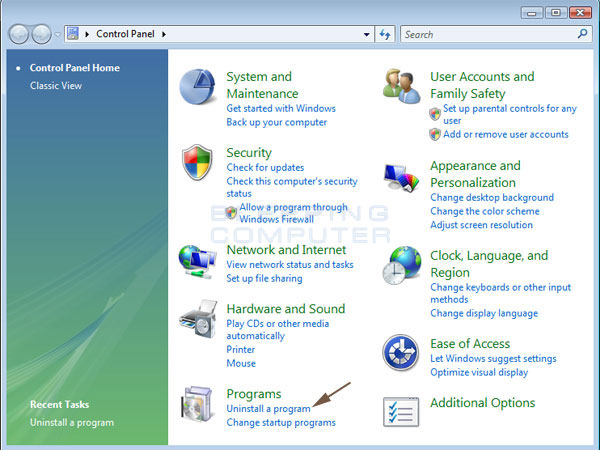
  3. When the Control Panel window opens click on the Uninstall a program option option under the Programs category. This option is shown by the arrow in the image below. If you are using the Classic View of the Control Panel, then you would double-click on the Programs and Features icon instead.


    Vista Control Panel
     
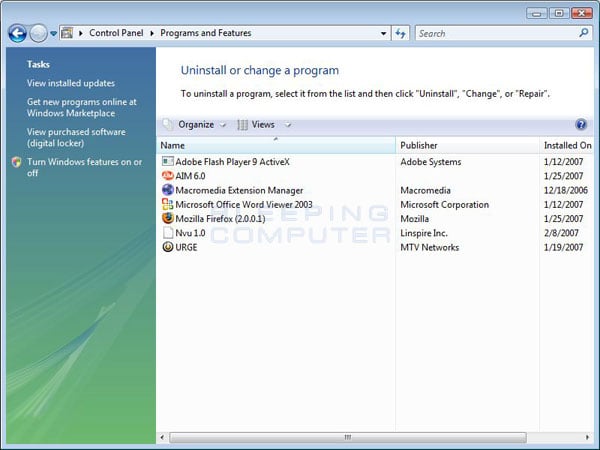
You will now be at the Programs and Features, or Uninstall or change a program, screen as shown below. From this screen you can uninstall programs, view installed updates, examine your digital locker, and turn Windows features on and off.

Vista Programs and Features Screen
Figure 1. Programs and Features Screen
This screen contains a list of the programs installed on your computer, the company that developed it, and when it was installed. This screen also contains four options in the left navigation bar that are unrelated to uninstalling a program. These four options are:
  • View Installed Updates - If you click on this option you will come to a screen that shows the installed updates and Ultimate Extras. From this screen you then have the ability to uninstall them. More information about this screen can be found in this tutorial.
     
  • Get new programs online at Windows Marketplace - If you click on this link your web browser will open and go to the Windows Marketplace homepage. From here you can purchase and download software.
     
  • View purchased software (digital locker) - When you purchase software at the Windows Marketplace, the software will be added to your digital locker. You can manage these programs from this screen.
     
  • Turn Windows features on or off - Windows Vista is installed with certain features enabled and disabled by default. By clicking on this option you can manage that Vista features you want enabled. More information can be found at this tutorial.
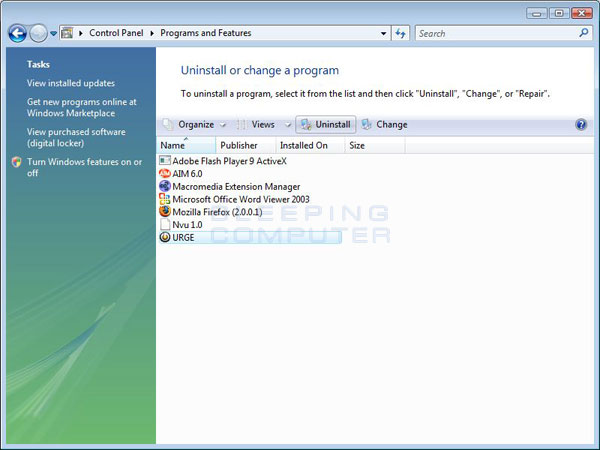
Now that we know what all the options in this screen do, lets start learning how to uninstall a program. The first step is look through the list of programs for the one that you would like to uninstall and then left-click on it once so that it becomes highlighted. Once you highlight a program you will see two new options next to the Organize and View button called Uninstall and Change. I have pointed those out with arrows in the image below.

Selected entry in the programs list
Figure 2. Select entry in the program list

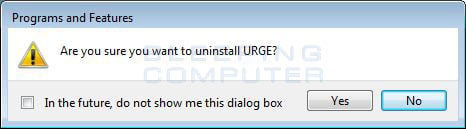
If you press the Change button, the program will launch it's setup so that you can modify how the program is presently installed. It is important to note that the Change button does not uninstall a program, but rather allows you to modify how it is currently installed. If you want to uninstall the program you should instead click on the Uninstall button. Once you click on the uninstall button you will be presented with a confirmation asking if you would like to continue as shown in Figure 3 below. For those who like shortcuts, you could just double-click on an entry to start this process as well. For some programs when choose to uninstall it, Windows may prompt you with a message stating Windows needs your permission to continue. At this screen you should click on the Continue button.

Confirmation screen to continue with the uninstall
Figure 3. Confirmation screen to continue with the uninstall
If you do not want to continue, then you should press the No button, and you will come back to the list of programs. If you press the Yes button Vista will start the uninstall routine for the program and begin to remove it. An uninstall screen will typically now open and may ask you questions about how the program should be uninstalled. You typically want to remove the entire program except any data that you may need in the future. As each program's uninstall process is different, it is advised that you read each screen carefully and continue with the uninstall process. When uninstalling certain programs you may receive a prompt from Windows stating An unidentified programs wants access to your computer. When you receive this as you uninstall the program, you should click on the Allow button, as it is the uninstaller being started.

The program will now continue to uninstall, and when completed you will be back at the list of programs installed on your computer. You will notice, though, that the program you just uninstalled is no longer listed. At this point you can either uninstall another programs or close the Programs and Features screen.
When examining the list of programs in your Uninstall list, if you are unsure as to what a program is, you can search for its name in our Uninstall Database.
How to uninstall a program in Windows 7 and Windows 8
To see a list of the programs that we can uninstall we must first open the Programs and Features control panel. To do this you should follow these steps:
  1. In Windows 7 click on the Start button to open your Start Menu. The Start button looks like this: Windows 7 Start Button .When the Start Menu opens click on the Control Panel menu option. In Windows 8, click on the Control Panel app in the Windows 8 Start Screen. Then scroll to the bottom and click on the More Settings option.
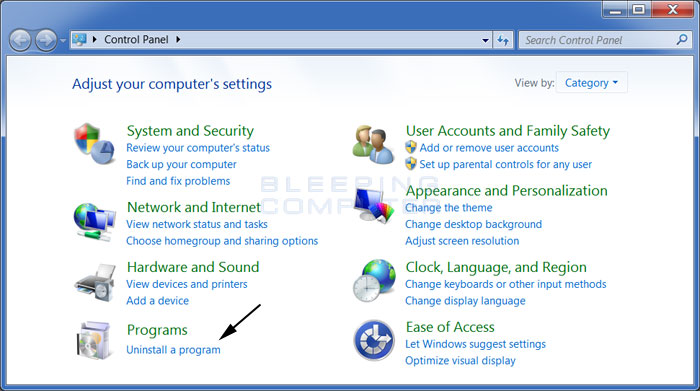
     
  2. When the Control Panel window opens click on the Uninstall a program option option under the Programs category. This option is shown by the arrow in the image below. If you are using the Classic View of the Control Panel, then you would double-click on the Programs and Features icon instead.


    Windows 7 & Windows 8 Control Panel
     
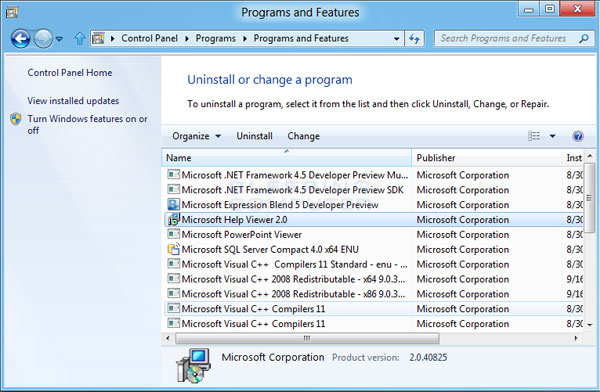
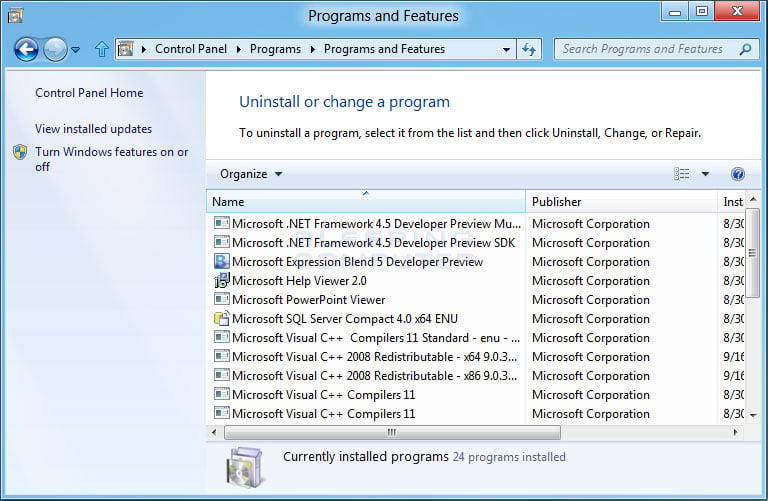
You will now be at the Programs and Features, or Uninstall or change a program, screen as shown below. From this screen you can uninstall programs, view installed updates, and turn Windows features on and off.

Windows 7 and Windows 8 Programs and Features Screen
Figure 1. Programs and Features Screen
This screen contains a list of the programs installed on your computer, the company that developed it, and when it was installed. This screen also contains four options in the left navigation bar that are unrelated to uninstalling a program. These four options are:
  • Control Panel Home - This will bring you back to the main Control Panel screen.
     
  • View installed updates - If you click on this option you will come to a screen that shows the installed Windows updates on your computer
     
  • Turn Windows features on or off - Windows 7 and Windows 8 is installed with certain features enabled and disabled by default. By clicking on this option you can manage that Vista features you want enabled.
Now that we know what all the options in this screen do, lets start learning how to uninstall a program. The first step is look through the list of programs for the one that you would like to uninstall and then left-click on it once so that it becomes highlighted. Once you highlight a program you will see two new options next to the Organize and View button called Uninstall and Change. I have pointed those out with arrows in the image below.

Selected entry in the programs list
Figure 2. Select entry in the program list

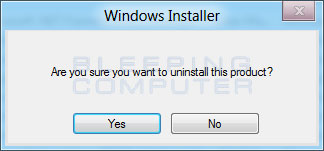
If you press the Change button, the program will launch it's setup so that you can modify how the program is presently installed. It is important to note that the Change button does not uninstall a program, but rather allows you to modify how it is currently installed. If you want to uninstall the program you should instead click on the Uninstall button. Once you click on the uninstall button you will be presented with a confirmation asking if you would like to continue as shown in Figure 3 below. For those who like shortcuts, you could just double-click on an entry to start this process as well. For some programs when choose to uninstall it, Windows may prompt you with a message stating Windows needs your permission to continue. At this screen you should click on the Continue button.

Confirmation screen to continue with the uninstall
Figure 3. Confirmation screen to continue with the uninstall
If you do not want to continue, then you should press the No button, and you will come back to the list of programs. If you press the Yes button Vista will start the uninstall routine for the program and begin to remove it. An uninstall screen will typically now open and may ask you questions about how the program should be uninstalled. You typically want to remove the entire program except any data that you may need in the future. As each program's uninstall process is different, it is advised that you read each screen carefully and continue with the uninstall process. When uninstalling certain programs you may receive a prompt from Windows stating An unidentified programs wants access to your computer. When you receive this as you uninstall the program, you should click on the Allow button, as it is the uninstaller being started.

The program will now continue to uninstall, and when completed you will be back at the list of programs installed on your computer. You will notice, though, that the program you just uninstalled is no longer listed. At this point you can either uninstall another programs or close the Programs and Features screen.
When examining the list of programs in your Uninstall list, if you are unsure as to what a program is, you can search for its name in our Uninstall Database.

Conclusion
Now that know the proper way to uninstall a program you can avoid leaving errant files and configuration information on the computer when you would like to remove a program. This also allows you to clear up some extra disk space, if needed, by uninstalling any programs that you do not need.


Thanks & Regards,

"Remember Me When You Raise Your Hand For Dua"
Raheel Ahmed Khan
System Engineer
send2raheel@yahoo.com
send2raheel@engineer.com
sirraheel@gmail.com
send2raheel (skype id)

My Blog Spot
http://raheel-mydreamz.blogspot.com/
http://raheeldreamz.wordpress.com/

My Face book pages
http://www.facebook.com/pages/My-Dreamz-Rebiuld-our-nation
http://www.facebook.com/pages/Beauty-of-islam
http://www.facebook.com/pages/Health-is-wealth

TCP and UDP Ports Explained

Introduction
In this tutorial we will discuss the concept of Ports and how they work with IP addresses. If you have not read our article on IP addresses and need a brush up, you can find the article here. If you understand the concepts of IP addresses, then lets move on to TCP and UDP ports and how they work.
The devices and comptuers connected to the Internet use a protocol called TCP/IP to communicate with each other. When a computer in New York wants to send a piece of data to a computer in England, it must know the destination IP address that it woud like to send the information to. That information is sent most often via two methods, UDP and TCP.

The two Internet workhorses: UDP and TCP
UDP? TCP? I know you are getting confused, but I promise I will explain this in very basic terms so that you can understand this concept.
TCP stands for Transmission Control Protocol. Using this method, the computer sending the data connects directly to the computer it is sending the data it to, and stays connected for the duration of the transfer. With this method, the two computers can guarantee that the data has arrived safely and correctly, and then they disconnect the connection. This method of transferring data tends to be quicker and more reliable, but puts a higher load on the computer as it has to monitor the connection and the data going across it. A real life comparison to this method would be to pick up the phone and call a friend. You have a conversation and when it is over, you both hang up, releasing the connection.
UDP stands for User Datagram Protocol. Using this method, the computer sending the data packages the information into a nice little package and releases it into the network with the hopes that it will get to the right place. What this means is that UDP does not connect directly to the receiving computer like TCP does, but rather sends the data out and relies on the devices in between the sending computer and the receiving computer to get the data where it is supposed to go properly. This method of transmission does not provide any guarantee that the data you send will ever reach its destination. On the other hand, this method of transmission has a very low overhead and is therefore very popular to use for services that are not that important to work on the first try. A comparison you can use for this method is the plain old US Postal Service. You place your mail in the mailbox and hope the Postal Service will get it to the proper location. Most of the time they do, but sometimes it gets lost along the way.
Now that you understand what TCP and UDP are, we can start discussing TCP and UDP ports in detail. Lets move on to the next section where we can describe the concept of ports better.

TCP and UDP Ports
As you know every computer or device on the Internet must have a unique number assigned to it called the IP address. This IP address is used to recognize your particular computer out of the millions of other computers connected to the Internet. When information is sent over the Internet to your computer how does your computer accept that information? It accepts that information by using TCP or UDP ports.
An easy way to understand ports is to imagine your IP address is a cable box and the ports are the different channels on that cable box. The cable company knows how to send cable to your cable box based upon a unique serial number associated with that box (IP Address), and then you receive the individual shows on different channels (Ports).
Ports work the same way. You have an IP address, and then many ports on that IP address. When I say many, I mean many. You can have a total of 65,535 TCP Ports and another 65,535 UDP ports. When a program on your computer sends or receives data over the Internet it sends that data to an ip address and a specific port on the remote computer, and receives the data on a usually random port on its own computer. If it uses the TCP protocol to send and receive the data then it will connect and bind itself to a TCP port. If it uses the UDP protocol to send and receive data, it will use a UDP port. Figure 1, below, is a represenation of an IP address split into its many TCP and UDP ports. Note that once an application binds itself to a particular port, that port can not be used by any other application. It is first come, first served.

<-------------------- 192.168.1.10 -------------------->
0 1 2 3 4 5 .. .. .. .. .. .. .. .. 65531 65532 65533 65534 65535
Figure 1. IP address with Ports

This all probably still feels confusing to you, and there is nothing wrong with that, as this is a complicated concept to grasp. Therefore, I will give you an example of how this works in real life so you can have a better understanding. We will use web servers in our example as you all know that a web server is a computer running an application that allows other computers to connect to it and retrieve the web pages stored there.
In order for a web server to accept connections from remote computers, such as yourself, it must bind the web server application to a local port. It will then use this port to listen for and accept connections from remote computers. Web servers typically bind to the TCP port 80, which is what the http protocol uses by default, and then will wait and listen for connections from remote devices. Once a device is connected, it will send the requested web pages to the remote device, and when done disconnect the connection.
On the other hand, if you are the remote user connecting to a web server it would work in reverse. Your web browser would pick a random TCP port from a certain range of port numbers, and attempt to connect to port 80 on the IP address of the web server. When the connection is established, the web browser will send the request for a particular web page and receive it from the web server. Then both computers will disconnect the connection.
Now, what if you wanted to run an FTP server, which is a server that allows you to transfer and receive files from remote computers, on the same web server. FTP servers use TCP ports 20 and 21 to send and receive information, so you won't have any conflicts with the web server running on TCP port 80. Therefore, the FTP server application when it starts will bind itself to TCP ports 20 and 21, and wait for connections in order to send and receive data.
Most major applications have a specific port that they listen on and they register this information with an organization called IANA. You can see a list of applications and the ports they use at the IANA Registry. With developers registering the ports their applications use with IANA, the chances of two programs attempting to use the same port, and therefore causing a conflict, will be diminished.

Thanks & Regards,

"Remember Me When You Raise Your Hand For Dua"
Raheel Ahmed Khan
System Engineer
send2raheel@yahoo.com
send2raheel@engineer.com
sirraheel@gmail.com
send2raheel (skype id)

My Blog Spot
http://raheel-mydreamz.blogspot.com/
http://raheeldreamz.wordpress.com/

My Face book pages
http://www.facebook.com/pages/My-Dreamz-Rebiuld-our-nation
http://www.facebook.com/pages/Beauty-of-islam
http://www.facebook.com/pages/Health-is-wealth

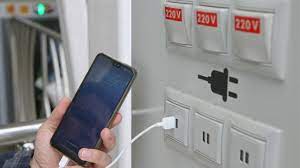
what is Juice Jacking SCAM

  Juice Jacking is a cybersecurity threat that occurs when cybercriminals manipulate public charging stations, such as USB charging ports in...