Saturday, 6 October 2012

How to connect an iPad to a Wireless or Wi-Fi network

Introduction
The iPad is ultimately a device create to allow you consume content in an easy and portable manner. As there is no better location for consumable content than the Internet, being able to connect to a Wi-Fi network so you can access the Internet is a necessity. This guide will walk you through all of the steps required to connect to a Wi-Fi network using your iPad. We have also outlined steps that will allow you to access almost all types of Wi-Fi networks as well as using proxy servers if your particular scenario requires it.

How to connect to a Wi-Fi or Wireless Network
This section will explain how to connect to a Wi-Fi or Wireless network that is broadcasting its name or SSID. For most public, and many private, Wi-Fi networks the name, or SSID, of the network is broadcast so that anyone who tries to connect to it will be able to do so. This guide will walk you through the steps of connecting to a Wi-Fi network that is broadcasting its name. If you wish to connect to a wireless network that is not broadcasting its name, then please see the steps here.
  1. Start the iPad
     
  2. Tap on the Settings app. The Settings icon looks like the following:
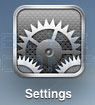

    Settings Icon
    Settings Icon


    Once in the settings application, you will be at the General Settings screen as shown below.
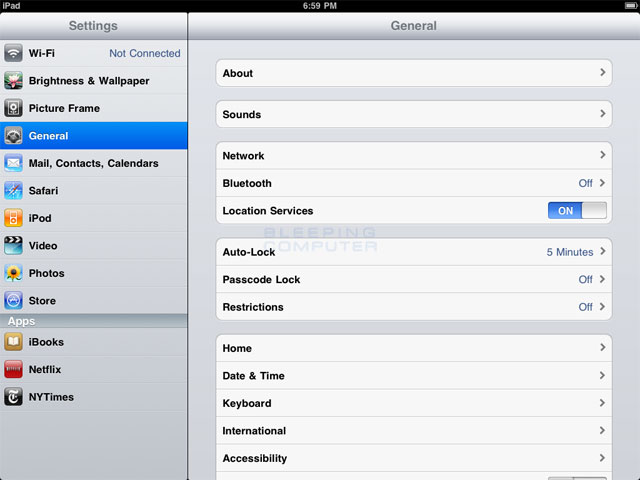

    General Settings screen
    General Settings screen

     
  3. Tap on the Wi-Fi category to get to the screen where you will connect to a wireless network as shown below.
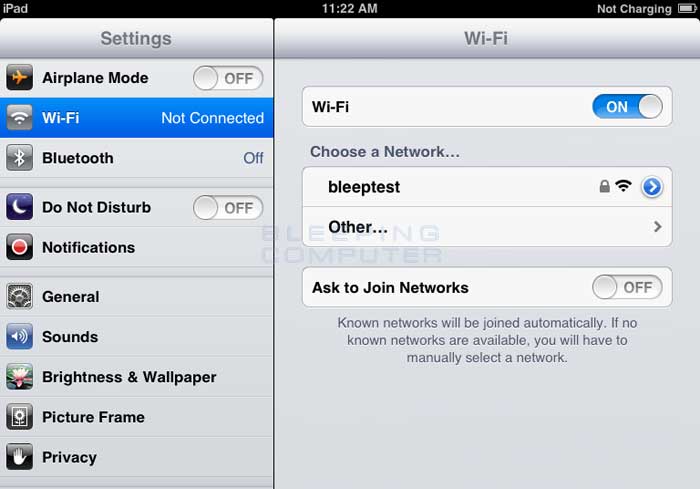

    Choose an available wireless network screen
    Choose an available wireless network screen

    When you reach this screen, the iPad will start searching for Wi-Fi networks that are in range and that are broadcasting their names. As it discovers available networks it will list them under the Choose a Network... label. Please note that it may take some time for the iPad to see all of the available networks, so please be patient while it searches. You can tell that it is searching as there will be an animated symbol next to the Choose a Network... label while it is searching. If it does not find anything, it will pause for about a minute and then attempt to search again.

    When you see the Wi-Fi network that you would like to connect to, simply tap on it to attempt to join it. If it has a lock next to the name, then it will require you to enter a wireless encryption password in order to connect to it as discussed in the next step.
     
  4. Once you Tap on a network name, it will try to connect to it. If the network is not using encryption, then you can just skip to this step. If the network is using wireless encryption, though, you will be presented with a screen asking you to enter the wireless encryption password as shown below.
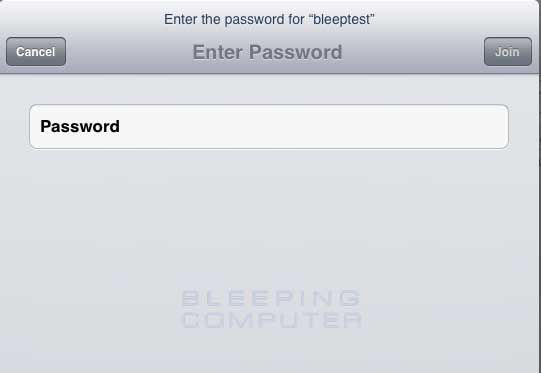

    Enter wireless security password screen
    Enter wireless security password screen


    In the password field, enter the wireless encryption password that is required to join this network. This password was originally set on your wireless router, and if you do not remember this password anymore, you can logon to the router and change the password to a new one. Please note that if you change the password on the router, then any other devices that connect to this device wirelessly will also need to have their settings changed to use the new password.

     
  5. The iPad will now attempt to connect to the network, and when finished, will display the Wi-Fi settings screen again, but this time with the joined network listed and with a checkmark next to it as shown below.
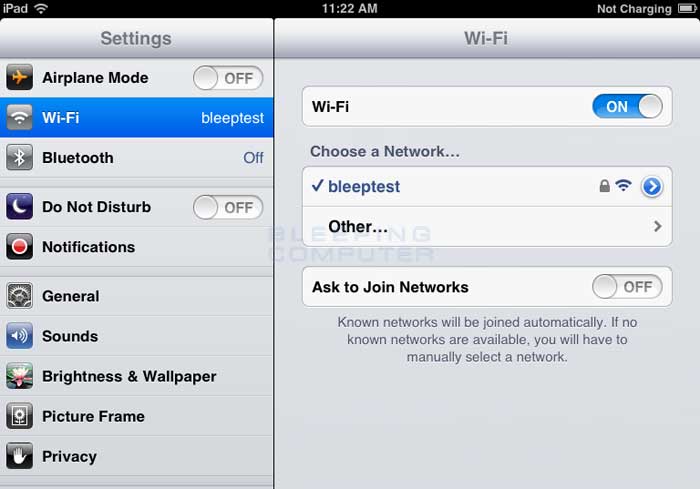

    Screen showing the iPad connected to a wireless network
    Screen showing the iPad connected to a wireless network


    This checkmark designates that your iPad is connected to the network. You can also see that your iPad is connected to a wireless network as in the upper left-hand corner you will see the word iPad with the Wi-Fi symbol ()next to it. You can now go back to your home screen and use any apps that require Wi-Fi connectivity.

How to connect to a Wi-Fi or Wireless network that is not broadcasting its name or SSID
There are many networks that do not advertise their network name, or SSID, for extra security. Due to this, the only way for an iPad to connect to these types of networks is to manually enter the network information that is required to make a connection. This section will explain how to manually connect your iPad to a wireless network.
In order to accomplish this please follow these steps:
  1. Start the iPad
     
  2. Tap on the Settings app. The app icon looks like the following:


    Settings Icon
    Settings Icon


    Once in the settings application, you will be at the General Settings screen as shown below.


    General Settings screen
    General Settings screen


  3. Tap on the Wi-Fi category to get to the screen where you will connect to a wireless network as shown below.
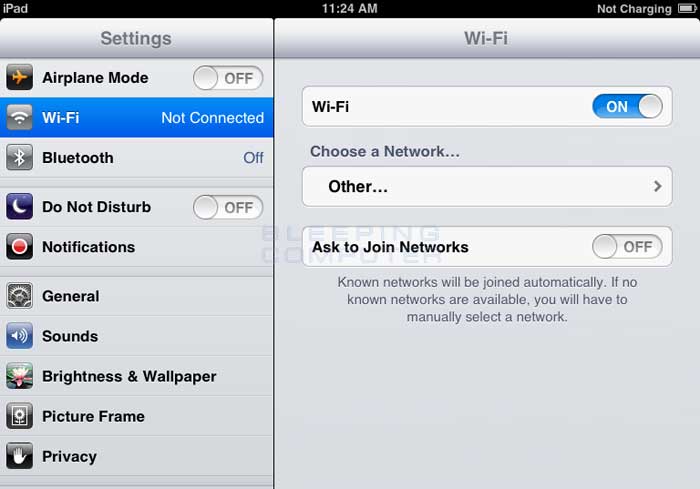

    Wi-Fi Settings screen
    Wi-Fi Settings screen

     
  4. Determine the correct Name, or SSID, that you will be connecting to and Tap on the Other... button. You will now be at the Other Network screen where the iPad will ask you to enter the settings required to connect to the network.
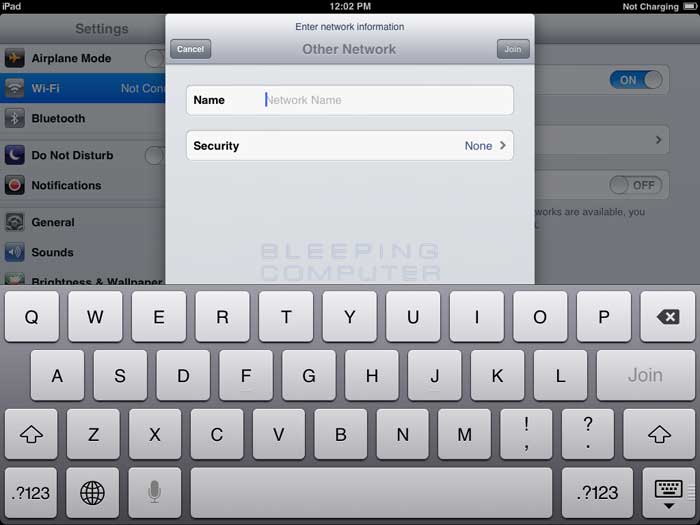

    Enter SSID screen
    Enter SSID screen


    In the Name field, enter the network name or SSID.
     
  5. Then tap on the Security button and you will be at the screen show below.
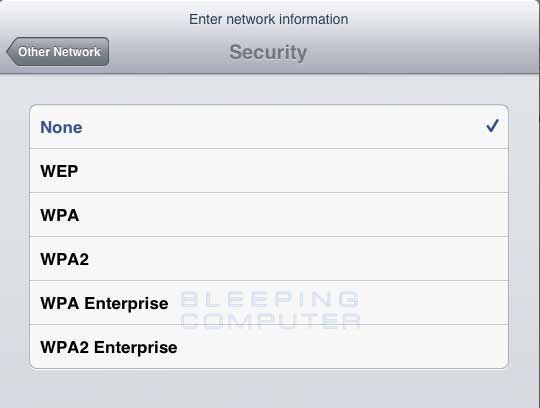

    Select Security Encryption Type screen
    Select Security Encryption Type screen

    At this screen you need to select the wireless encryption that the network that network you wish to connect to is using. It is important that you select the correct encryption type, as if you do not, you will not be able to connect to the wireless network. After selecting the encryption type, tap on the Other Network button.
     
  6. You will now be back at the Other Network screen where the iPad is now prompting you to enter the password as shown below.
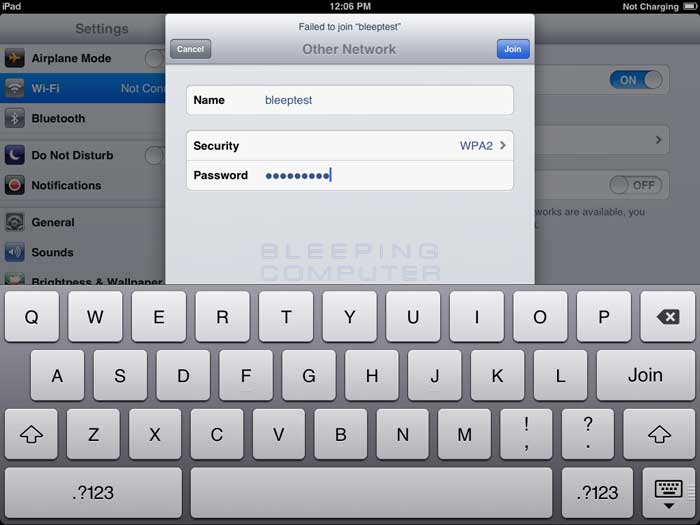


    Enter Security Encryption Password screen
    Enter Security Encryption Password screen

    In the password field, please enter the password that is required to connect to the Wi-Fi network. This password was originally set on your wireless router, and if you do not remember this password, you can logon to the router and change the password to a new one. Please note that if you change the password on the router, then any other devices that connect to this device wirelessly will also need to have their settings changed to use the new password.
     
  7. Once you have entered in all the required information, tap the Join button on the iPad keyboard. The iPad will attempt to connect to the network, and when finished, will display the Wi-Fi settings screen again, but this time with the joined network listed and with a checkmark next to it as shown below.


    Screen showing the iPad connected to a wireless network
    Screen showing the iPad connected to a wireless network


    This checkmark designates that your iPad is connected to the network. You can also see that your iPad is connected to a wireless network as in the upper left-hand corner you will see the word iPad with the Wi-Fi symbol () next to it. You can now go back to your home screen and use any apps that require Wi-Fi connectivity.

How to configure your iPad Wi-Fi connection to use a static IP address
If the wireless network you are connecting to does not use DHCP to assign IP addresses to wireless devices, then you will need to configure your iPad with static IP addresses and other information in order to connect to the Internet or a network. To do this first find out the info, such as the static IP address, IP subnet mask, DNS servers, and router IP address, and proceed with the following steps. Please note, you must first create the wireless profile that you will be assigning static information to.
  1. Start the iPad
     
  2. Tap on the Settings app. When the Settings app loads, you will be at the General Settings category.

     
  3. Tap on the Wi-Fi settings category and you will be at a screen as shown below.
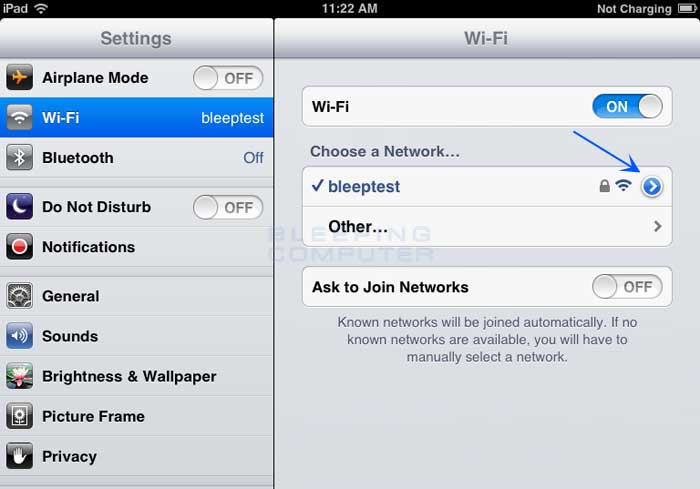

    Screen showing the iPad connected to a wireless network
    Screen showing the iPad connected to a wireless network

    You should now tap on the to access the specific settings of the wireless connection.
     
  4. You will now be at the Wi-Fi network settings screen for the connected network.
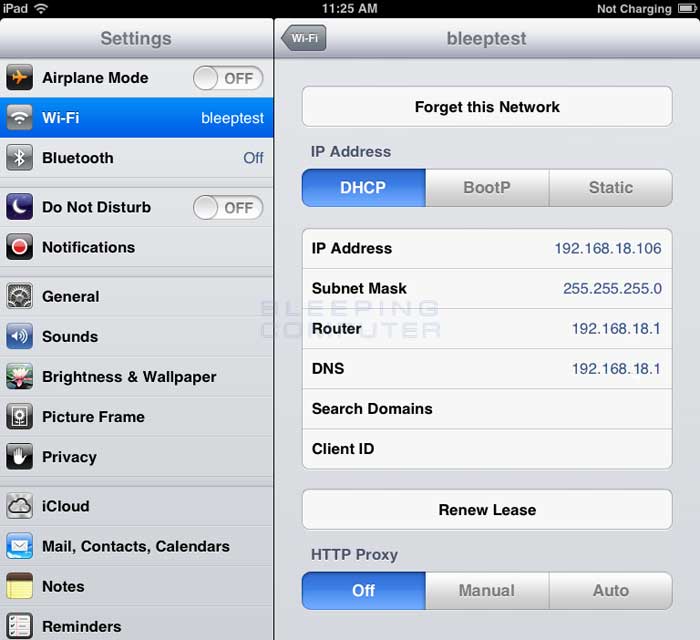


    Wireless settings for a Wi-Fi network
    Wireless settings for a Wi-Fi network
  5. Now tap the Static button to enter the static settings screen as shown below.
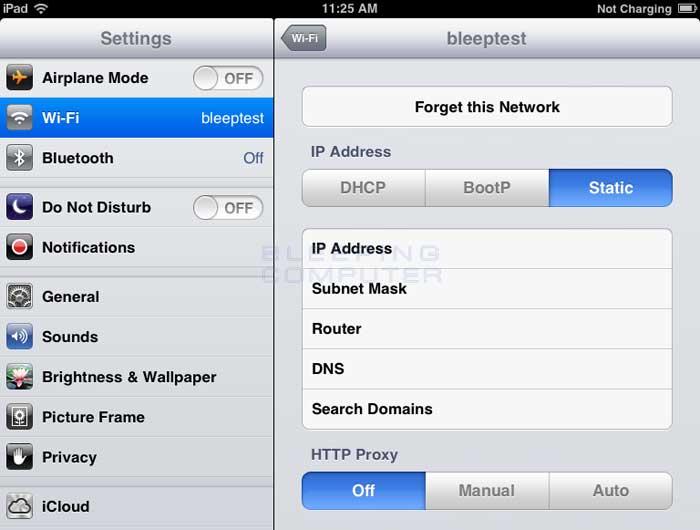

    Screen showing the iPad connected to a wireless network
    Screen showing the iPad connected to a wireless network

    In this screen you can enter the IP address, IP subnet mask, router IP address, DNS server, and search domains as necessary. At a minimum you must enter information in the IP Address, Subnet Mask, Router, and DNS fields for the iPad to be able to properly work on the wireless network. If you do not know this information, you should ask the router owner or administrator.

    When you are done entering the information, tap on the Wi-Fi Networks button and then go back to your Home screen to start using the iPad with these new settings.

How to configure your iPad to use a Proxy Server
Some networks require you to use a proxy server to access the Internet. A proxy server is another computer or device that acts as an intermediary between you and the Internet by relaying your requests to a server and the servers responses back to you. Unfortunately, this type of setup requires you to specify certain settings in order for you to use the Internet properly. This section will provide information on how to configure your iPad to use a proxy server.
  1. Start the iPad
     
  2. Tap on the Settings app. When the Settings app loads, you will be at the General Settings category.

     
  3. Tap on the Wi-Fi settings category and you will be at a screen as shown below.


    Screen showing the iPad connected to a wireless network
    Screen showing the iPad connected to a wireless network

    You should now tap on the to access the specific settings of the wireless connection.
     
  4. You will now be at the Wi-Fi network settings screen for the connected network.


    Wireless settings for a Wi-Fi network
    Wireless settings for a Wi-Fi network


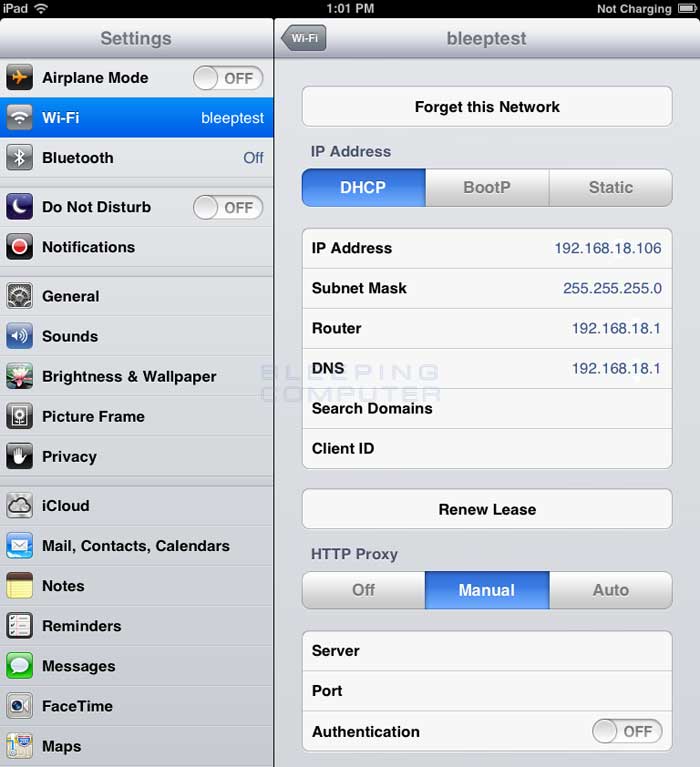
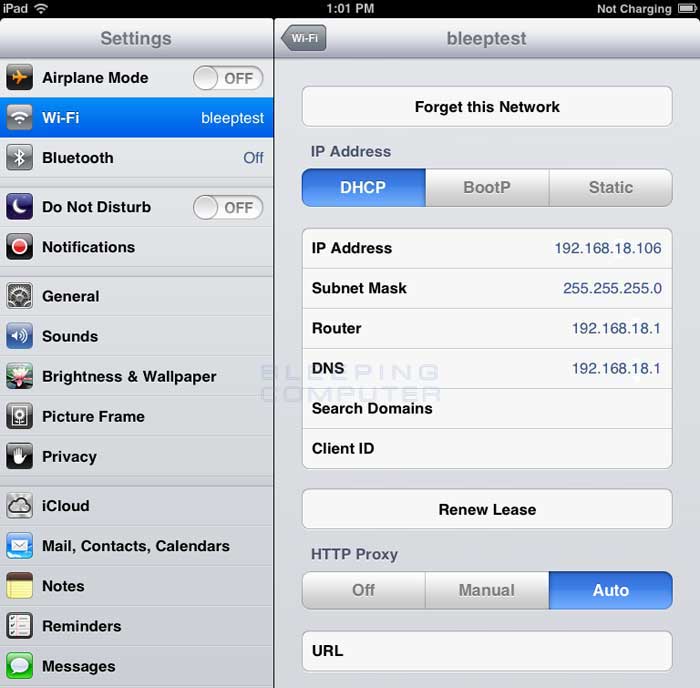
    At the bottom you will find three proxy server options that you can choose from. The first option is Off, which is the default option and means that the iPad will not use a Proxy Server. The second setting is Manual, which means that you will enter the specific information about proxy server in the specified fields. The last option is Auto, which allows you to enter a URL that contains the configuration information as to what proxy settings the iPad should use.
     
  5. If you need to specify manual settings, then simply tap on the Manual button and fill in the appropriate fields as shown below.

    Screen showing the iPad connected to a wireless network
    Screen showing the iPad connected to a wireless network

    If your proxy server requires you to login to it before it allows you to use it, make sure you slide Authentication to ON and input your login credentials.

    If you have a configuration URL that contains your proxy settings, then simply tap on the Auto button and you will see a screen similar to below.

    Screen showing the iPad connected to a wireless network
    Screen showing the iPad connected to a wireless network

    Simply fill in the URL field with the proxy autoconfiguration URL.
     
  6. When you are done setting up your proxy server, tap on the Wi-Fi Networks button and then go back to your Home screen to start using the iPad with these new settings.

Deleting a Wi-Fi connection profile so the iPad wont automatically join it
At times you may find the need to delete a Wi-Fi connection profile that has previously been configured on your iPad. Whether this is because the profile belongs to a hotel that you are no longer staying at or you have changed your wireless password and need to re-enter it, this section will explain how to delete the profile from your iPad.
  1. Start the iPad
     
  2. Tap on the Settings app. When the Settings app loads, you will be at the General Settings category.

     
  3. Tap on the Wi-Fi settings category and you will be at a screen as shown below.


    Screen showing the iPad connected to a wireless network
    Screen showing the iPad connected to a wireless network

    You should now tap on the next to the Wi-Fi profile that you wish to delete.
     
  4. You will now be at the Wi-Fi network settings screen for the connected network.


    Wireless settings for a Wi-Fi network
    Wireless settings for a Wi-Fi network
  5. Tap on the Forget this Network button.
     
  6. When the iPad asks you to confirm that you wish to forget the network, tap on the Forget button.
You will no longer automatically connect to this network. Do not be concerned, though, if you go back to the Wi-Fi settings and still see the network you just specified should be forgotten. Once you power off the iPad, and start it again, the network will no longer be listed.

Troubleshooting
When working with computers and networking problems invariably happen. This section will offer steps that can be tried to resolve Wi-Fi connectivity issues with your iPad.
What to do if your iPad can't access a visible network:
The first step is to make sure that the wireless connection does not require a password. You can determine this by seeing if there is a lock symbol next to the wireless network name. If there is, then make sure you know the correct password to the network before attempting to join it. If that still does not resolve your issue, try moving closer to the wireless router and seeing if you are able to connect then.
What to do if you cannot access a network that is not broadcasting its network name or SSID:
Diagnosing connections to Wi-Fi networks that are not broadcasting their name or SSID can be difficult. The first suggestion, if the wireless router is under your control, is to allow the router to broadcast the name. If you can then connect, then you may have entered the name incorrectly, selected the wrong wireless encryption type, or entered the wrong wireless encryption password. You should then confirm these settings by looking at the configuration of the router, and if necessary, changing those settings to new ones. Then try connecting again.
What to do if you cannot access the Internet when connected to a wireless network:
If it shows that you are connected to a network, but you still cannot access the network, you should first make sure that your Internet connection is actually working. Test the connection from another computer and device to confirm that it is working. If it is working, go into the Wi-Fi settings for this particular connection on the iPad and under the DHCP settings, make sure that you have an assigned IP Address, Subnet Mask, Router, and DNS. If you do not have these fields populated, then tap on the Renew Lease button, and then tap on the Renew button when it asks if you with to continue. This will make the iPad request new connection settings. Once that is done, if you now have settings in the DHCP fields, try connecting to the Internet again.
If this still does not work, then you may want to confirm that you do not need to enter a static networking configuration into the iPad. To determine this, you should ask the owner or administrator of the wireless router.
Last, but not least, if the iPad shows its connected, but cannot access the internet, it could be because you entered the wrong wireless encryption password or it was changed after you initially created the Wi-Fi profile. To test this, simply Forget the network profile and try recreating it and entering the password again.
How to fix slow iPad Wi-Fi speeds or low quality wireless connections:
Unfortunately there have been a lot of reports that the iPad wireless range and sensitivity is not as good as it could, or should, be. That means that Wi-Fi connections that work fine with other devices or computers may not work as well with the iPad. To determine the quality of your Wi-Fi connection, you can look in the upper left-hand corner of the device. The three quality levels are shown from best to worst as , with the lower the level being the worst connection speed.
Unless Apple releases an update, or a software hack is released to increase the power of the antenna, we will need to use other methods to make the Wi-Fi connection quality better. To do this you can first try and use the iPad closer to the wireless router to increase your connection quality. This, though, is a ridiculous thing to have to do considering how much you spent on the iPad. Another option is to purchase a wireless extender that can extend the range of your wireless device so it is strong throughout your entire house or apartment. Popular extenders are the Linksys WRE54G Wireless-G Extender, Belkin Wireless G Universal Range Extender, or the Netgear WGXB102 Range Extender. When you add an extender to your wireless network, it will increase the range of your wireless router so that you can connect to your network in locations that previously you could not.

Conclusion
As you can see there are many Wi-Fi configuration options available to suit your specific needs. By knowing how to connect to a wireless network you can now connect to the Internet from locations such as a public Wi-Fi hotspot, a friends house, or a hotel. No matter what the specific requirement of your location, hopefully the information in this guide has shown you how to work around them.


Thanks & Regards,

"Remember Me When You Raise Your Hand For Dua"
Raheel Ahmed Khan
System Engineer
send2raheel@yahoo.com
send2raheel@engineer.com
sirraheel@gmail.com
send2raheel (skype id)

My Blog Spot
http://raheel-mydreamz.blogspot.com/
http://raheeldreamz.wordpress.com/

My Face book pages
http://www.facebook.com/pages/My-Dreamz-Rebiuld-our-nation
http://www.facebook.com/pages/Beauty-of-islam
http://www.facebook.com/pages/Health-is-wealth

Monday, 1 October 2012

10 things you should do when building a new PC

Takeaway: Building a custom system lets you tailor the components to meet your needs, while holding down the costs. Here are a few things to consider before you get started.
Oftentimes, the only way to get what you really want out of a new computer is to build it yourself. Although there is nothing inherently difficult about building a PC, there are a number of considerations you need to take into account before you begin ordering the parts. This article outlines 10 such considerations.

1: Decide what is really important to you

Even though computer hardware prices have dropped dramatically over the last few years, it is still possible to spend several thousand dollars building a PC. Assuming that you want to keep the total cost reasonable, stop and think about how the computer will be used. This will help you best determine how to allocate your budget. For example, if the computer is going to be used as a gaming machine, you might choose to spend a good part of your budget on a high-end video card or two. On the other hand, if the computer will serve as a virtualization host, you might be better off spending the money on extra memory.

2: Plan for the future

Computers evolve at a feverish pace, and there is no way to future-proof your hardware. The eventual obsolescence of your computer is a sad fact of life, no matter how high end the machine might be today. One thing you can do to help extend the lifespan of your new computer is to purchase a high-end system board. The system board as the one component that arguably limits your computer more than anything else. For example, your system board limits the total amount of memory that can be installed on the computer and dictates the system’s CPU architecture. Spending a little bit extra on a system board now might make it easier to upgrade your computer down the road.

3: Don’t skimp on the fans

One lesson I have learned the hard way is that heat kills. If a computer gets too hot, the heat can damage the CPU. This can be an issue for almost any PC, but the problem of heat dissipation comes more pronounced on higher-end systems because they generally produce more heat. Consider the problem of heat dissipation when you’re designing your new system. Be sure to plan for an adequate number of fans and maybe even some liquid cooling.

4: Determine up front if you will need any extra connectors

While I am on the subject of cooling, I want to mention that it is important to determine up front how you will power the cooling fans. Many of the cooling fans that are available today are designed to attach to a four-pin Molex connector (normally used for powering legacy disk types). However, some of the newer fans use a PWM connector instead. These fans are designed to plug directly into the system board, which can monitor the fan’s rotational speed. While this might sound good in theory, system boards have a limited number of fan connectors.
For example, I recently built several new systems. The case I used had four fans installed, but my system board had connectors for only three fans (plus the CPU fan). As a result, I had to order an adapter for each machine that would allow me to plug the fan into a disk power connector.

5: Perform periodic maintenance

As previously mentioned, higher-end systems need plenty of fans to keep the internal components cool. However, installing lots of fans alone isn’t enough. It’s also necessary to do some periodic maintenance to make sure that the fans are doing their jobs.
To give you a more concrete example, I have a fairly high-end PC that has nine case fans. The problem is that the computer sits underneath my desk, relatively obscured from sight. A few months ago, the computer’s air intake became clogged with dust. This prevented the nine fans from moving enough air, and the computer overheated as a result. My failure to keep the air intake clean resulted in having to purchase a new processor.
As a side note, it is also a good idea to periodically make sure that the fans installed in your new computer are actually working. Many of the case fans on the market are cheaply made and sometimes stop working.

6: Choose power supplies carefully

When picking out a power supply for your new computer, you should first make sure that the power supply delivers adequate wattage to power the computer. Unlike the days of old, however, wattage should not be your only consideration.
You also need to consider the types of connectors provided by the power supply. A basic, low-end PC will probably be fine using a power supply that provides only system board and disk connectors. But higher-end systems may require that certain components be powered directly by the power supply. For example, some AMD video cards require a 850 watt (or higher) power supply with two 150 watt eight-pin and two 75 watt six-pin PCI Express power connectors.
Another concern with regard to your power supply is the length of the power cables. If you ‘re building the PC in a large, full-tower case, you may find that some disk power cables are simply too short to reach all of the drive bays.

7: Shop around for the best price on memory

When I was shopping for parts to build my latest PC, I noticed that memory prices were all over the place. I compared prices with three online vendors and found that one vendor’s price for memory was double that of the lowest-priced vendor for exactly the same product. It goes without saying that different vendors will often have different prices, but I was really surprised by just how drastic the price differences were for memory.

8: Don’t buy more case than you need

When building a computer, it can be tempting to spend a few extra bucks and get a case that is flashy and eye-catching. Sometimes, though, the higher-end cases could end up being overkill. For example, I recently found a case that had 15 Internal drive bays. But a case like that would seriously been overkill since I was planning to install only six drives.

9: Verify that your case has the appropriate USB headers

When picking out a case, you should also make sure that it has the appropriate USB headers. Most of the newer system boards have a connection for USB 3.0 headers. The physical design of this port prevents the connection of USB 2.0 headers. So it’s important to look for a case that fully supports USB 3.0.

10: Have a plan for cable management

Finally, make sure that you have a plan for cable management. The more components you install in a computer, the more cables you’ll generally have to deal with. For instance, every drive requires a data cable and a power cable, and you might also need power cables for things like case fans and video cards. All those cables can get messy — and a clutter of cables can restrict airflow through the case, resulting in excessive heat. Develop a plan for keeping the cables neat and tidy before you start building.

Thanks & Regards,

"Remember Me When You Raise Your Hand For Dua"
Raheel Ahmed Khan
System Engineer
send2raheel@yahoo.com
send2raheel@engineer.com
sirraheel@gmail.com
send2raheel (skype id)

My Blog Spot
http://raheel-mydreamz.blogspot.com/
http://raheeldreamz.wordpress.com/

My Face book pages
http://www.facebook.com/pages/My-Dreamz-Rebiuld-our-nation
http://www.facebook.com/pages/Beauty-of-islam
http://www.facebook.com/pages/Health-is-wealth

Sunday, 23 September 2012

TCP and UDP Ports Explained

Introduction
In this tutorial we will discuss the concept of Ports and how they work with IP addresses. If you have not read our article on IP addresses and need a brush up, you can find the article here. If you understand the concepts of IP addresses, then lets move on to TCP and UDP ports and how they work.
The devices and comptuers connected to the Internet use a protocol called TCP/IP to communicate with each other. When a computer in New York wants to send a piece of data to a computer in England, it must know the destination IP address that it woud like to send the information to. That information is sent most often via two methods, UDP and TCP.
The two Internet workhorses: UDP and TCP
UDP? TCP? I know you are getting confused, but I promise I will explain this in very basic terms so that you can understand this concept.
TCP stands for Transmission Control Protocol. Using this method, the computer sending the data connects directly to the computer it is sending the data it to, and stays connected for the duration of the transfer. With this method, the two computers can guarantee that the data has arrived safely and correctly, and then they disconnect the connection. This method of transferring data tends to be quicker and more reliable, but puts a higher load on the computer as it has to monitor the connection and the data going across it. A real life comparison to this method would be to pick up the phone and call a friend. You have a conversation and when it is over, you both hang up, releasing the connection.
UDP stands for User Datagram Protocol. Using this method, the computer sending the data packages the information into a nice little package and releases it into the network with the hopes that it will get to the right place. What this means is that UDP does not connect directly to the receiving computer like TCP does, but rather sends the data out and relies on the devices in between the sending computer and the receiving computer to get the data where it is supposed to go properly. This method of transmission does not provide any guarantee that the data you send will ever reach its destination. On the other hand, this method of transmission has a very low overhead and is therefore very popular to use for services that are not that important to work on the first try. A comparison you can use for this method is the plain old US Postal Service. You place your mail in the mailbox and hope the Postal Service will get it to the proper location. Most of the time they do, but sometimes it gets lost along the way.
Now that you understand what TCP and UDP are, we can start discussing TCP and UDP ports in detail. Lets move on to the next section where we can describe the concept of ports better.
TCP and UDP Ports
As you know every computer or device on the Internet must have a unique number assigned to it called the IP address. This IP address is used to recognize your particular computer out of the millions of other computers connected to the Internet. When information is sent over the Internet to your computer how does your computer accept that information? It accepts that information by using TCP or UDP ports.
An easy way to understand ports is to imagine your IP address is a cable box and the ports are the different channels on that cable box. The cable company knows how to send cable to your cable box based upon a unique serial number associated with that box (IP Address), and then you receive the individual shows on different channels (Ports).
Ports work the same way. You have an IP address, and then many ports on that IP address. When I say many, I mean many. You can have a total of 65,535 TCP Ports and another 65,535 UDP ports. When a program on your computer sends or receives data over the Internet it sends that data to an ip address and a specific port on the remote computer, and receives the data on a usually random port on its own computer. If it uses the TCP protocol to send and receive the data then it will connect and bind itself to a TCP port. If it uses the UDP protocol to send and receive data, it will use a UDP port. Figure 1, below, is a represenation of an IP address split into its many TCP and UDP ports. Note that once an application binds itself to a particular port, that port can not be used by any other application. It is first come, first served.

<-------------------- 192.168.1.10 -------------------->
0 1 2 3 4 5 .. .. .. .. .. .. .. .. 65531 65532 65533 65534 65535
Figure 1. IP address with Ports

This all probably still feels confusing to you, and there is nothing wrong with that, as this is a complicated concept to grasp. Therefore, I will give you an example of how this works in real life so you can have a better understanding. We will use web servers in our example as you all know that a web server is a computer running an application that allows other computers to connect to it and retrieve the web pages stored there.
In order for a web server to accept connections from remote computers, such as yourself, it must bind the web server application to a local port. It will then use this port to listen for and accept connections from remote computers. Web servers typically bind to the TCP port 80, which is what the http protocol uses by default, and then will wait and listen for connections from remote devices. Once a device is connected, it will send the requested web pages to the remote device, and when done disconnect the connection.
On the other hand, if you are the remote user connecting to a web server it would work in reverse. Your web browser would pick a random TCP port from a certain range of port numbers, and attempt to connect to port 80 on the IP address of the web server. When the connection is established, the web browser will send the request for a particular web page and receive it from the web server. Then both computers will disconnect the connection.
Now, what if you wanted to run an FTP server, which is a server that allows you to transfer and receive files from remote computers, on the same web server. FTP servers use TCP ports 20 and 21 to send and receive information, so you won't have any conflicts with the web server running on TCP port 80. Therefore, the FTP server application when it starts will bind itself to TCP ports 20 and 21, and wait for connections in order to send and receive data.
Most major applications have a specific port that they listen on and they register this information with an organization called IANA. You can see a list of applications and the ports they use at the IANA Registry. With developers registering the ports their applications use with IANA, the chances of two programs attempting to use the same port, and therefore causing a conflict, will be diminished.

Thanks & Regards,

"Remember Me When You Raise Your Hand For Dua"
Raheel Ahmed Khan
System Engineer
send2raheel@yahoo.com
send2raheel@engineer.com
sirraheel@gmail.com
send2raheel (skype id)

My Blog Spot
http://raheel-mydreamz.blogspot.com/
http://raheeldreamz.wordpress.com/

My Face book pages
http://www.facebook.com/pages/My-Dreamz-Rebiuld-our-nation
http://www.facebook.com/pages/Beauty-of-islam
http://www.facebook.com/pages/Health-is-wealth
    

How to connect an iPad to a Wireless or Wi-Fi network

Introduction
The iPad is ultimately a device create to allow you consume content in an easy and portable manner. As there is no better location for consumable content than the Internet, being able to connect to a Wi-Fi network so you can access the Internet is a necessity. This guide will walk you through all of the steps required to connect to a Wi-Fi network using your iPad. We have also outlined steps that will allow you to access almost all types of Wi-Fi networks as well as using proxy servers if your particular scenario requires it.

How to connect to a Wi-Fi or Wireless Network
This section will explain how to connect to a Wi-Fi or Wireless network that is broadcasting its name or SSID. For most public, and many private, Wi-Fi networks the name, or SSID, of the network is broadcast so that anyone who tries to connect to it will be able to do so. This guide will walk you through the steps of connecting to a Wi-Fi network that is broadcasting its name. If you wish to connect to a wireless network that is not broadcasting its name.
  1. Start the iPad
     
  2. Tap on the Settings app. The Settings icon looks like the following:


    Settings Icon
    Settings Icon


    Once in the settings application, you will be at the General Settings screen as shown below.


    General Settings screen
    General Settings screen

     
  3. Tap on the Wi-Fi category to get to the screen where you will connect to a wireless network as shown below.


    Choose an available wireless network screen
    Choose an available wireless network screen

    When you reach this screen, the iPad will start searching for Wi-Fi networks that are in range and that are broadcasting their names. As it discovers available networks it will list them under the Choose a Network... label. Please note that it may take some time for the iPad to see all of the available networks, so please be patient while it searches. You can tell that it is searching as there will be an animated symbol next to the Choose a Network... label while it is searching. If it does not find anything, it will pause for about a minute and then attempt to search again.

    When you see the Wi-Fi network that you would like to connect to, simply tap on it to attempt to join it. If it has a lock next to the name, then it will require you to enter a wireless encryption password in order to connect to it as discussed in the next step.
     
  4. Once you Tap on a network name, it will try to connect to it. If the network is not using encryption, then you can just skip to this step. If the network is using wireless encryption, though, you will be presented with a screen asking you to enter the wireless encryption password as shown below.


    Enter wireless security password screen
    Enter wireless security password screen


    In the password field, enter the wireless encryption password that is required to join this network. This password was originally set on your wireless router, and if you do not remember this password anymore, you can logon to the router and change the password to a new one. Please note that if you change the password on the router, then any other devices that connect to this device wirelessly will also need to have their settings changed to use the new password.

     
  5. The iPad will now attempt to connect to the network, and when finished, will display the Wi-Fi settings screen again, but this time with the joined network listed and with a checkmark next to it as shown below.


    Screen showing the iPad connected to a wireless network
    Screen showing the iPad connected to a wireless network


    This checkmark designates that your iPad is connected to the network. You can also see that your iPad is connected to a wireless network as in the upper left-hand corner you will see the word iPad with the Wi-Fi symbol ()next to it. You can now go back to your home screen and use any apps that require Wi-Fi connectivity.

How to connect to a Wi-Fi or Wireless network that is not broadcasting its name or SSID
There are many networks that do not advertise their network name, or SSID, for extra security. Due to this, the only way for an iPad to connect to these types of networks is to manually enter the network information that is required to make a connection. This section will explain how to manually connect your iPad to a wireless network.
In order to accomplish this please follow these steps:
  1. Start the iPad
     
  2. Tap on the Settings app. The app icon looks like the following:


    Settings Icon
    Settings Icon


    Once in the settings application, you will be at the General Settings screen as shown below.


    General Settings screen
    General Settings screen


  3. Tap on the Wi-Fi category to get to the screen where you will connect to a wireless network as shown below.


    Wi-Fi Settings screen
    Wi-Fi Settings screen

     
  4. Determine the correct Name, or SSID, that you will be connecting to and Tap on the Other... button. You will now be at the Other Network screen where the iPad will ask you to enter the settings required to connect to the network.


    Enter SSID screen
    Enter SSID screen


    In the Name field, enter the network name or SSID.
     
  5. Then tap on the Security button and you will be at the screen show below.


    Select Security Encryption Type screen
    Select Security Encryption Type screen

    At this screen you need to select the wireless encryption that the network that network you wish to connect to is using. It is important that you select the correct encryption type, as if you do not, you will not be able to connect to the wireless network. After selecting the encryption type, tap on the Other Network button.
     
  6. You will now be back at the Other Network screen where the iPad is now prompting you to enter the password as shown below.


    Enter Security Encryption Password screen
    Enter Security Encryption Password screen

    In the password field, please enter the password that is required to connect to the Wi-Fi network. This password was originally set on your wireless router, and if you do not remember this password, you can logon to the router and change the password to a new one. Please note that if you change the password on the router, then any other devices that connect to this device wirelessly will also need to have their settings changed to use the new password.
     
  7. Once you have entered in all the required information, tap the Join button on the iPad keyboard. The iPad will attempt to connect to the network, and when finished, will display the Wi-Fi settings screen again, but this time with the joined network listed and with a checkmark next to it as shown below.


    Screen showing the iPad connected to a wireless network
    Screen showing the iPad connected to a wireless network


    This checkmark designates that your iPad is connected to the network. You can also see that your iPad is connected to a wireless network as in the upper left-hand corner you will see the word iPad with the Wi-Fi symbol () next to it. You can now go back to your home screen and use any apps that require Wi-Fi connectivity.

How to configure your iPad Wi-Fi connection to use a static IP address
If the wireless network you are connecting to does not use DHCP to assign IP addresses to wireless devices, then you will need to configure your iPad with static IP addresses and other information in order to connect to the Internet or a network. To do this first find out the info, such as the static IP address, IP subnet mask, DNS servers, and router IP address, and proceed with the following steps. Please note, you must first create the wireless profile that you will be assigning static information to.
  1. Start the iPad
     
  2. Tap on the Settings app. When the Settings app loads, you will be at the General Settings category.

     
  3. Tap on the Wi-Fi settings category and you will be at a screen as shown below.


    Screen showing the iPad connected to a wireless network
    Screen showing the iPad connected to a wireless network

    You should now tap on the to access the specific settings of the wireless connection.
     
  4. You will now be at the Wi-Fi network settings screen for the connected network.


    Wireless settings for a Wi-Fi network
    Wireless settings for a Wi-Fi network
  5. Now tap the Static button to enter the static settings screen as shown below.


    Screen showing the iPad connected to a wireless network
    Screen showing the iPad connected to a wireless network

    In this screen you can enter the IP address, IP subnet mask, router IP address, DNS server, and search domains as necessary. At a minimum you must enter information in the IP Address, Subnet Mask, Router, and DNS fields for the iPad to be able to properly work on the wireless network. If you do not know this information, you should ask the router owner or administrator.

    When you are done entering the information, tap on the Wi-Fi Networks button and then go back to your Home screen to start using the iPad with these new settings.

How to configure your iPad to use a Proxy Server
Some networks require you to use a proxy server to access the Internet. A proxy server is another computer or device that acts as an intermediary between you and the Internet by relaying your requests to a server and the servers responses back to you. Unfortunately, this type of setup requires you to specify certain settings in order for you to use the Internet properly. This section will provide information on how to configure your iPad to use a proxy server.
  1. Start the iPad
     
  2. Tap on the Settings app. When the Settings app loads, you will be at the General Settings category.

     
  3. Tap on the Wi-Fi settings category and you will be at a screen as shown below.


    Screen showing the iPad connected to a wireless network
    Screen showing the iPad connected to a wireless network

    You should now tap on the to access the specific settings of the wireless connection.
     
  4. You will now be at the Wi-Fi network settings screen for the connected network.


    Wireless settings for a Wi-Fi network
    Wireless settings for a Wi-Fi network


    At the bottom you will find three proxy server options that you can choose from. The first option is Off, which is the default option and means that the iPad will not use a Proxy Server. The second setting is Manual, which means that you will enter the specific information about proxy server in the specified fields. The last option is Auto, which allows you to enter a URL that contains the configuration information as to what proxy settings the iPad should use.
     
  5. If you need to specify manual settings, then simply tap on the Manual button and fill in the appropriate fields as shown below.


    Screen showing the iPad connected to a wireless network
    Screen showing the iPad connected to a wireless network

    If your proxy server requires you to login to it before it allows you to use it, make sure you slide Authentication to ON and input your login credentials.

    If you have a configuration URL that contains your proxy settings, then simply tap on the Auto button and you will see a screen similar to below.


    Screen showing the iPad connected to a wireless network
    Screen showing the iPad connected to a wireless network

    Simply fill in the URL field with the proxy autoconfiguration URL.
     
  6. When you are done setting up your proxy server, tap on the Wi-Fi Networks button and then go back to your Home screen to start using the iPad with these new settings.

Deleting a Wi-Fi connection profile so the iPad wont automatically join it
At times you may find the need to delete a Wi-Fi connection profile that has previously been configured on your iPad. Whether this is because the profile belongs to a hotel that you are no longer staying at or you have changed your wireless password and need to re-enter it, this section will explain how to delete the profile from your iPad.
  1. Start the iPad
     
  2. Tap on the Settings app. When the Settings app loads, you will be at the General Settings category.

     
  3. Tap on the Wi-Fi settings category and you will be at a screen as shown below.


    Screen showing the iPad connected to a wireless network
    Screen showing the iPad connected to a wireless network

    You should now tap on the next to the Wi-Fi profile that you wish to delete.
     
  4. You will now be at the Wi-Fi network settings screen for the connected network.


    Wireless settings for a Wi-Fi network
    Wireless settings for a Wi-Fi network
  5. Tap on the Forget this Network button.
     
  6. When the iPad asks you to confirm that you wish to forget the network, tap on the Forget button.
You will no longer automatically connect to this network. Do not be concerned, though, if you go back to the Wi-Fi settings and still see the network you just specified should be forgotten. Once you power off the iPad, and start it again, the network will no longer be listed.

Troubleshooting
When working with computers and networking problems invariably happen. This section will offer steps that can be tried to resolve Wi-Fi connectivity issues with your iPad.
What to do if your iPad can't access a visible network:
The first step is to make sure that the wireless connection does not require a password. You can determine this by seeing if there is a lock symbol next to the wireless network name. If there is, then make sure you know the correct password to the network before attempting to join it. If that still does not resolve your issue, try moving closer to the wireless router and seeing if you are able to connect then.
What to do if you cannot access a network that is not broadcasting its network name or SSID:
Diagnosing connections to Wi-Fi networks that are not broadcasting their name or SSID can be difficult. The first suggestion, if the wireless router is under your control, is to allow the router to broadcast the name. If you can then connect, then you may have entered the name incorrectly, selected the wrong wireless encryption type, or entered the wrong wireless encryption password. You should then confirm these settings by looking at the configuration of the router, and if necessary, changing those settings to new ones. Then try connecting again.
What to do if you cannot access the Internet when connected to a wireless network:
If it shows that you are connected to a network, but you still cannot access the network, you should first make sure that your Internet connection is actually working. Test the connection from another computer and device to confirm that it is working. If it is working, go into the Wi-Fi settings for this particular connection on the iPad and under the DHCP settings, make sure that you have an assigned IP Address, Subnet Mask, Router, and DNS. If you do not have these fields populated, then tap on the Renew Lease button, and then tap on the Renew button when it asks if you with to continue. This will make the iPad request new connection settings. Once that is done, if you now have settings in the DHCP fields, try connecting to the Internet again.
If this still does not work, then you may want to confirm that you do not need to enter a static networking configuration into the iPad. To determine this, you should ask the owner or administrator of the wireless router.
Last, but not least, if the iPad shows its connected, but cannot access the internet, it could be because you entered the wrong wireless encryption password or it was changed after you initially created the Wi-Fi profile. To test this, simply Forget the network profile and try recreating it and entering the password again.
How to fix slow iPad Wi-Fi speeds or low quality wireless connections:
Unfortunately there have been a lot of reports that the iPad wireless range and sensitivity is not as good as it could, or should, be. That means that Wi-Fi connections that work fine with other devices or computers may not work as well with the iPad. To determine the quality of your Wi-Fi connection, you can look in the upper left-hand corner of the device. The three quality levels are shown from best to worst as , with the lower the level being the worst connection speed.
Unless Apple releases an update, or a software hack is released to increase the power of the antenna, we will need to use other methods to make the Wi-Fi connection quality better. To do this you can first try and use the iPad closer to the wireless router to increase your connection quality. This, though, is a ridiculous thing to have to do considering how much you spent on the iPad. Another option is to purchase a wireless extender that can extend the range of your wireless device so it is strong throughout your entire house or apartment. Popular extenders are the Linksys WRE54G Wireless-G Extender, Belkin Wireless G Universal Range Extender, or the Netgear WGXB102 Range Extender. When you add an extender to your wireless network, it will increase the range of your wireless router so that you can connect to your network in locations that previously you could not.

Conclusion
As you can see there are many Wi-Fi configuration options available to suit your specific needs. By knowing how to connect to a wireless network you can now connect to the Internet from locations such as a public Wi-Fi hotspot, a friends house, or a hotel. No matter what the specific requirement of your location, hopefully the information in this guide has shown you how to work around them.

Thanks & Regards,

"Remember Me When You Raise Your Hand For Dua"
Raheel Ahmed Khan
System Engineer
send2raheel@yahoo.com
send2raheel@engineer.com
sirraheel@gmail.com
send2raheel (skype id)

My Blog Spot
http://raheel-mydreamz.blogspot.com/
http://raheeldreamz.wordpress.com/

My Face book pages
http://www.facebook.com/pages/My-Dreamz-Rebiuld-our-nation
http://www.facebook.com/pages/Beauty-of-islam
http://www.facebook.com/pages/Health-is-wealth

Friday, 21 September 2012

How to Change a Linux Password

Keep your Linux computer secure by occasionally changing the password.

Linux is an operating system known for its stability and security. IT professionals generally consider Linux to be one of the most secure operating systems available today. This security can be weakened, however, if you have a weak password. It is also advisable to change your password from time to time just in case a hacker were to somehow discover your password. Changing a password in Linux is a very straightforward process, and with it you can make your system much more secure.

Instructions Changing a Linux password
       
1)Open a terminal. A terminal is the Linux version of the DOS command prompt in Windows. It takes text commands and produces text output. The process to open a terminal differs between different distributions and desktop environments. In GNOME, you can open a terminal by pressing "Alt+F2" and then typing "xterm" into the prompt that pops up.
  
2)Become root. This essentially elevates your privilege level to the Linux equivalent of "Administrator" in Windows. This may not be necessary if your user account already has the permissions to change passwords. To become root, type "sudo su" into the terminal and press "Enter." You are prompted to enter the root password. As you type your password, no dots or asterisks appear as they do on most applications, so take care to type it correctly. Once you have successfully done this, the dollar sign at the end of the command prompt will be replaced with a pound sign (#).
  
3)Change the password by typing "passwd username" (replace username with the user name on the account for which you want to change the password) and pressing "Enter." You are prompted to enter the new password twice. The entry method is the same as when you became root--no asterisks or dots appear as you type. You may also change the root password by just typing "passwd" with no user name and pressing "Enter." You should ideally use a strong password (at least eight characters long, consisting of at least three types of characters, such as lowercase or uppercase letters, numbers, and special characters such as spaces or punctuation). The terminal gives you a success message, and now you have successfully changed your Linux password.


Thanks & Regards,

"Remember Me When You Raise Your Hand For Dua"
Raheel Ahmed Khan
System Engineer
send2raheel@yahoo.com
send2raheel@engineer.com
sirraheel@gmail.com
send2raheel (skype id)

My Blog Spot
http://raheel-mydreamz.blogspot.com/
http://raheeldreamz.wordpress.com/

My Face book pages
http://www.facebook.com/pages/My-Dreamz-Rebiuld-our-nation
http://www.facebook.com/pages/Beauty-of-islam
http://www.facebook.com/pages/Health-is-wealth

How to Change an XP Password in Linux

Resetting and recovering a lost user’s password in Windows XP is easy provided you have access to the administrator account. If you have lost the administrator’s password, things get a bit tricky. One of the best and easiest ways of changing the administrator’s password is by using Linux. With an Unbuntu Linux Live CD, you can access the Windows hard drive and change the admin password, regaining administrative access on your XP installation.

Instructions

1)Download the Ubuntu ISO from Ubuntu.com and burn the image to a CD, if you have not already. Use your favorite ISO recording application (MagicISO, Nero, Roxio or ISO Recorder) to do so.
  
2)Place the Ubuntu Live CD into the computer’s disc drive and restart the computer. Press any key to boot into the Linux disc and select “Try Ubuntu Without Making Any Changes...” when prompted.

3)Select “System” > “Administration” from the menu bar, when the Ubuntu desktop loads. Select “Synaptic Package Manager” > “Settings” > “Repositories.” Enable the option to allow restricted software. Close the utility.
  
4)Relaunch the Synaptic Package Manager. Click “Search” and search for “chntpw”. Then hit "Enter." Install the returned result by selecting it and clicking “Apply.”
  
5)Select the Windows hard drive from the “Places” menu.
  
6)Select “Terminal” via the “Applications” menu, located in the “Accessories” subfolder.
  
7)Type "cd: /media/disk/WINDOWS/system32/config" and hit "Enter" to navigate to the Windows hard drive.
  
8)Type “sudo chntpw SAM” and hit "Enter." Use an asterisk to set a blank password, or type in the desired new password, and hit "Enter." Press “Y” to confirm the action.
  
9)Remove the Ubuntu Linux Live CD and restart the computer. You have successfully changed the Windows password via Linux.

Thanks & Regards,

"Remember Me When You Raise Your Hand For Dua"
Raheel Ahmed Khan
System Engineer
send2raheel@yahoo.com
send2raheel@engineer.com
sirraheel@gmail.com
send2raheel (skype id)

My Blog Spot
http://raheel-mydreamz.blogspot.com/
http://raheeldreamz.wordpress.com/

My Face book pages
http://www.facebook.com/pages/My-Dreamz-Rebiuld-our-nation
http://www.facebook.com/pages/Beauty-of-islam
http://www.facebook.com/pages/Health-is-wealth

what is Juice Jacking SCAM

  Juice Jacking is a cybersecurity threat that occurs when cybercriminals manipulate public charging stations, such as USB charging ports in...