Friday, 21 September 2012

How to Change a Lost Computer Password


When a Windows-based computer is booted in Safe Mode, it is generally necessary to enter the Administrator password for the computer to continue. Unfortunately, the Administrator password is easily fo

rgotten, making it impossible to log into the Windows Administrator account. However, any account with administrative privileges can be used to reset the password of any other account in Windows. Use the Windows command prompt to reset the password for your computer's Administrator account, or any lost password.

Instructions

1)Boot Windows normally. Log in to your computer using any account with administrative privileges.

2)Press the Windows logo and "R" keys on the keyboard simultaneously. The "Run" box appears.

3)Type "cmd" without the quotation marks in the Run box, and hit "Enter." The Windows command prompt appears.

4)Type "net user (user name) (password)" at the command prompt and hit "Enter." For example, if you want to change the Administrator password to "password," type "net user Administrator password." Substitute the username of your choice if you would like to reset a password other than the one for the Administrator account.

5)Restart your computer and log in to Windows using the new password you chose.
 
Thanks & Regards,

"Remember Me When You Raise Your Hand For Dua"
Raheel Ahmed Khan
System Engineer
send2raheel@yahoo.com
send2raheel@engineer.com
sirraheel@gmail.com
send2raheel (skype id)

My Blog Spot
http://raheel-mydreamz.blogspot.com/
http://raheeldreamz.wordpress.com/

My Face book pages
http://www.facebook.com/pages/My-Dreamz-Rebiuld-our-nation
http://www.facebook.com/pages/Beauty-of-islam
http://www.facebook.com/pages/Health-is-wealth

How to Remove an Administrator Password in Windows XP


How to Remove an Administrator Password in Windows XP thumbnail
You can reset your Windows XP administrator password or eliminate it altogether.

Passwords--those ubiquitious alphanumeric codes that protect us and give us access to everything digital--can be confusing. Though your computer likely won't forget a password, you very well might. When this happens, you can be locked out of your whole system, as in the case of the Windows XP administrator password.

Instructions

1)Insert your Windows XP CD into your CD drive and boot your computer. If you receive the message "press any key to boot from CD," press any key.
      
2)Press "Enter" to set up Windows. After you accept the license agreement, you will be asked if you want start a repair process.

3)Press "R" to begin the repair process. Setup will now check your disks and start copying files, which can take several minutes. After this, reboot. Let the computer boot normally (do not press a key to boot from CD).
       
4)Keep your eye on the lower left portion of the screen. When you see the Installing Devices progress bar, press "Shift" and "F10" at the same time. This will open a command line console.
       
5)Type "NUSRMGR.CPL" (without quotes) at the prompt, then press "Enter." This will give you access to User Accounts. Remove or change your password. Write it down. After the repair is finished, you will be able to log on with your new password.

Thanks & Regards,

"Remember Me When You Raise Your Hand For Dua"
Raheel Ahmed Khan
System Engineer
send2raheel@yahoo.com
send2raheel@engineer.com
sirraheel@gmail.com
send2raheel (skype id)

My Blog Spot
http://raheel-mydreamz.blogspot.com/
http://raheeldreamz.wordpress.com/

My Face book pages
http://www.facebook.com/pages/My-Dreamz-Rebiuld-our-nation
http://www.facebook.com/pages/Beauty-of-islam
http://www.facebook.com/pages/Health-is-wealth

Thursday, 20 September 2012

Windows Program Automatic Startup Locations

Many programs that you install are automatically run when you start your computer and load Windows. For the majority of cases, this type of behavior is fine. Unfortunately, there are programs that are not legitimate, such as spyware, hijackers, trojans, worms, viruses, that load in this manner as well. It is therefore important that you check regularly your startup registry keys regularly. Windows does offer a program that will list programs that are automatically started from SOME of these locations. This program, Msconfig.exe, unfortunately, though, only lists programs from a limited amount of startup keys.
Below are the various list of registry keys that can start a program when Windows boots. I have tried to keep the keys in the exact order that they load. Keep in mind, that some of the keys are set to load at the same time, so it is possible that the order will change on each boot up. These keys generally apply to Windows 95, 98, ME, NT, XP, 2000, Windows Vista, and Windows 7, and I will note when it is otherwise.
Upon turning on the computer the following autostart locations are processed in the following order:
Windows Boot Device Drivers - These drivers are loaded first as they are required for the proper operation of hardware such as storage devices. Boot device drivers will be located under the following key and have a Start value equal to 0.
Registry Keys:
HKEY_LOCAL_MACHINE\System\CurrentControlSet\Services
Windows will now perform various tasks and then start the Winlogon process. Winlogon eventually starts the service control manager that loads services and drivers that are set for auto-start.
Windows Auto-start Services & Drivers -The Service Control Manager (SCM) process (\Windows\System32\services.exe), will now launch any services or drivers that are marked with a Start value of 2.
Registry Keys:
HKEY_LOCAL_MACHINE\System\CurrentControlSet\Services
RunServicesOnce - This key is designed to start services when a computer boots up. These entries can also continue running even after you log on, but must be completed before the HKEY_LOCAL_MACHINE\...\RunOnce registry can start loading its programs.
Registry Keys:
HKEY_LOCAL_MACHINE\Software\Microsoft\Windows\CurrentVersion\RunServicesOnce
HKEY_CURRENT_USER\Software\Microsoft\Windows\CurrentVersion\RunServicesOnce
RunServices - This key is designed to start services as well. These entries can also continue running even after you log on, but must be completed before the HKEY_LOCAL_MACHINE\...\RunOnce registry can start loading its programs.
Registry Keys:
HKEY_LOCAL_MACHINE\Software\Microsoft\Windows\CurrentVersion\RunServices
HKEY_CURRENT_USER\Software\Microsoft\Windows\CurrentVersion\RunServices
The Windows logon prompt is shown on the Screen. After a user logs in the rest of the keys continue.
Notify - This key is used to add a program that will run when a particular event occurs. Events include logon, logoff, startup, shutdown, startscreensaver, and stopscreensaver. When Winlogon.exe generates an event such as the ones listed, Windows will look in the Notify registry key for a DLL that will handle this event. Malware has been known to use this method to load itself when a user logs on to their computer. Loading in such a way allows the malware program to load in such a way that it is not easy to stop.
Registry Key:
HKEY_LOCAL_MACHINE\SOFTWARE\Microsoft\Windows NT\CurrentVersion\Winlogon\Notify

UserInit Key - This key specifies what program should be launched right after a user logs into Windows. The default program for this key is C:\windows\system32\userinit.exe. Userinit.exe is a program that restores your profile, fonts, colors, etc for your user name. It is possible to add further programs that will launch from this key by separating the programs with a comma. For example:
HKLM\Software\Microsoft\Windows NT\CurrentVersion\Winlogon\Userinit =C:\windows\system32\userinit.exe,c:\windows\badprogram.exe.
This will make both programs launch when you log in and is a common place for trojans, hijackers, and spyware to launch from.
Registry Key:
HKEY_LOCAL_MACHINE\Software\Microsoft\Windows NT\CurrentVersion\Winlogon\Userinit
Shell Value - This value contains a list of comma separated values that Userinit.exe will launch. The default shell for Windows is explorer.exe, though there are legitimate replacements that have been made. When userinit.exe starts the shell, it will first launch the Shell value found in HKEY_CURRENT_USER. If this value is not present, it will then launch the value found in HKEY_LOCAL_MACHINE.
Registry Key:
HKEY_CURRENT_USER\Software\Microsoft\Windows NT\CurrentVersion\Winlogon\\Shell
HKEY_LOCAL_MACHINE\Software\Microsoft\Windows NT\CurrentVersion\Winlogon\\Shell
The rest of the Autostart locations will now be processed.
RunOnce Local Machine Key - These keys are designed to be used primarily by Setup programs. Entries in these keys are started once and then are deleted from the key. If there is an- exclamation point preceding the value of the key, the entry will not be deleted until after the program completes, otherwise it will be deleted before the program runs. This is important, because if the exclamation point is not used, and the program referenced in this key fails to complete, it will not run again as it will have already been deleted. All entries in this key are started synchronously in an undefined order. Due to this, all programs in this key must be finished before any entries in HKEY_LOCAL_MACHINE\...\Run, HKEY_CURRENT_USER\...\Run, HKEY_CURRENT_USER\...\RunOnce, and Startup Folders can be loaded. The RunOnce keys are ignored under Windows 2000 and Windows XP in Safe Mode. The RunOnce keys are not supported by Windows NT 3.51.
Registry Keys:
HKEY_LOCAL_MACHINE\Software\Microsoft\Windows\CurrentVersion\RunOnce
HKEY_LOCAL_MACHINE\Software\Microsoft\Windows\CurrentVersion\RunOnceEx
Run - These are the most common startup locations for programs to install auto start from. By default these keys are not executed in Safe mode. If you prefix the value of these keys with an asterisk, *, it will run in Safe Mode.
Registry Keys:
HKEY_LOCAL_MACHINE\Software\Microsoft\Windows\CurrentVersion\Run
HKEY_CURRENT_USER\Software\Microsoft\Windows\CurrentVersion\Run
All Users Startup Folder - For Windows XP, 2000, and NT, this folder is used for programs that should be auto started for all users who will login to this computer. It is generally found at:
Windows XP C:\Documents and Settings\All Users\Start Menu\Programs\Startup
Windows NT C:\wont\Profiles\All Users\Start Menu\Programs\Startup
Windows 2000 C:\Documents and Settings\All Users\Start Menu\Programs\Startup
User Profile Startup Folder - This folder will be executed for the particular user who logs in. This folder is usually found in:
Win 9X, ME c:\windows\start menu\programs\startup
Windows XP C:\Documents and Settings\LoginName\Start Menu\Programs\Startup
RunOnce Current User Key - These keys are designed to be used primarily by Setup programs. Entries in these keys are started once and then are deleted from the key. If there is an exclamation point preceding the value of the key, the entry will not be deleted until after the program completes, otherwise it will be deleted before the program runs. This is important, because if the exclamation point is not used, and the program referenced in this key fails to complete, it will not run again as it will have already been deleted. The RunOnce keys are ignored under Windows 2000 and Windows XP in Safe Mode. The RunOnce keys are not supported by Windows NT 3.51.
Registry Key:
HKEY_CURRENT_USER\Software\Microsoft\Windows\CurrentVersion\RunOnce
Explorer Run - These keys are generally used to load programs as part of a policy set in place on the computer or user.
Registry Keys:
HKEY_LOCAL_MACHINE\Software\Microsoft\Windows\CurrentVersion\Policies\Explorer\Run
HKEY_CURRENT_USER\Software\Microsoft\Windows\CurrentVersion\Policies\Explorer\Run
Load Key - This key is not commonly used anymore, but can be used to auto start programs.
Registry Key:
HKEY_CURRENT_USER\Software\Microsoft\Windows NT\CurrentVersion\Windows\load
AppInit_DLLs - This value corresponds to files being loaded through the AppInit_DLLs Registry value. The AppInit_DLLs registry value contains a list of dlls that will be loaded when user32.dll is loaded. As most Windows executables use the user32.dll, that means that any DLL that is listed in the AppInit_DLLs registry key will be loaded also. This makes it very difficult to remove the DLL as it will be loaded within multiple processes, some of which can not be stopped without causing system instability. The user32.dll file is also used by processes that are automatically started by the system when you log on. This means that the files loaded in the AppInit_DLLs value will be loaded very early in the Windows startup routine allowing the DLL to hide itself or protect itself before we have access to the system.
Registry Key:
HKEY_LOCAL_MACHINE\Software\Microsoft\Windows NT\CurrentVersion\Windows
ShellServiceObjectDelayLoad - This Registry value contains values in a similar way as the Run key does. The difference is that instead of pointing to the file itself, it points to the CLSID's InProcServer, which contains the information about the particular DLL file that is being used.
The files under this key are loaded automatically by Explorer.exe when your computer starts. Because Explorer.exe is the shell for your computer, it will always start, thus always loading the files under this key. These files are therefore loaded early in the startup process before any human intervention occurs.
Registry Key:
HKEY_LOCAL_MACHINE\SOFTWARE\Microsoft\Windows\CurrentVersion\ShellServiceObjectDelayLoad
SharedTaskScheduler - This section corresponds to files being loaded through the SharedTaskScheduler registry value for XP, NT, 2000 machines. The entries in this registry value run automatically when you start windows.
Registry Key:
HKEY_LOCAL_MACHINE\SOFTWARE\Microsoft\Windows\CurrentVersion\Explorer\SharedTaskScheduler
The following are files that programs can autostart from on bootup:
1. c:\autoexec.bat
2. c:\config.sys
3 . windir\wininit.ini - Usually used by setup programs to have a file run once and then get deleted.
4. windir\winstart.bat
5. windir\win.ini - [windows] "load"
6. windir\win.ini - [windows] "run"
7. windir\system.ini - [boot] "shell"
8 . windir\system.ini - [boot] "scrnsave.exe"
9. windir\dosstart.bat - Used in Win95 or 98 when you select the "Restart in MS-DOS mode" in the shutdown menu.
10. windir\system\autoexec.nt
11. windir\system\config.nt
Though it is good to know these details, if you just need a program to quickly scan these keys and produce a list for you, you can use Sysinternals Autoruns program. While you are at that site, you should browse some of the other excellent utilities.


Thanks & Regards,

"Remember Me When You Raise Your Hand For Dua"
Raheel Ahmed Khan
System Engineer
send2raheel@yahoo.com
send2raheel@engineer.com
sirraheel@gmail.com
send2raheel (skype id)

My Blog Spot
http://raheel-mydreamz.blogspot.com/
http://raheeldreamz.wordpress.com/

My Face book pages
http://www.facebook.com/pages/My-Dreamz-Rebiuld-our-nation
http://www.facebook.com/pages/Beauty-of-islam
http://www.facebook.com/pages/Health-is-wealth

How to see hidden files in Windows

Introduction
By default Windows hides certain files from being seen with Windows Explorer or My Computer. This is done to protect these files, which are usually system files, from accidentally being modified or deleted by the user. Unfortunately viruses, spyware, and hijackers often hide there files in this way making it hard to find them and then delete them.
By following the steps below for each version of Windows you will be able to change the operating systems behavior so that you can see hidden and protected files. In this way you will be able to delete or replaces files for troubleshooting purposes.
Windows 95
To enable the viewing of Hidden files follow these steps:
  1. Close all programs so that you are at your desktop.
  2. Double-click on the My Computer icon.
  3. Select the View menu and then click Options.
  4. After the new window appears select the View tab.
  5. Scroll down until you see the Show all files radio button and select it.
  6. Press the OK button and close the My Computer window.
  7. Now your computer is configured to show all hidden files.
Windows 98
To enable the viewing of Hidden files follow these steps:
  1. Close all programs so that you are at your desktop.
  2. Double-click on the My Computer icon.
  3. Select the View menu and then click Folder Options.
  4. After the new window appears select the View tab.
  5. Scroll down until you see the Show all files radio button and select it.
  6. Press the Apply button and then the OK button and close the My Computer window.
  7. Now your computer is configured to show all hidden files.
Windows ME
To enable the viewing of Hidden files follow these steps:
  1. Close all programs so that you are at your desktop.
  2. Double-click on the My Computer icon.
  3. Select the Tools menu and click Folder Options.
  4. After the new window appears select the View tab.
  5. Under the Hidden files and folders section select the radio button labeled Show hidden files and folders.
  6. Remove the checkmark from the checkbox labeled Hide file extensions for known file types.
  7. Remove the checkmark from the checkbox labeled Hide protected operating system files.
  8. Press the Apply button and then the OK button and shutdown My Computer.
  9. Now your computer is configured to show all hidden files.
Windows NT
To enable the viewing of Hidden files follow these steps:
  1. Close all programs so that you are at your desktop.
  2. Double-click on the My Computer icon.
  3. Select the View menu and then click Options.
  4. After the new window appears select the View tab.
  5. Scroll down until you see the Show all files radio button and select it.
  6. Press the OK button and shutdown My Computer.
  7. Now your computer is configured to show all hidden files.
Windows 2000
To enable the viewing of Hidden files follow these steps:
  1. Close all programs so that you are at your desktop.
  2. Double-click on the My Computer icon.
  3. Select the Tools menu and click Folder Options.
  4. After the new window appears select the View tab.
  5. Under the Hidden files and folders section select the radio button labeled Show hidden files and folders.
  6. Remove the checkmark from the checkbox labeled Hide file extensions for known file types.
  7. Remove the checkmark from the checkbox labeled Hide protected operating system files.
  8. Press the Apply button and then the OK button and shutdown My Computer.
  9. Now your computer is configured to show all hidden files.
Windows XP and Windows 2003
To enable the viewing of Hidden files follow these steps:
  1. Close all programs so that you are at your desktop.
  2. Double-click on the My Computer icon.
  3. Select the Tools menu and click Folder Options.
  4. After the new window appears select the View tab.
  5. Put a checkmark in the checkbox labeled Display the contents of system folders.
  6. Under the Hidden files and folders section select the radio button labeled Show hidden files and folders.
  7. Remove the checkmark from the checkbox labeled Hide file extensions for known file types.
  8. Remove the checkmark from the checkbox labeled Hide protected operating system files.
  9. Press the Apply button and then the OK button and shutdown My Computer.
  10. Now your computer is configured to show all hidden files.
Windows Vista
To enable the viewing of Hidden files follow these steps:
  1. Close all programs so that you are at your desktop.
  2. Click on the Start button. This is the small round button with the Windows flag in the lower left corner.
  3. Click on the Control Panel menu option.
  4. When the control panel opens you can either be in Classic View or Control Panel Home view:

    If you are in the Classic View do the following:
    1. Double-click on the Folder Options icon.
    2. Click on the View tab.
    3. Go to step 5.

    If you are in the Control Panel Home view do the following:
    1. Click on the Appearance and Personalization link .
    2. Click on Show Hidden Files or Folders.
    3. Go to step 5.
       
  5. Under the Hidden files and folders section select the radio button labeled Show hidden files and folders.
  6. Remove the checkmark from the checkbox labeled Hide extensions for known file types.
  7. Remove the checkmark from the checkbox labeled Hide protected operating system files.
  8. Press the Apply button and then the OK button.
  9. Now Windows Vista is configured to show all hidden files.
Windows 7
To enable the viewing of Hidden files follow these steps. Please note a guide with images that shows the same steps can be found here:
  1. Close all programs so that you are at your desktop.
  2. Click on the Start button. This is the small round button with the Windows flag in the lower left corner.
  3. Click on the Control Panel menu option.
  4. When the control panel opens click on the Appearance and Personalization link.
  5. Under the Folder Options category, click on Show Hidden Files or Folders.
  6. Under the Hidden files and folders section select the radio button labeled Show hidden files, folders, or drives.
  7. Remove the checkmark from the checkbox labeled Hide extensions for known file types.
  8. Remove the checkmark from the checkbox labeled Hide protected operating system files (Recommended).
  9. Press the Apply button and then the OK button..
  10. Now Windows 7 is configured to show all hidden files.
Windows 8
To enable the viewing of Hidden files follow these steps. Please note a guide with images that shows the same steps can be found here:
  1. From the Windows 8 Start Screen, click on the Control Panel app.
  2. When the Control Panel opens scroll down to the bottom and click on the More Settings option.
  3. The traditional Windows 8 Control Panel will now open. When it is open, click on the Appearance and Personalization link.
  4. Under the Folder Options category, click on Show Hidden Files or Folders.
  5. Under the Hidden files and folders section select the radio button labeled Show hidden files, folders, or drives.
  6. Remove the checkmark from the checkbox labeled Hide extensions for known file types.
  7. Remove the checkmark from the checkbox labeled Hide protected operating system files (Recommended).
  8. Press the Apply button and then the OK button..
  9. Now Windows 8 is configured to show all hidden files.
Please note that you will now see icons that were not previously visible. One of the most common concerns is that you will see a file called desktop.ini throughout your computer. These are legitimate hidden files and can be ignored.
Conclusion
Now that you know how to see all hidden files on your computer, malicious programs such as viruses, spyware, and hijackers will no longer be able to hide their presence from you or people helping you.
 
Thanks & Regards,

"Remember Me When You Raise Your Hand For Dua"
Raheel Ahmed Khan
System Engineer
send2raheel@yahoo.com
send2raheel@engineer.com
sirraheel@gmail.com
send2raheel (skype id)

My Blog Spot
http://raheel-mydreamz.blogspot.com/
http://raheeldreamz.wordpress.com/

My Face book pages
http://www.facebook.com/pages/My-Dreamz-Rebiuld-our-nation
http://www.facebook.com/pages/Beauty-of-islam
http://www.facebook.com/pages/Health-is-wealth

Wednesday, 19 September 2012

How to remove a Trojan, Virus, Worm, or other Malware

Dialers, Trojans, Viruses, and Worms Oh My!
If you use a computer, read the newspaper, or watch the news, you will know about computer viruses or other malware. These are those malicious programs that once they infect your machine will start causing havoc on your computer. What many people do not know is that there are many different types of infections that are categorized in the general category of Malware.
Malware - Malware is programming or files that are developed for the purpose of doing harm. Thus, malware includes computer viruses, worms, Trojan horses, spyware, hijackers, and certain type of adware.
This article will focus on those malware that are considered viruses, trojans, worms, and viruses, though this information can be used to remove the other types of malware as well. We will not go into specific details about any one particular infection, but rather provide a broad overview of how these infections can be removed. For the most part these instructions should allow you to remove a good deal of infections, but there are some that need special steps to be removed and these won't be covered under this tutorial.
Before we continue it is important to understand the generic malware terms that you will be reading about.
Adware - A program that generates pop-ups on your computer or displays advertisements. It is important to note that not all adware programs are necessarily considered malware. There are many legitimate programs that are given for free that display ads in their programs in order to generate revenue. As long as this information is provided up front then they are generally not considered malware.
Backdoor - A program that allows a remote user to execute commands and tasks on your computer without your permission. These types of programs are typically used to launch attacks on other computers, distribute copyrighted software or media, or hack other computers.
Dialler - A program that typically dials a premium rate number that has per minute charges over and above the typical call charge. These calls are with the intent of gaining access to pornographic material.
Hijackers - A program that attempts to hijack certain Internet functions like redirecting your start page to the hijacker's own start page, redirecting search queries to a undesired search engine, or replace search results from popular search engines with their own information.
Spyware - A program that monitors your activity or information on your computer and sends that information to a remote computer without your knowledge.
Trojan - A program that has been designed to appear innocent but has been intentionally designed to cause some malicious activity or to provide a backdoor to your system.
Virus - A program that when run, has the ability to self-replicate by infecting other programs and files on your computer. These programs can have many effects ranging from wiping your hard drive, displaying a joke in a small box, or doing nothing at all except to replicate itself. These types of infections tend to be localized to your computer and not have the ability to spread to another computer on their own. The word virus has incorrectly become a general term that encompasses trojans, worms, and viruses.
Worm - A program that when run, has the ability to spread to other computers on its own using either mass-mailing techniques to email addresses found on your computer or by using the Internet to infect a remote computer using known security holes.

How these infections start
Just like any program, in order for the program to work, it must be started. Malware programs are no different in this respect and must be started in some fashion in order to do what they were designed to do. For the most part these infections run by creating a configuration entry in the Windows Registry in order to make these programs start when your computer starts.
Unfortunately, though, in the Windows operating system there are many different ways to make a program start which can make it difficult for the average computer user to find manually. Luckily for us, though, there are programs that allow us to cut through this confusion and see the various programs that are automatically starting when windows boots. The program we recommend for this, because its free and detailed, is Autoruns from Sysinternals.

When you run this program it will list all the various programs that start when your computer is booted into Windows. For the most part, the majority of these programs are safe and should be left alone unless you know what you are doing or know you do not need them to run at startup.
At this point, you should download Autoruns and try it out. Just run the Autoruns.exe and look at all the programs that start automatically. Don't uncheck or delete anything at this point. Just examine the information to see an overview of the amount of programs that are starting automatically. When you feel comfortable with what you are seeing, move on to the next section.

Use an anti-virus and anti-malware program to remove the infections
Make sure you are using an anti-virus program and that the anti-virus program is updated to use the latest definitions. If you do not currently have an anti-virus installed, you can select one from the following list and use it to scan and clean your computer. The list below includes both free and commercial anti-virus programs, but even the commercial ones typically have a trial period in which you can scan and clean your computer before you have to pay for it.
It is also advised that you install and scan your computer with MalwareBytes' Anti-Malware and SUPERAntiSpyware. Both of these are excellent programs and have a good track record at finding newer infections that the more traditional anti-virus programs miss. Guides on how to install and use these programs can be found below.
How to use Malwarebytes' Anti-Malware to scan and remove malware from your computer
How to use SUPERAntiSpyware to scan and remove malware from your computer
After performing these instructions if you still are infected, you can use the instructions below to manually remove the infection.

How to remove these infections manually
We have finally arrived at the section you came here for. You are most likely reading this tutorial because you are infected with some sort of malware and want to remove it. With this knowledge that you are infected, it is also assumed that you examined the programs running on your computer and found one that does not look right. You did further research by checking that program against our Startup Database or by searching in Google and have learned that it is an infection and you now want to remove it.
If you have identified the particular program that is part of the malware, and you want to remove it, please follow these steps.
  1. Download and extract the Autoruns program by Sysinternals to C:\Autoruns
  2. Reboot into Safe Mode so that the malware is not started when you are doing these steps. Many malware monitor the keys that allow them to start and if they notice they have been removed, will automatically replace that startup key. For this reason booting into safe mode allows us to get past that defense in most cases.
     
  3. Navigate to the C:\Autoruns folder you created in Step 1 and double-click on autoruns.exe.
     
  4. When the program starts, click on the Options menu and enable the following options by clicking on them. This will place a checkmark next to each of these options.
    1. Include empty locations
       
    2. Verify Code Signatures
       
    3. Hide Signed Microsoft Entries
       
  5. Then press the F5 key on your keyboard to refresh the startups list using these new settings.
     
  6. The program shows information about your startup entries in 8 different tabs. For the most part, the filename you are looking for will be found under the Logon or the Services tabs, but you should check all the other tabs to make sure they are not loading elsewhere as well. Click on each tab and look through the list for the filename that you want to remove. The filename will be found under the Image Path column. There may be more than one entry associated with the same file as it is common for malware to create multiple startup entries. It is important to note that many malware programs disguise themselves by using the same filenames as valid Microsoft files. it is therefore important to know exactly which file, and the folder they are in, that you want to remove. You can check our Startup Database for that information or ask for help in our computer help forums.
     
  7. Once you find the entry that is associated with the malware, you want to delete that entry so it will not start again on the next reboot. To do that right click on the entry and select delete. This startup entry will now be removed from the Registry.
     
  8. Now that we made it so it will not start on boot up, you should delete the file using My Computer or Windows Explorer. If you can not see the file, it may be hidden. To allow you to see hidden files you can follow the steps for your operating system found in this tutorial:

    How to see hidden files in Windows
     
  9. When you are finished removing the malware entries from the Registry and deleting the files, reboot into normal mode as you will now be clean from the infection.
How to protect yourself in the future
In order to protect yourself from this happening again it is important that take proper care and precautions when using your computer. Make sure you have updated antivirus and spyware removal software running, all the latest updates to your operating system, a firewall, and only open attachments or click on pop-ups that you know are safe. These precautions can be a tutorial unto itself, and luckily, we have one created already:
Simple and easy ways to keep your computer safe and secure on the Internet
Please read this tutorial and follow the steps listed in order to be safe on the Internet. Other tutorials that are important to read in order to protect your computer are listed below.
Understanding Spyware, Browser Hijackers, and Dialers
Understanding and Using a Firewall
Safely Connecting a Computer to the Internet
Using SpywareBlaster to protect your computer from Spyware, Hijackers, and Malware
Using IE-Spyad to enhance your privacy and Security

Conclusion
Now that you know how to remove a generic malware from your computer, it should help you stay relatively clean from infection. Unfortunately there are a lot of malware that makes it very difficult to remove and these steps will not help you with those particular infections. In situations like that where you need extra help, do not hesitate to ask for help in our computer help forums. We also have a self-help section that contains detailed fixes on some of the more common infections that may be able to help.


 Thanks & Regards,

"Remember Me When You Raise Your Hand For Dua"
Raheel Ahmed Khan
System Engineer
send2raheel@yahoo.com
send2raheel@engineer.com
sirraheel@gmail.com
send2raheel (skype id)

My Blog Spot
http://raheel-mydreamz.blogspot.com/
http://raheeldreamz.wordpress.com/

My Face book pages
http://www.facebook.com/pages/My-Dreamz-Rebiuld-our-nation
http://www.facebook.com/pages/Beauty-of-islam
http://www.facebook.com/pages/Health-is-wealth

How to force quit a program on a Mac

When using an application on a Mac it may become unresponsive and become frozen. When an application is in this state you are normally not able to interact with the program or close it normally via the Quit menu option. When this occurs the only way to close the program is to use Force Quit, which will forcefully close the programs. This tutorial will walk you through terminating an unresponsive program on your Mac.
WARNING: When you forcefully close a program as shown in the steps below, any unsaved data will be lost. You should only close programs this way if the application is hung and you cannot quit it normally.
To forcefully quit a program, please click on the Apple icon (Apple Menu icon) in the top left corner of your MacOS desktop and select Force Quit Finder as shown below.

Apple Menu

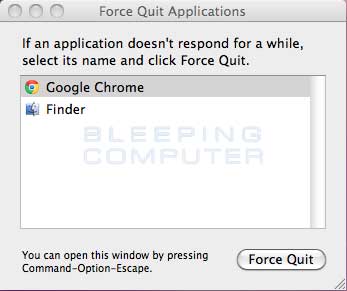
This will bring up the Force Quit Applications menu that displays a list of all the running applications that you can close.

Force Quit Applications Menu

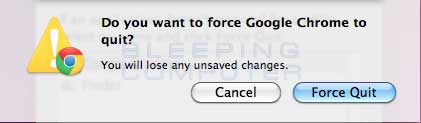
Left click on the application you would like to close so that it is selected and then click on the Force Quit button. You will now be shown a prompt confirming whether or not you want to continue terminating the program.

Force Quit Confirmation

Click on the Force Quit button again and the program will be forcefully closed on your Mac.


Thanks & Regards,

"Remember Me When You Raise Your Hand For Dua"
Raheel Ahmed Khan
System Engineer
send2raheel@yahoo.com
send2raheel@engineer.com
sirraheel@gmail.com
send2raheel (skype id)

My Blog Spot
http://raheel-mydreamz.blogspot.com/
http://raheeldreamz.wordpress.com/

My Face book pages
http://www.facebook.com/pages/My-Dreamz-Rebiuld-our-nation
http://www.facebook.com/pages/Beauty-of-islam
http://www.facebook.com/pages/Health-is-wealth
 

How to start Windows in Safe Mode

Introduction
Windows Safe Mode is a way of booting up your Windows operating system in order to run administrative and diagnostic tasks on your installation. When you boot into Safe Mode the operating system only loads the bare minimum of software that is required for the operating system to work. This mode of operating is designed to let you troubleshoot and run diagnostics on your computer. Windows Safe Mode loads a basic video drivers so your programs may look different than normal.
For Win98/ME, XP, Vista and Windows 7 there are two methods of booting into Safe Mode, while 95 and 2000 only have one. We will describe these methods below:
F8 - By pressing the F8 key right when Windows starts, usually right after you hear your computer beep when you reboot it, you will be brought to a menu where you can choose to boot into safe mode. If it does not work on the first try, reboot and try again as you have to be quick when you press it. I have found that during boot up right after the computer shows you all the equipment , memory, etc installed on your computer, if you start lightly tapping the F8 key you will usually be able to get to the desired menu.
System Configuration Utility - You can use the System Configuration Utility, or MSCONFIG, found in Windows 98, ME, XP, Windows Vista, and Windows 7 to make Windows boot into Safe Mode on the next reboot. We will go into specific details in the sections below. Please note, that you should not force your computer to boot into Safe Mode using the System Configuration Utility if you suspect you are infected with malware as the malware may corrupt keys required to boot into Safe Mode. You can read more about this here.
Windows 95
Windows 95 can only boot into Safe Mode using the F8 method as it does not have a System Configuration Utility.
Using the F8 Method:
  1. Restart your computer.
  2. When the machine first starts it will generally list some equipment that is installed in your machine, amount of memory, hard drives installed etc. When it is finished with that it will say "Starting Windows 95". Immediately after seeing "Starting Windows 95" press the F8 key.
  3. You will now be presented with a menu. Select the option for Safe Mode using the arrow keys.
  4. Then press enter on your keyboard to boot into Safe Mode.
  5. Do whatever tasks you require and when you are done reboot to boot back into normal mode.
Windows 98/ME
NOTE: Windows ME may look slightly different than what is shown in the images below. You should still have no problem following along.
Using the F8 Method:
  1. Restart your computer.
  2. When the machine first starts again it will generally list some equipment that is installed in your machine, amount of memory, hard drives installed etc. At this point you should gently tap the F8 key repeatedly until you are presented with a menu.
  3. When you have the menu on the screen. Select the option for Safe Mode using the arrow keys.
  4. Then press enter on your keyboard to boot into Safe Mode.
  5. Do whatever tasks you require and when you are done reboot to boot back into normal mode.
Using the System Configuration Tool Method:
Step 1: Close all programs so that you have nothing open and are at the desktop.
Step 2: Click on the Start button then click on Run.
Step 3: In the Run field type msconfig as shown in the image below.
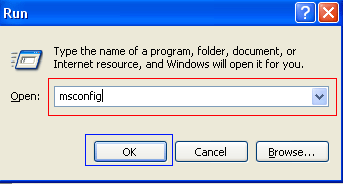
Figure 1. Starting Msconfig

Step 4: Press the OK button and the System Configuration Utility will start up. You will then see a screen similar to Figure 2 below.
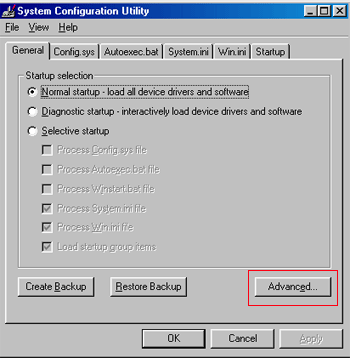

Figure 2. SCU Startup Screen
Step 5: You should now press the Advanced button designated by the red box in the figure above and you will see a screen similar to figure 3 below.
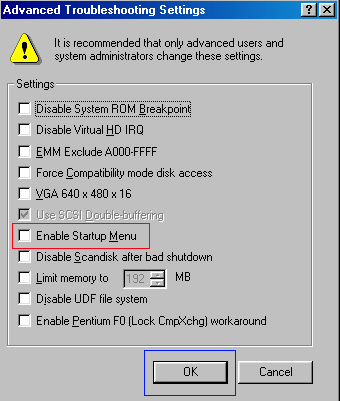

Figure 3. Advanced Options

Step 6: Place a checkmark in the checkbox labeled "Enable Startup Menu" designated by the red box in Figure 3 above. Then press the OK button and then the OK button again. Windows 98/ME will now prompt if you would like to reboot as shown in Figure 4 below.
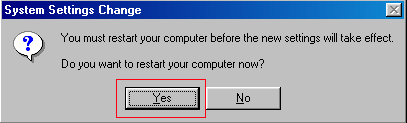

Figure 4. Confirm Reboot

Step 7: Press the Yes button and your computer will restart into Safe Mode.
Step 8: When the computer boots up perform what diagnostic or troubleshooting tasks you require.
Step 9. When you are finished with these tasks, complete steps 1-7 again, but in Step 6 this time uncheck the checkbox labeled "Enable Startup Menu".
Step 10: Reboot the computer back into normal mode.
Windows 2000
Windows 2000 can only boot into Safe Mode using the F8 method as it does not have a System Configuration Utility.
Using the F8 Method:
  1. Restart your computer.
  2. When the machine first starts again it will generally list some equipment that is installed in your machine, amount of memory, hard drives installed etc. When that is completed it will start loading Windows.
  3. When you see the screen that has a black and white bar at the bottom stating "Starting Windows", tap the F8 key repeatedly until you get to the Windows 2000 Advanced Options Menu
  4. At this menu use the arrow keys to select the Safe Mode option, which is usually the first in the list.
  5. Press the enter key.
  6. Your computer will continue booting, but now will boot into Safe Mode.
  7. Do whatever tasks you require and when you are done reboot to boot back into normal mode.
Windows XP
Using the F8 Method:
  1. Restart your computer.
  2. When the machine first starts again it will generally list some equipment that is installed in your machine, amount of memory, hard drives installed etc. At this point you should gently tap the F8 key repeatedly until you are presented with a Windows XP Advanced Options menu.
  3. Select the option for Safe Mode using the arrow keys.
  4. Then press enter on your keyboard to boot into Safe Mode.
  5. Do whatever tasks you require and when you are done reboot to boot back into normal mode.
Using the System Configuration Tool Method:
Note: If you are having trouble entering Safe Mode via the F8 method, you should not use this method to force it to startup into safe mode. For reasons why, you should read this.
Step 1: Close all programs so that you have nothing open and are at the desktop.
Step 2: Click on the Start button then click on Run.
Step 3: In the Run field type msconfig as shown in the image below.
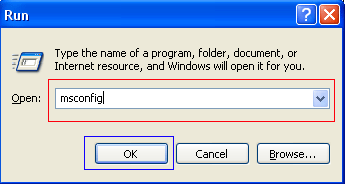
Figure 4. Starting Msconfig

Step 4: Press the OK button and the System Configuration Utility will start up. You will then see a screen similar to Figure 5 below.
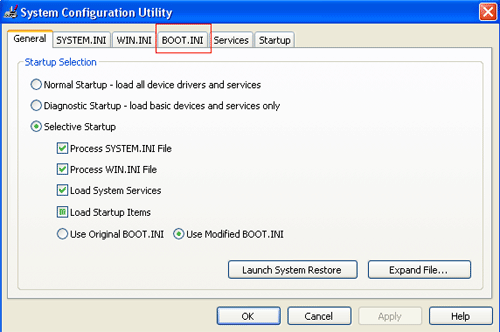

Figure 5. Starting the System Configuration Utility
Step 5: Click on the tab labeled "BOOT.INI" which is designated by the red box in Figure 5 above. You will then be presented with a screen similar to Figure 6 below.
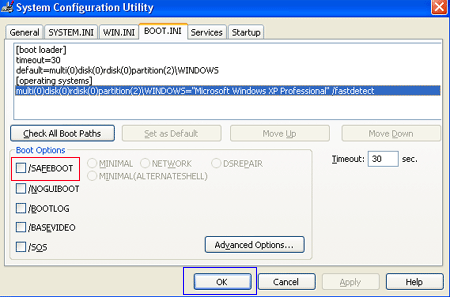

Figure 6. BOOT.INI Tab
Step 6: Put a checkmark in the checkbox labeled "/SAFEBOOT" designated by the red box in Figure 6 above. Then press the OK button. After pressing the button you will be presented with a confirmation box as shown in Figure 7 below.
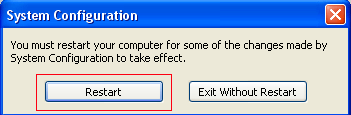

Figure 7. Confirm Reboot
Step 7: Press the Restart button and let the computer reboot. It will now boot up into Safe Mode.
Step 8: When the computer boots up do what diagnostic or troubleshooting tasks that you need to do.
Step 9. When are finished with your tasks, complete steps 1-7 again, but in Step 6 this time uncheck the checkbox labeled "/SAFEBOOT". Then click on the General tab and set it for Normal startup.
Step 10: Reboot the computer back into normal mode.

Windows Vista
Using the F8 Method:
  1. Restart your computer.
  2. When the computer starts you will see your computer's hardware being listed. When you see this information start to gently tap the F8 key repeatedly until you are presented with the Windows Vista Advanced Boot Options.
  3. Select the Safe Mode option using the arrow keys.
  4. Then press the enter key on your keyboard to boot into Vista Safe Mode.
  5. When Windows starts you will be at a typical logon screen. Logon to your computer and Vista will enter Safe mode.
  6. Do whatever tasks you require, and when you are done, reboot to go back into normal mode.
Using the System Configuration Tool Method:
Note: If you are having trouble entering Safe Mode via the F8 method, you should not use this method to force it to startup into safe mode.
  1. Close any running programs and open Windows so you are back at the desktop.
     
  2. Click on the Start () button.
     
  3. In the Start Menu Search Box () type msconfig and press enter on your keyboard.
     
  4. The System Configuration utility will open and you will see a screen similar to the one below.
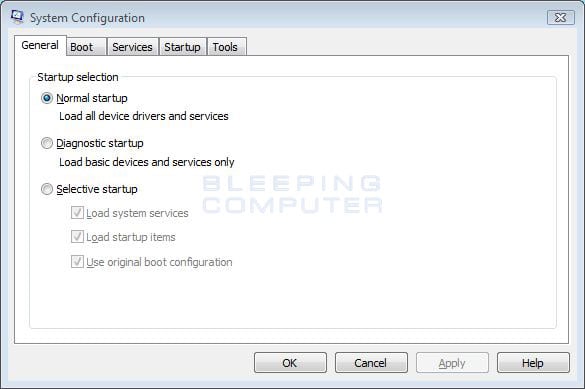


    Vista System Configuration Utility
    Figure 8. Vista System Configuration Utility


    Click on the Boot tab.
  5. You will now be at the Boot options screen as shown below.
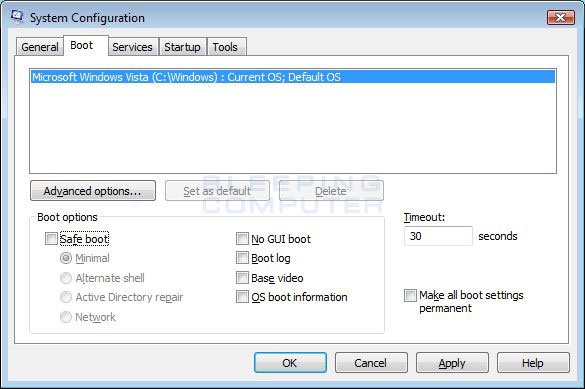


    Vista Boot tab in the System Configuration utility
    Figure 9. Vista Boot tab in the System Configuration utility


    Put a checkmark in the checkbox labeled Safe boot
     
  6. Press the Apply button and then press the OK button.
     
  7. You will now be presented with a prompt stating that you need to reboot the computer to apply the change.
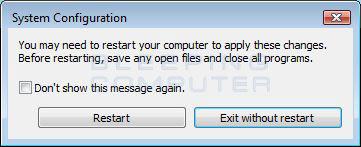


    Restart Prompt
    Figure 10. Restart Prompt


    Click on the Restart button to reboot your computer.
     
  8. Your computer will now restart directly into Safe Mode. When you get to the Vista logon screen, log on to the computer and perform any necessary tasks.
     
  9. When done with your tasks, from within Safe Mode, start msconfig.
     
  10. When the program is open, and you are on the General tab, select the option labeled Normal Startup.
     
  11. Then press the Apply button and then the OK button.
     
  12. When the programs prompts you to reboot, allow it to do so, and you will boot back into Windows Vista in normal mode.

Windows 7
Using the F8 Method:
  1. Restart your computer.
  2. When the computer starts you will see your computer's hardware being listed. When you see this information start to gently tap the F8 key on your keyboard repeatedly until you are presented with the Windows 7 Advanced Boot Options screen as shown in the image below.
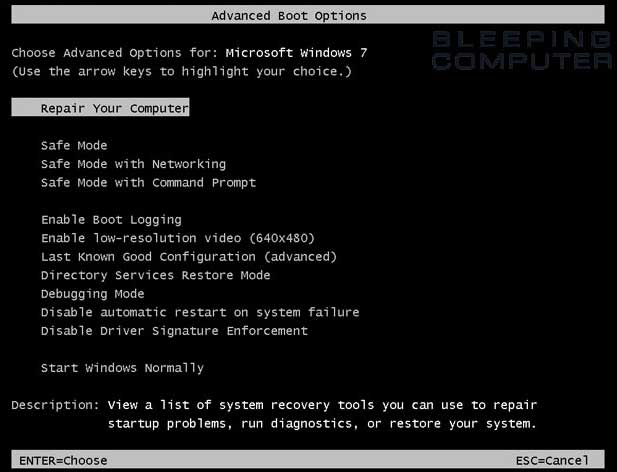

    Figure 11. Windows 7 Advanced Boot Options screen
    Figure 11. Windows 7 Advanced Boot Options screen
  3. Using the arrow keys, select the Safe Mode option you want.
  4. Then press the enter key on your keyboard to boot into Windows 7 Safe Mode.
  5. When Windows starts you will be at a typical logon screen. Logon to your computer and Windows 7 will enter Safe mode.
  6. Do whatever tasks you require, and when you are done, reboot to go back into normal mode.
Using the System Configuration Tool Method:
Note: If you are having trouble entering Safe Mode via the F8 method, you should not use this method to force it to startup into safe mode. For reasons why, you should read this.
  1. Close any running programs and open Windows so you are back at the desktop.
     
  2. Click on the Start () button.
     
  3. In the Start Menu Search Box type msconfig as shown in Figure 12 below.
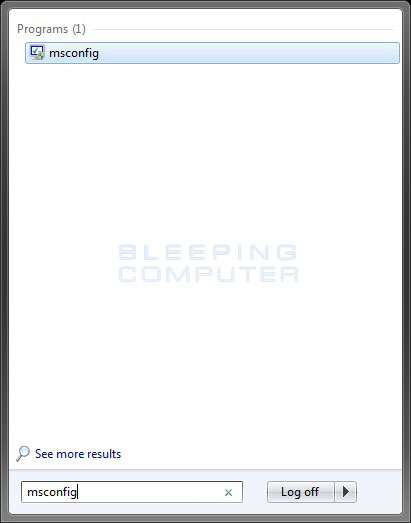

    Figure 12. Windows 7 Search box
    Figure 12. Windows 7 Search box


    Then press enter on your keyboard.
     
  4. The System Configuration utility will open and you will see a screen similar to the one below.
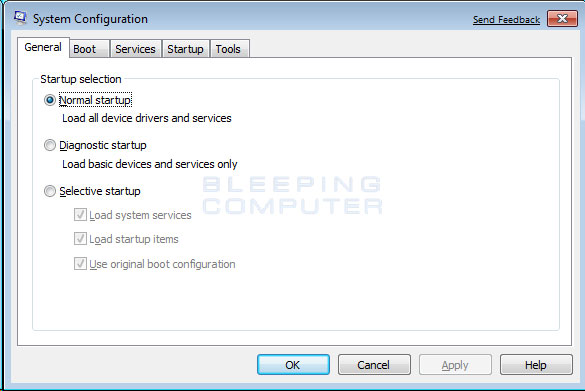


    Vista System Configuration Utility
    Figure 13. Windows 7 System Configuration Utility


    Click on the Boot tab.
     
  5. You will now be at the Boot screen as shown below.
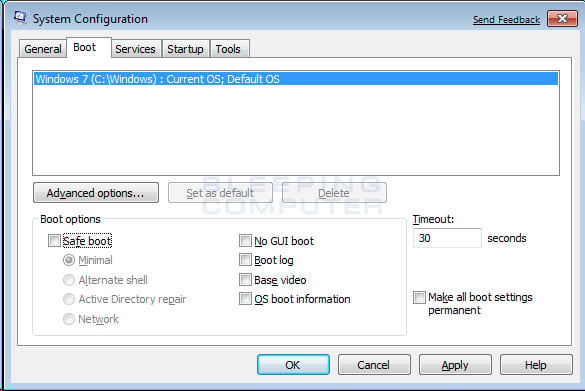


    Vista Boot tab in the System Configuration utility
    Figure 14. Windows 7 Boot tab in the System Configuration utility


    Put a checkmark in the checkbox labeled Safe boot
     
  6. Press the Apply button and then press the OK button.
     
  7. You will now be presented with a prompt stating that you need to reboot the computer to apply the change.
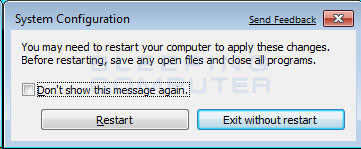


    Figure 15. Restart Prompt
    Figure 15. Restart Prompt


    Click on the Restart button to reboot your computer.
     
  8. Your computer will now restart directly into Safe Mode. When you get to the Windows 7 logon screen, log on to the computer and perform any necessary tasks.
     
  9. When done with your tasks, from within Safe Mode, start msconfig.
     
  10. When the program is open, and you are on the General tab, select the option labeled Normal Startup.
     
  11. Then press the Apply button and then the OK button.
     
  12. When the programs prompts you to reboot, allow it to do so, and you will boot back into Windows 7 in normal mode.

Problems that can occur by forcing Safe Mode using the System Configuration Utility
It is possible to make your computer continuously boot up into safe mode using the System Configuration utility as described above. The program does this by changing your boot.ini file, the settings file that configures your computer's boot sequence, and adding the /safeboot argument to your operating systems startup line. An example of this can be seen below.

Original [operating systems]
multi(0)disk(0)rdisk(0)partition(2)\WINDOWS="Microsoft Windows XP Professional" /FASTDETECT /NOEXECUTE=OPTIN
After using MsConfig.exe [operating systems]
multi(0)disk(0)rdisk(0)partition(2)\WINDOWS="Microsoft Windows XP Professional" /FASTDETECT /NOEXECUTE=OPTIN /safeboot:minimal
When you are done using safe mode, you would then run the System Configuration utility again and uncheck the /Safeboot option, thus removing the /safeboot argument from the boot.ini file, and allowing your computer to boot up normally.
On a computer that is operating properly this is normally not a problem. Unfortunately, though, a new trick that some of the more recent malware are using is to delete certain Windows Registry keys so that your computer can not properly boot into safe mode. It is in these situations that using the System Configuration utility to boot into safe mode can cause the computer to become inoperable for many users.
This is because once you set the computer to boot into Safe Mode using /Safeboot, it will continuously attempt to start Safe Mode until the /safeboot argument is removed from the boot.ini. Since the malware is not allowing us to actually boot into safe mode, you have no way of getting to a point where you can run the System Configuration utility again to uncheck the /Safeboot option. Thus, you are stuck with a computer constantly attempting to get into safe mode and not being able to do so.
If a situation like this has happened to you it is possible to fix this problem by renaming your boot.ini file. The first step would be to use a boot disk to start your computer. If your computer does not have a floppy disk, then you can typically boot off the Windows CD that came with your computer in order to access the Windows Recovery Console. More information about the Windows Recovery Console can be found here. Once booted to a command prompt, you would simply rename your C:\Boot.ini file to another name like C:\Boot.ini.bak. The command to rename the file at the command prompt is:
ren C:\Boot.ini Boot.ini.bak
Once the file is renamed, you can then remove the boot disk and reboot your computer to get back to normal mode. When booting up after the rename, do not be surprised if you see an error stating that you do not have a valid Boot.ini file. When you get back to normal Windows mode, you can then rename C:\Boot.ini.bak to C:\Boot.ini and run Msconfig again to remove the /safeboot flag.

Conclusion
It is not uncommon when people are helping you troubleshoot your computer that they tell you to enter Safe Mode. With this tutorial you should now know how to enter Safe Mode when it is required.


Thanks & Regards,

"Remember Me When You Raise Your Hand For Dua"
Raheel Ahmed Khan
System Engineer
send2raheel@yahoo.com
send2raheel@engineer.com
sirraheel@gmail.com
send2raheel (skype id)

My Blog Spot
http://raheel-mydreamz.blogspot.com/
http://raheeldreamz.wordpress.com/

My Face book pages
http://www.facebook.com/pages/My-Dreamz-Rebiuld-our-nation
http://www.facebook.com/pages/Beauty-of-islam
http://www.facebook.com/pages/Health-is-wealth 

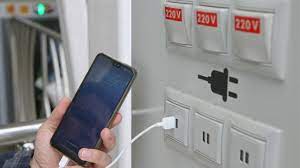
what is Juice Jacking SCAM

  Juice Jacking is a cybersecurity threat that occurs when cybercriminals manipulate public charging stations, such as USB charging ports in...